SMS touchpoints are configured in the Production dialog box. Once you've connected to an SMS provider, you can access the Production dialog box directly from the touchpoint in the diagram, or from the library.
You can test the SMS by defining a phone number for testing purposes.
SMS messages are subject to legal regulations. Currently only transactional messages are supported.
Important points to consider when configuring SMS touchpoints:
● Long SMS messages are split into multiple messages. If the SMS carrier supports consolidation of the messages, then the message will arrive at the recipient's phone as a single message. However, be aware that if the message is split and sent in multiple messages, you will be charged per SMS. Therefore, be attentive to the length of your message.
● It is likely that you will include a PURL in your message. If you wish to reduce the number of characters in the PURL, you can do one or both of the following:
§ Purchase a short domain and use it as the friendly URL.
§ Find and use a URL shortening service, which are available on the internet.
● Each country and each phone carrier have different capabilities and legislation. For example,
§ Canada and the US do not support alphanumeric sender ID. You can only send from an identifiable number.
§ Legislation in France places time limits on promotional SMS messages. It is prohibited to send SMS messages early in the morning or late at night.
§ Some countries require that the number be a local number.
Adherence to these laws is your responsibility. Therefore, when you define your SMSs and your recipient list has multiple countries, it is recommended that you have separate SMS touchpoints per country, and filter the recipient list according to county.
To configure an SMS touchpoint:
1. In the diagram,
click the Production icon ![]() above the touchpoint to open the Production
dialog box.
above the touchpoint to open the Production
dialog box.
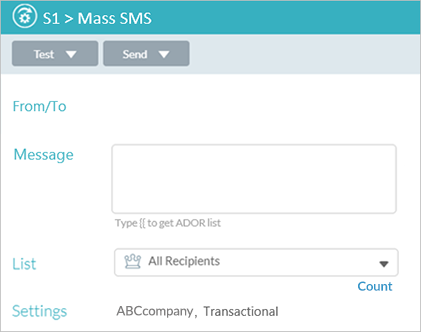
2. Click the From/To area to display the S1 > From/To dialog box.
Notice that the default SMS provider for the current account is displayed at the top right corner of the dialog box. You can change the default provider by clicking the provider's name and selecting a different one from the popup menu.
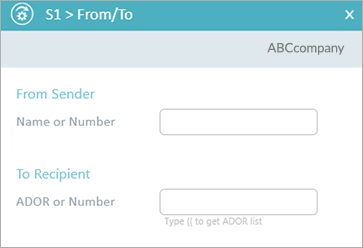
3. In the From Sender field, enter a dedicated number or an alphanumeric name, which is an alias for a number.
– Use a name in the following cases:
§ If you want to use one of Vonage's shared numbers. Type in a name, and one of the shared numbers will be used for delivery.
§ Alphanumeric sender ID is supported in the target country.
§ The name can only include alphanumeric characters (i.e., a-z/A-Z and 0-9).
– Use a number if names are not supported, as is the case in Canada and the US, or in case of dedicated numbers of big brands. If you're using Vonage, make sure you also include the country code. Check the requirements when using other providers.
A dedicated number is purchased on behalf of the brand, to keep the blacklist separate. Pay attention that the dedicated number applies to the brand.
Number format requirements are per SMS provider. Vonage requires that the number format contains only digits. If you try to use a number which contains an alphanumeric character, it will be recognized as a name, and delivery will occur via a shared number. If you use a custom SMS provider, pay attention to the number format expected by the provider.
4. In the To Recipient field, enter an ADOR or number.
The ADOR should be the mobile phone number in the format expected by the SMS provider. If you're using Vonage, make sure you also include the country code. Check the requirements when using other providers.
You can add ADORs by doing one of the following:
§ Manually type the ADOR between two open and close curly brackets {{ADOR_1}}
§ Type two open curly brackets to display the ADOR list and then select the relevant ADOR.
Make use of the QLingo "CleanNumber" function in uPlan provided in PersonalEffect 9.7, to remove all non-digits and leave digits only.
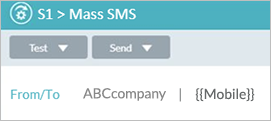
5. Click OK to return to the Production dialog box. Notice that the From/To area now shows the values set in the From/To dialog box.
6. In the Message area, compose your text message in the white rectangular area. You may add ADORs. Type two open curly brackets to display the ADOR list and then select the relevant ADOR.
Pay attention that the number of characters in the SMS message is limited. This number depends on you SMS provider and language. Make sure you are familiar with this value.

7. From the List dropdown list, select an existing
recipient list or click Add  to add a new list.
By default, All Recipients is selected.
To edit an existing list, select it and click Edit
![]() .
.
8. In the Settings area, the default SMS provider is selected by default (unless no provider has yet been defined). You can change the default delivery provider by clicking the provider's name and selecting a different one from the popup menu.
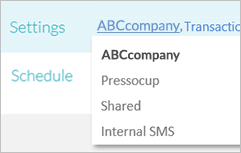
Note that only transactional SMSs are currently supported. Transactional messages can be sent to existing recipients with whom the sender already has a relationship or to those who have explicitly requested receiving such messages.
9. In the Schedule field, set up scheduling
definitions.
By default, scheduling is not active. Scheduling becomes Active
once the project is set to Live.
10. Click Save and then Close to exit the Production dialog box.
The SMS is now available for preview when clicking the node title link in the diagram.