Configuring email touchpoints
-
In the diagram, click the Production icon
 above the touchpoint to open the Production
dialog box.
above the touchpoint to open the Production
dialog box.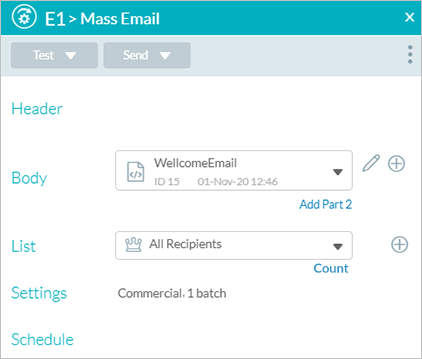
-
Fill in the headers.
-
From the Body list, select an email document or create an email document using the email editor.
-
From the List dropdown list, select an existing recipient list or click Add
 to add a new list.
By default, All Recipients is selected. To edit an existing list, select it and click Edit .
. -
In the Settings area, define the account email settings.
-
In the Schedule field, set up scheduling definitions.
By default, scheduling is not active and the email is sent immediatelyScheduling becomes Active once the project is set to Live.
-
Click Save and then Close to exit the Production dialog box.
Once a document has been associated with a touchpoint and the touchpoint has been saved, the document becomes available for preview when clicking the node title link in the diagram.
Define headers
The header fields available to you vary according to the delivery provider you select. The administrator is responsible for setting up supported delivery providers for your account.
Circle supports the following delivery providers:
-
XMPie Email Service (XES)
-
SMTP
-
Third-party delivery providers
An email header typically includes the following fields:
-
From (name and email address)
-
Reply To (This field exists for SMTP and for the latest XES version. If you do not see this field, you may contact Support for an upgrade.)
-
To Email
-
Subject
To define headers:
-
In the diagram, click the Production icon
above the touchpoint to open the Production
dialog box.
-
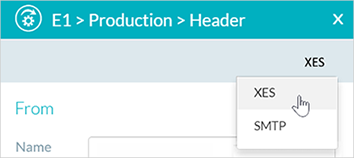
Click Header to display the Production > Header dialog box.
Notice that the default delivery provider for the current account is displayed at the top right corner of the dialog box.
The fields in the dialog box change according to the selected delivery provider. -
You can change the default delivery provider by clicking the provider's name and selecting a different one from the popup menu.
-
Fill in the fields as required.
Note: The XES delivery provider requires that before you send emails you verify each email address that you plan to use as a "From" or "Sender" address, to prove that you own it. Verify the "From" address by clicking the Verify link. You can check the verification status of the address using the Status link. For further information on why you must verify emails, see About XMPie Email Service (XES) in the XES documentation.

-
You can add content objects to any of the fields in the message header by doing one of the following:
-
Manually type the content object between two open and close curly brackets {{Address}}.
-
Type two open curly brackets to display the content object list and then select the relevant content object.
All fields in the Header page can include static text as well as multiple text content objects. The only exception is the Address field, which can include only a single text content object or email address.
Examples:
-
In the To field:
{{EmailAddress}}
-
In the Subject field:
Greetings {{FirstName}} {{LastName}} from Cars4U
-
-
Click OK.
The delivery provider is saved together with the touchpoint with which it is associated. You can assign a different delivery provider for other touchpoints without affecting those that have already been saved.