Working with lists
Before launching production, you need to define recipients for a specific touchpoint. This is done by setting up a list of recipients.
A list represents a group of recipients to whom you want to target production. A list is defined on a project level. For example, you can define a list representing VIP members and reuse this list in multiple touchpoints of the same project. Changing the list in one touchpoint affects all the other touchpoints using this list.
The largest possible list - the master list - is called All Recipients and is automatically created when you define the recipient table of the data source.
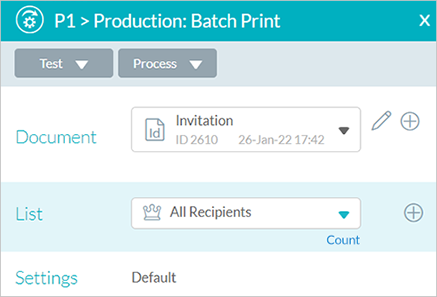
In the List section, click the Count link to see the number of recipients in that list.
Other lists which are subsets of the master list are created by defining a filtered list.
You can filter recipients using the following tools:
-
Plan filter: allows filtering recipients based on something in their data such as gender, age or zip code. The recipient profile is defined in the plan filter using uPlan.
-
Event-based rules: allows filtering recipients based on some behavior or event. For example, you can send a reminder email to those recipients who received the first email but did not respond to it.
Note: When using event-based rules and referring to a specific touchpoint (e.g., P1-Print Never Occurred), the touchpoint name is not relative. If you use the same list in another touchpoint (e.g., P2), it will still use the rule based on P1. If you need to use the same rule for P2 based on P2 events, you must create a new list.
Add a list
-
Open the library.
-
In the left pane, click Touchpoints.
The Touchpointlist is displayed.
-
Select a touchpoint from the list.
The Production dialog box is displayed. By default, the List dropdown list displays All Recipients.
-
To add a new filtered list, click the Add
icon following the List dropdown.
The Filtered List dialog box is displayed.
-
In the List Name field, enter a unique name of the list.
-
In the Description field, enter free text describing the recipient segment which the filtered list represents.
-
In the Rules section, select a master list (All Recipients) or a plan filter.
By default, Rule A is always All Recipients. For information on using plan filters, see the section below.
-
(Optional). Define rules based on events performed by the recipients, as explained below.
-
Click Save.
Use a plan filter
A plan filter allows filtering recipients based on something in their data such as gender, age or zip code. The recipient profile is defined in the plan filter using uPlan.
In Circle, a plan filter is selected in the Filtered List dialog box > the Rules section> Rule A.
By default, Rule A is always All Recipients. If you have plan filters defined in your plan file, you can select them instead of using a master list. This is useful if you want to target a specific group of recipients.
Important: To enforce consistent order and avoid unexpected results, it is mandatory that the plan filter query includes the ORDER BY clause. Without it, in certain cases (e.g. automatic or manual split production), some recipients may receive multiple outputs, while others receive none.
To select a plan filter:
-
Click All Recipients and select your plan filter from the list. In the example below, there are three plan filters available for selection: GradeAvg bigger than 80, Last Name Green, State MA. The plan filters are indicated by the
 icon.
icon.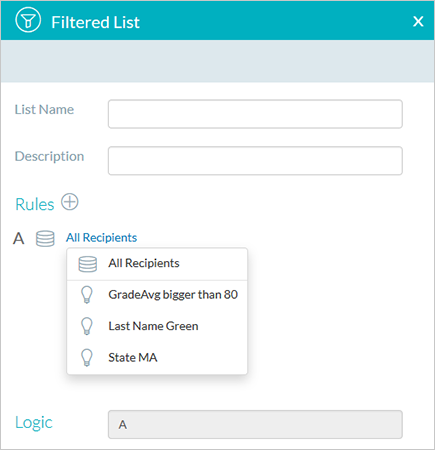
Define event-based rules
Event-based rules allow filtering recipients based on some behavior or event. For example, you can send a reminder email to those recipients who received the first email but did not respond to it.
For examples of event rules, see Event rule examples.
To define event-based rules:
-
In the Rules section, define the event rules based on the events performed by recipients.
Event rules are added to Rule A which can be either All Recipients or a plan filter (see "Using a plan filter above).
-
Click the Add Rule
icon to add a new event rule. The Filtered List >Event dialog box is displayed. The name of the current project appears in the Project field.
-
From the Touchpoint dropdown list, select the name of the touchpoint for which you wish to define an event filter.
Note: If you wish to define an event filter for a web touchpoint, make sure that a Tracking Page Name is specified for this touchpoint in the Productiondialog box. A Tracking Page Name is assigned to a webpage. For more details, see the Cheat sheet for web.
-
From the Event dropdown list, select an event. The dropdown list displays events that are applicable for the selected touchpoint type.
For example, if you define an event filter for an email touchpoint, events, such as Email Sent , Email Opened are displayed. Supported event
types
-
Print touchpoint
-
Print Occurred: a print output file has been created.
-
-
Email touchpoint
-
Email Failed: an email failed to be delivered.
-
Email Failed Hard Bounce: an email returned to the sender because, for example, the recipient's address was invalid.
-
Email Failed Soft Bounce: an email gets to the recipient's email server but is bounced back undelivered before it gets to the intended recipient (for example, if the recipient’s inbox is full).
-
Email Link Clicked: a link inside an email message has been clicked. For such events to be tracked, the Email Delivery Provider must have the capability to report such events to uProduce (for example, the ET Enhanced Delivery Provider).
-
Email Opened: an email has been opened. Be aware that not all Email Viewers report Email Open events. This fact should be taken into account when using this event.
-
Email Sent: an email was sent.
-
Email Unsubscribed: the Unsubscribe link inside the email has been clicked.
-
-
Web touchpoint
-
Action Performed: an action has been performed on the specific webpage.
-
Link Clicked: a link has been clicked on the specific webpage.
-
Webpage Visited: the specific webpage has been visited.
-
-
SMS touchpoints
-
SMS sent: an SMS was sent.
-
SMS failed: the SMS failed to be delivered.
-
SMS delivered: the SMS has been delivered.
-
-
-
From the Qualifier dropdown list, select the event qualifier:
-
Occurred: the event took place.
-
Never Occurred: the event never took place.
-
Hours Since Last Occurred: the number of hours since the event was last performed. If the event occurred more than once, the time of the last occurrence is used. When selecting this qualifier, you must choose a comparison operator from the Comparison dropdown list and specify the number of hours in the text box. Note that a value of 1.5 hours represents 90 minutes.
-
Calendar days since the event last occurred. If the event occurred more than once, the time of the last occurrence is used. When selecting this qualifier, you must choose a comparison operator from the Comparison dropdown list and specify the number of days in the input field.
For example, if today is October 30th and if the filter specifies that only recipients that last performed a specified event more than 3 days ago must be retrieved, the recipients who performed the event 3 days ago (October 27th) will be filtered out whereas the recipient who performed the event 4 and more days ago (October 26th and earlier) will be filtered in.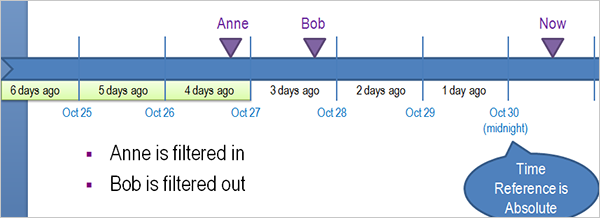
-
-
Click OK to complete the definition.
-
Event rule examples
Example 1
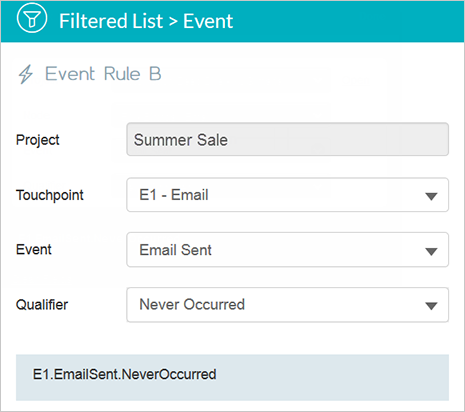
Suppose that you want to send your email in several batches. To avoid duplicate sending to the same recipient, you need to verify that you only send to those recipients to whom an email has not been previously sent.
The rule will look as follows:
-
Select the touchpoint for which you wish to define a filter.
-
In the Event field, select the Email Sent.
-
From the Qualifier dropdown list, select Never occurred.
Example 2
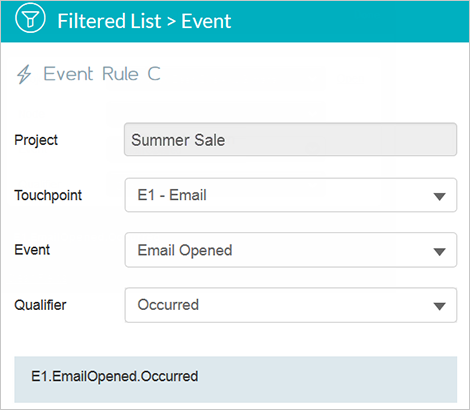
Suppose you want to send a reminder email to those recipients who opened the previously sent email but did not visit the landing page of the website. In this case you will need to define two event rules.
Rule 1:
-
Select the touchpoint for which you wish to define a filter.
-
In the Event field, select Email Opened.
-
From the Qualifier dropdown list, select Occurred.
Rule 2:
-
Select the webpage touchpoint that represents the landing webpage.
-
In the Event field, select the Webpage Visited.
-
From the Qualifier dropdown list, select Never Occurred.
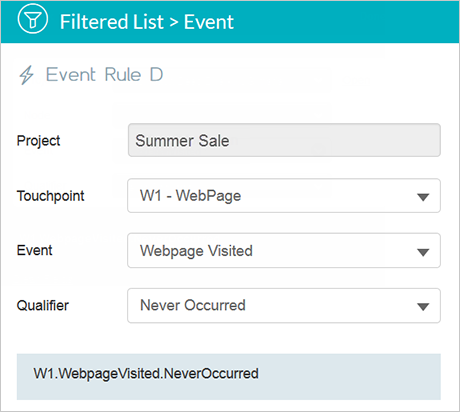
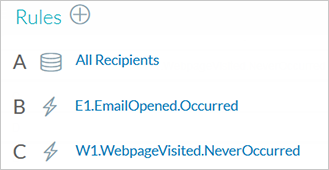
Both rules will be applied and the event filter summary will look like this:
Sample recipients
The Sample Recipients option allows you to preview your production-related elements as they will be viewed by a selection of recipients who represent a specific segment of the project's target audience.
The Sample Recipients button is displayed on the toolbar in the Build tab after you connect a project to uProduce.
The Sample Recipients button is available only to the project builder.
Define sample recipients
The Sample Recipients button appears on the Circle toolbar only after connecting to uProduce.
To define sample recipients:
-
In the Buildtab, click Sample Recipients.

The Recipient Details wizard is displayed.
-
In Step 1:
-
Specify the range of sample recipients. You can choose the first 200 recipients, or specify a range.
-
In the Display area, select the content objects you want to display for each recipient.
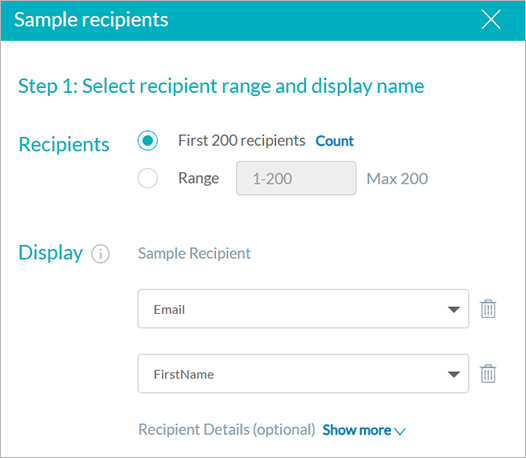
The first two content objects will appear in the sample recipient list and in the Recipient Details dialog. It is recommended to use First Name and Last Name to identify the recipient. The additional content objects will be shown in the Recipient Details dialog only.
-
-
Click Next.
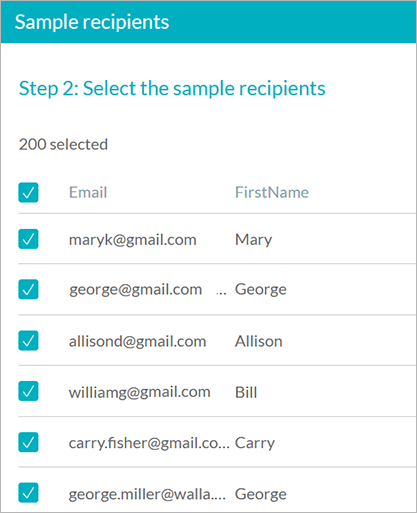
All the recipients corresponding to the criteria defined in the previous step are displayed and selected.
-
Choose the recipients you want to use in your project preview.
Note: Since the details of sample recipients are stored on the cloud, for security reasons create and select fake sample recipients which showcase your campaign. Avoid selecting real recipient data.
-
Click Save.
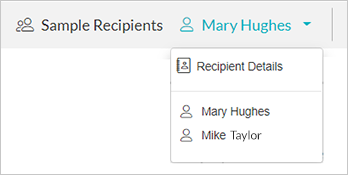
The Recipient dropdown list is displayed on the toolbar in the Plan, Build and Review tabs.
By default, the Recipient dropdown list displays the name of the first sample recipient in the list, in alphabetical order. This recipient will be used when clicking a link in a node to preview its content.
Select sample recipients
In the Sample Recipients dropdown list in the toolbar, you can view a list of recipients, together with their content object values. You can then select the recipients who are most suitable for previewing the specified project element.
