About templates and instances
Note: This feature is only available if you have Circle Business Edition and PersonalEffect version 9.0.1 or above. In addition, you need to be an administrator or power user with builder authorizations.
A template is a model project which is intended for duplication. Using templates, you can create off-the-shelf projects which are ready for duplication and fast implementation. When duplicating a template, the resultant project is called an instance. Each instance is a fully-functional independent project that can be fine-tuned for the specific customer needs.
Using templates and instances, you invest once in creating the template and enjoy the benefits of that investment every time you create an instance based on that template. This allows you to speed up your delivery time, maintain a high level of quality, and achieve a higher return on investment.
Automation never runs in the template because the template is a model. Automation runs in the instance when the instance is live. In addition, the website is defined in the template and is shared with all its instances.
uStore, XMPie’s e-commerce solution, uses templates and instances to provide campaigns on demand. For information about setting up cross-media products in uStore, see uStore help.
Work with templates and instances
A template is a project which is used as a model for duplication when creating a new instance. Each instance is a fully-functional independent project that can be fine-tuned for a specific customer’s needs. Using templates, you can create reusable projects which are ready for duplication and fast implementation as an instance.
When duplicating a template, all components are copied to the instance excluding the following:
-
Website: The website is shared by the template and all its instances. All website changes are made on the template and affect all instances of that template.
-
Unused data sources: Any data source which is not used in the master list is considered and unused data source. Therefore, it is not copied to the instance.
-
Comments: The comments sent by users while developing the template are not likely to be relevant for the instance. Therefore, they are not copied to the instance.
Every instance is created in the same uProduce account as its template. This ensures that the template’s email delivery provider is available to the instances and that the email settings of all instances match the template.
You can modify a template or an instance in the same way that you modify a regular project. When you make changes to a template, any new instance created from the template includes the changes. Existing instances are not affected by the changes except for their web touchpoints (because the website is shared).
There is a limitation that the template’s friendly URL is the same for all instances and no changes can be made to the friendly URL once instances exist.
Important:
-
A general URL (i.e., a GURL is a non-personalized URL), which is typically used for a self-registration page, is currently not supported in templates and instances.
-
Since the template’s master list data source is copied to the instance, its data should never include private recipient information. It should include sample data which can be copied without violating recipient privacy.
Create a template
-
Create a new project and save it.
-
From the File menu, select Open/Organize.
-
In the My Projects tab, hover over the required project, click the menu icon
 and select Set as Template.
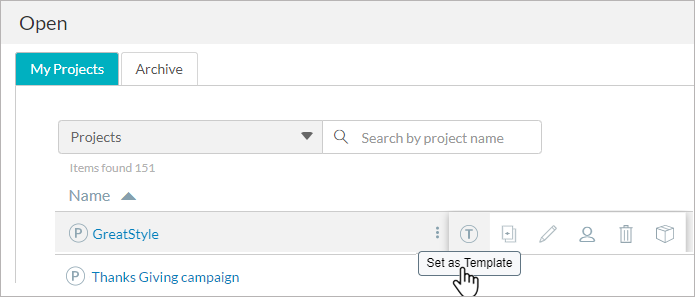
Only an active project can be set as a template, a sketch project cannot.
-
In the Set as Template dialog box, click Yes, set as template.
The project is now a template.
Create an instance
-
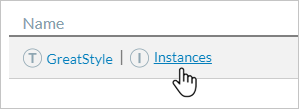
From the File menu, select Open/Organize.
-
In the My Projects tab, make sure the filter shows Templates.

-
Hover over the template row and click the Instances link to open the Instances tab.
-
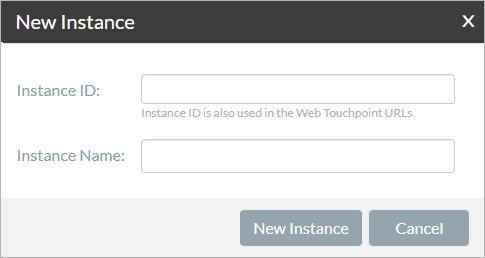
Click the New Instance button.
The New Instance dialog box opens.
-
In the New Instance dialog box, type a unique instance ID.
This ID identifies the instance and is also displayed in the web URLs of this instance. -
Enter a name in the Instance Name field.
-
Click the New Instance button.
The new instance is created.
Manage instances of a template
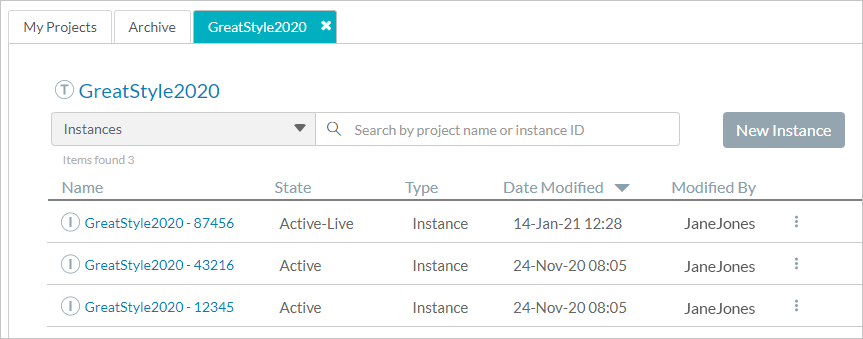
All instances of a specific template can be managed from the Instances tab.
-
In the Instances tab, you can:
-
View all instances of a specific template.
-
Open the template or any of its instances.
-
Create a new instance.
-
Delete, rename and archive an instance.
-
Filter and search for a specific instance.
Open the Instance tab
-
From the File menu, select Open/Organize.
-
In the My Projects tab, hover over a template row.
-
Click the Instances link. The Instances tab opens.
The Instances tab remains open until you choose to close it or until you open the Instances tab of another template.
Set up automation in templates and instances
Templates can include automation. However, automation never runs in the template because the template is a model. Automation runs in the instance when the instance is live. If you wish to test the template’s automation, you must test it in an instance of the template.
Because instances are typically executed at different dates, it makes sense to avoid using fixed dates. Instead, you can set up the template using parameterized scheduling as opposed to fixed scheduling. Parameterized scheduling is achieved by using project parameters in the touchpoint scheduling and setting specific values in the project parameters of the instance before changing it to Live.
To schedule a touchpoint to run at the first opportunity (as soon as possible), use the Project Start Date & Time parameter. All touchpoints scheduled to run on Project Start Date and Project Start Time are triggered as soon as the instance is set to Live.
Test template automation
-
Create an instance of the template for your testing.
-
In the instance, set values for the project parameters and then set the instance to live.
The automation runs on the instance.
-
Any fixes or changes should be done on the template. In this case, delete the test instance and then repeat this procedure.
Work with the template’s shared website
When creating an instance from a template, all components are copied to the instance excluding the website. The website is defined in the template and is shared with all its instances.
All website changes must be made on the template. Changes affect the instances as follows:
-
Changes to website pages affect all instances (new and existing instances) that reference those pages.
-
Changes to the website’s friendly URL work in new instance but will break existing instances.
-
Changes to web touchpoints (adding, deleting, and changing definitions) only affect new instances.
The template and all its instances share the website. They all access the same web pages and use the same website friendly URL. The instance ID differentiates which instance is accessing the website and therefore the Instance ID is included in the web URLs as follows:
-
http://www.MyDomain.com/MyFolder/Landing.html?iid={{XMPieInstanceID}}&rid={{XMPieRecipientKey}}
-
http://www.MyDomain.com/{{XMPieInstanceID}}/{{XMPieRecipientKey}}
-
http://{{XMPieRecipientKey}}.{{XMPieInstanceID}}.MyDomain.com
Best practice: While testing, before making changes to the template website and friendly URL, it is best to delete existing instances because changes can corrupt existing instances.