Defining delivery providers
Delivery providers are used to handle the uProduce email messaging mechanism.
The uProduce administrator can define the following delivery providers to handle email messaging in uProduce:
-
XMPie Email Service (XES)
-
SMTP Server
-
Third-party delivery providers
Warning: Make sure that you do not send mass email through your SMTP server to addresses outside your organization. This may cause your email address and possibly all of your organization’s email addresses to be listed as spam, and to be blacklisted across the internet. Send SMTP emails only internally and for testing purposes. For any real-life jobs, use an email provider, such as ExactTarget or XMPie Email Service.
Access the delivery providers page
-
On the navigation bar, click Settings.
The Settings page is displayed.
-
On the left panel, click Delivery Providers.
The Delivery Providers page is displayed.
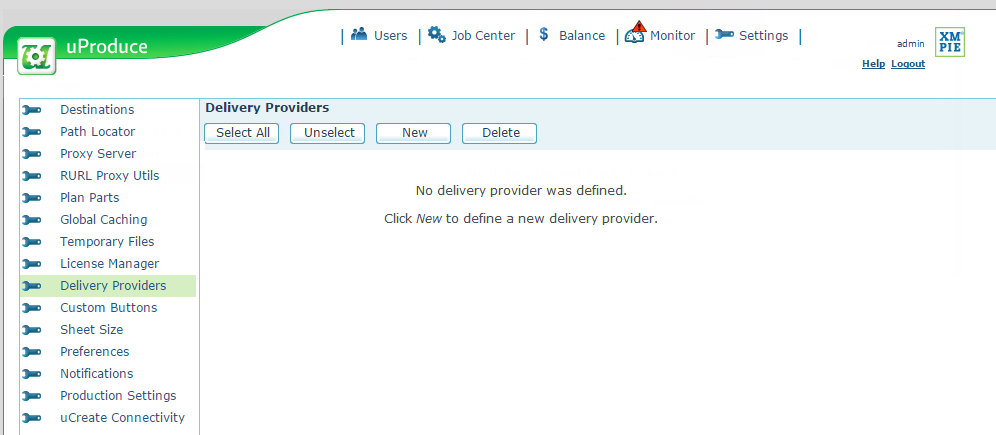
If you have not defined a delivery provider yet, the Delivery Providers page is blank. After you define delivery providers, this page displays the list of all your delivery providers.
Set Up XMPie Email Service (XES) as your delivery provider
XMPie Email Service (XES) offers a commercial-grade solution for personalized email delivery and tracking.
The service's email delivery uses Amazon Simple Email Service (Amazon SES) ensuring an integrated and effective solution.
For detailed information about XES, see the XES documentation.
-
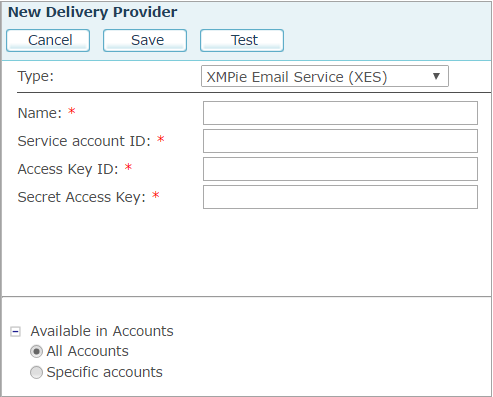
On the Delivery Providers page, click New.
-
From the Type list, select XMPie Email Service (XES).
-
Enter the required field values as specified below:
Option
Description
Name
The name of the new delivery provider.
Service account ID
When creating the XES account, this value is defined by Support.
Access Key ID
When creating the XES account, this value is defined by Support.
Secret Access Keys
When creating the XES account, this value is defined by Support.
-
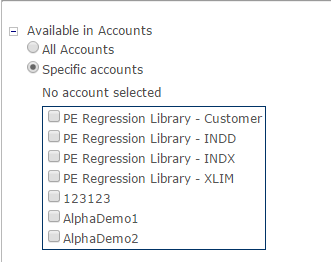
To assign a delivery provider to specific Accounts, expand the Available in Accounts section by clicking the “+” sign next to it.
The All accounts option is selected by default. Choose the Specific accounts option and select the Accounts.
Assigning delivery providers to specific accounts is only available for administrators.
-
Click Save.
It is recommended that you test the delivery provider after creating it.
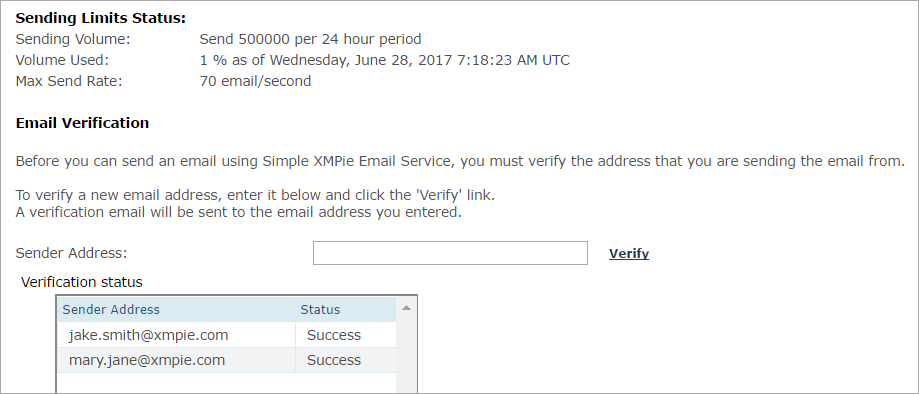
After creating the XES delivery provider, you can see its' sending limit status, a list specifying the verification status of each address, and you have the ability to verify new emails.
Option
Description
Name
Name of the new delivery provider. This name will appear in the Delivery Providers menu when selecting the default delivery provider in the account settings or in an email touchpoint.
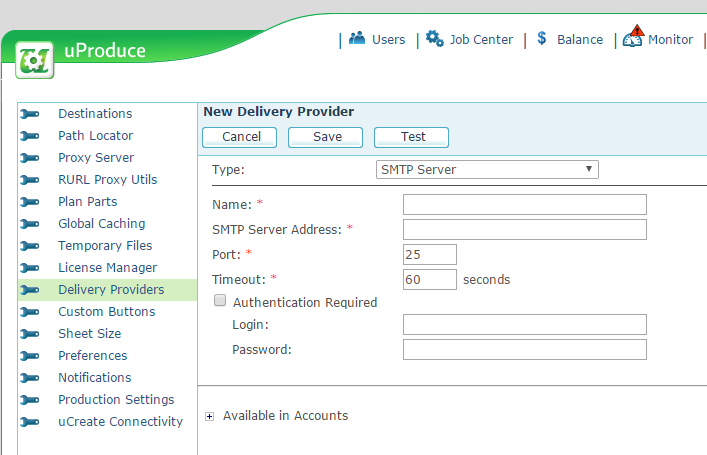
SMTP Server Address
IP address or host name of the SMTP server.
Port
SMTP server’s port (usually port 25).
Timeout
Timeout (in seconds) for accessing the SMTP server.
Authentication Required
If the SMTP server requires authentication, select the Authentication Required check box and enter the required user name in the Login field and password in the Password field.
Verify email addresses
XES requires that before you send emails, you must verify each email address that you will use as a "From" or "Sender" address to prove that you own it.
For information on why you must verify emails, see the XES documentation.
Set up an SMTP delivery provider
-
On the Delivery Providers page, click New.
-
From the Type list, select SMTP Server.
The New Delivery Provider page for SMTP Server is displayed:
-
Select SMTP Server from the Type list. Enter the required field values as specified below:
-
If you want to assign a delivery provider to specific accounts, expand the Available in Accounts section by clicking the “+” sign next to it.
-
The All accounts option is selected by default. Choose the Specific accounts option and select the accounts.
-
Click Save.
It is recommended that you test the Delivery Provider after creating it (see Testing a Delivery Provider).
Prepare for email distribution by third party delivery providers
uProduce allows you to prepare email files for distribution by third party delivery providers. The following files are prepared:
-
CSV files: contain a list of recipients with resolved content object values. The number of CSV files depends on your settings.
-
HTML and/or Plain Text Templates: templates with placeholders for content objects.
The third party delivery providers will use the template and the CSV files to compose personalized emails.
-
On the Delivery Providers page, click New.
-
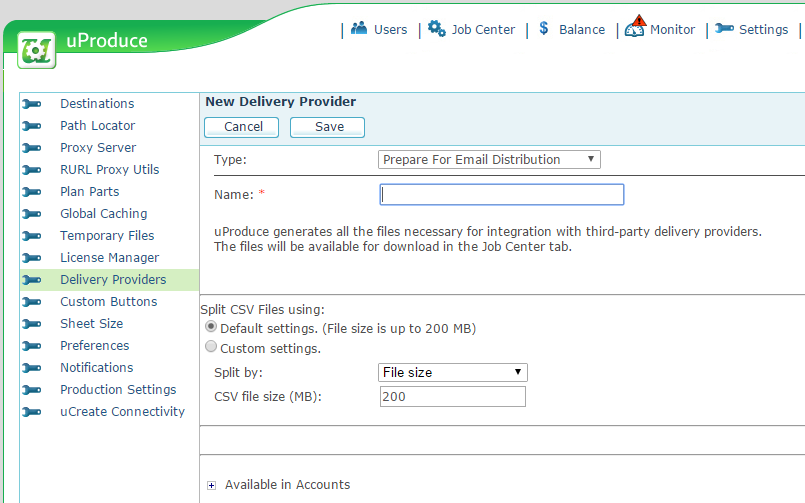
From the Type list, select Prepare for email distribution.
The New Delivery Provider page is displayed:
-
Enter the name of the delivery provider. This name will appear in the Delivery Providers dropdown list when the operator has to select a delivery provider.
-
Define the splitting method for the CSV files:
-
Default settings (File size up to 200MB): select this option to split CSV files according to the file size. Each time a file will reach 200MB, a new file will be created.
-
Custom settings
-
In the Split by dropdown list, select File size or Number of recipients.
-
If the File size option has been selected, enter a value in the CSV file size (MB) field. This option is used if you wish to specify a file size that is different from the default settings.
-
If the Number of recipients option has been selected, enter a value in the Number of recipients per file field.
-
-
-
If you want to assign a delivery provider to specific accounts, expand the Available in Accounts section by clicking the “+” sign next to it.
-
The All accounts option is selected by default. Choose the Specific accounts option and select the accounts.
-
Click Save.
Test a delivery provider
-
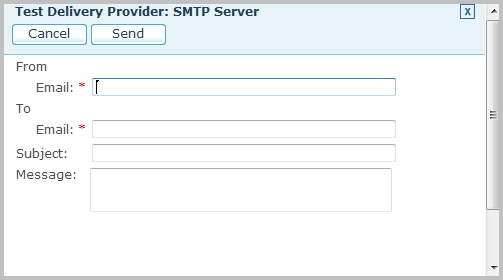
To send a single message to test your delivery provider’s settings, click the Test button in the Edit or New Delivery Provider pages.
The Test Delivery Provider window is displayed.
If you use Internet Explorer, you may be asked to allow pop ups in order to display the Test Delivery Provider window.
-
Enter the required field values as specified below.
Option
Description
From Email
Represents the From field in the test email message.
If you are testing the XES delivery provider, this address must be verified. For further information, see Verify email addresses.
To Email
Represents the To field in the test email message.
Subject
Subject of the test email message.
Message
Text body of the test email message.
-
When you are done, click Send to send the test message.