QLingo Extensions SDK
Implementing QLingo extensions allows you to extend the power of QLingo by adding custom functions. These custom functions can be used in QLingo expressions as naturally as one would use the original QLingo functions.
Originally, QLingo extensions could be implemented only with C++ programming language. As the community of .NET developers, or rather C# developers, increased, XMPie decided to implement a capability for developing .NET extensions also in C#. The great thing about it is that the implementation of this capability is itself a QLingo extension called the QLingoDotNetBridge.
This document discusses how to create a QLingo extension using either C++ or C# using the QLingoDotNetBridge, and how to use it in a QLingo expression in uPlan, uCreate Print and uProduce.
Important: The information provided here is relevant for PersonalEffect version 12.1 and later. You should download and use the QLingoExtensionSDK.zip for your specific PersonalEffect version. The version of the Microsoft Visual C libraries may change from time to time, so you should ensure that you are working with the version that is compatible with your XMPie environment.
This document is intended for users with Visual Studio programming experience who wish to extend the built-in capabilities of QLingo by adding custom functionality to the XMPie scripting language.
Introduction
QLingo is the programming language used for defining expressions in the XMPie environment using uPlan or uCreate Print. QLingo expressions are used for determining the values of ADORs, instructing how database fields are mapped into design decisions and how values should be written back to the database.
QLingo supports a wide set of built-in functions that you can use in your expressions. These functions include string manipulation, retrieval of values from a date object, barcode image generation, and more. The functionalities are wide and provide for most requirements.
However, sometimes you need extra capabilities. For example, you may want to:
-
Generate new kinds of images for use as Image ADORs
-
Add functions for complicated statistical computations not included with QLingo
-
Group some QLingo functions together to a single common functionality
To do so, you have a few options for extending the existing set of QLingo functions:
-
Create new QLingo functions using the QLingo language
-
Create new QLingo functions using JavaScript
-
Create a QLingo extension
The first two options allow you to write functions in the plan file using either QLingo or JavaScript, and provide slightly more power to the existing QLingo functionality with what either of the languages can provide.
The most powerful extension capability is the third one. Creating a QLingo extension, programmed using C++, allows you to use the full C++ environment to implement powerful new functions. Having defined them in C++ makes them cross platform, which sits well with the XMPie model.
C++ QLingo extensions should satisfy most advanced needs on creating new types of content that are not already included with the XMPie package. However, more and more programmers today lack knowledge of the C++ language and prefer programming using C# language and the .NET environment.
In order to introduce C# programmers into QLingo extensions, a generic bridge was developed, that allows you to write QLingo extensions completely in C#, without knowledge of C++.
The next sections will guide you through how to:
-
Download and unpack the QLingo Extension SDK
-
Develop a QLingo extension in C++
-
Develop a QLingo extension in C#
-
Install the QLingo extension in the different XMPie environments
-
Call the QLingo extension from uPlan
-
Call the QLingo extension from uCreate Print
-
Understand the way the .NET bridge works
Downloading the QLingo Extension SDK
To download the QLingoExtensionSDK.zip contact XMPie Support.
The download package contains the following:
-
Binaries – this folder contains a DotNet folder which includes:
-
XMPie.QLingo.Extension.dll – Required for developing and running a QLingo extension.
- QLingoDotNetBridge_R.dll – This is the bridge which enables development of QLingo extension using C# and other .NET languages. It implements the XMPie.QLingo.Extension and acts as a bridge to enable .NET assemblies to work with QLingo. Note that it is supported on the Windows environment only.
-
-
QLingoCPPExtensionSample – This folder contains a sample QLingo extension written in C++.
-
QLingoExtension.h – This header file contains all the necessary definitions for the new extension to connect with the QLingo.
-
QLingoCPPExtensionSample.cpp – This is the C++ source file for the sample QLingo C++ sample provided with the SDK.
-
QLingoCPPExtensionSample.vcxproj – This is the Visual Studio C++ project file for the QLingo C++ sample provided with the SDK.
-
-
QLingoDotNetExtensionSample – This folder contains a sample QLingo extension written in .NET C#.
-
QLingoDotNetExtensionSample.cs – This is the C# source file for the sample QLingo C# Sample provided with the SDK.
-
QLingoDotNetExtensionSample.csproj – This is the Visual Studio C# project file for the QLingo C# sample provided with the SDK.
-
-
UsageSampleDocument – This folder contains a uPlan file and an InDesign document using uCreate Print that both demonstrate how to call the two sample QLingo extensions provided in this SDK.
-
Required for running a .Net QLingo extension. Implements a C++ QLingo extension that servers as a generic driver (bridge) for running .Net QLingo extension. As opposed to most C++ QLingo extension it supports the Windows environment only.
-
-
QLingoExtensionSDK.sln – This is the Visual Studio solution that includes both the C++ and C# samples provided in this SDK.
-
ReadMe.doc – This file includes information on how to deploy the QLingo Extensions that you create based on which development environment you used (C++ or .NET).
-
XMP*.props – These files contain properties used by Visual Studio when compiling the sample SDK solution.
Creating a C++ QLingo extension
Rename or duplicate the QLingoCPPExtensionSample, and use is as the base for your extension, changing the content of the functions to suit your needs.
Note: The QLingoExtensionSDK for PersonalEffect version 12.x) was created in Visual Studio 2022 (v17.2). If you wish to compile the QLingoCPPExtensionSample and you are not using Visual Studio 2022, then you need to get Properties on the QLingoCPPExtensionSample project, and under Configuration Properties > General set the correct Platform Toolset version.
Creating a .NET QLingo Extension with C#
Although this example uses C#, you can, in theory, use other .NET programming languages in a similar way, although their code syntax will be different.
Preparing a new C# project
-
Add a new project to the solution for your new C# QLingo Extension.
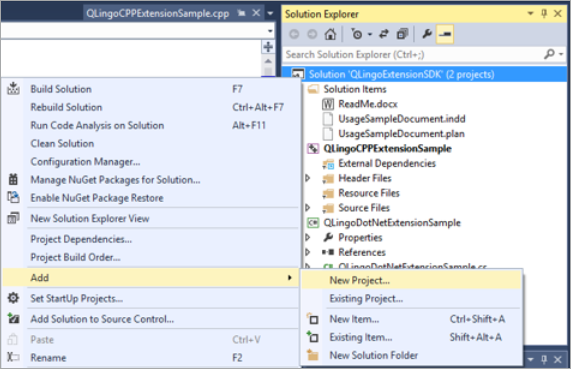
-
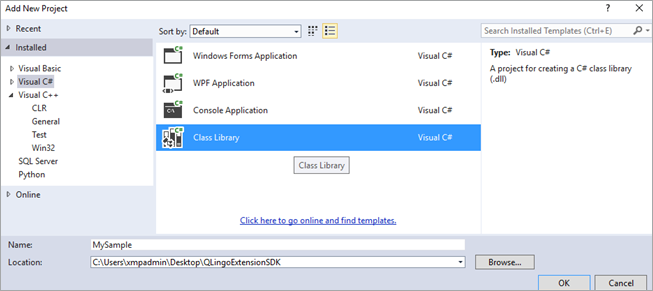
Enter a name for the new project. Set the project type to be Visual C# and select the Class Library template.
-
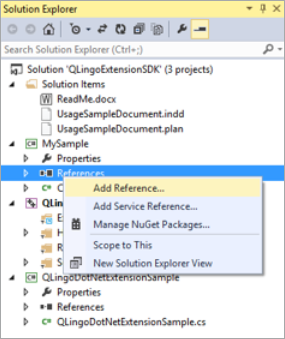
Locate your project, and below it right-click Reference > Add Reference.
-
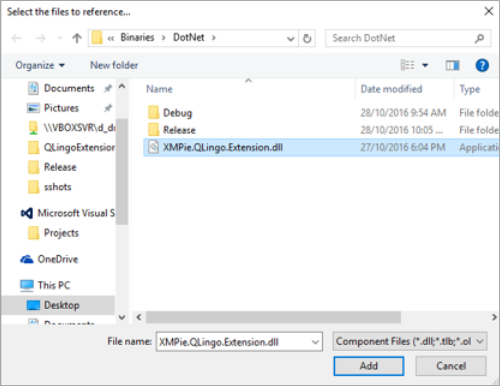
Click Browse and select the XMPie.QLingo.Extension.dll file from the Binaries\DotNet folder.
Note: The XMPie.QLingo.Extension.dll defines two attributes and a class that will be used in your QLingo extension for communicating with the QLingo environment:
-
QlingoExtensionClass attribute – An attribute placed on a class that defines this class as the external interface for the QLingo environment. This class defines all the methods that can later be used in QLingo.
-
QlingoExtensionMethod attribute – An attribute placed on methods and determines whether they are or are not meant to be exposed through QLingo.
-
QlingoExtensionResult Class – A Class that is meant to be the return object from every method that should be exposed through QLingo.
-
-
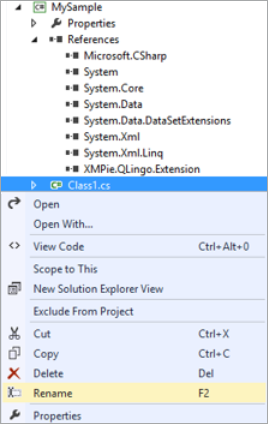
Rename the Class1.cs file that was created automatically by the Class Library template. In this example, it will be renamed MySampleClass.cs
-
When you are prompted to rename any references to the file, click Yes.
-
Open the new class file. At the top of the file along with other namespace declarations, add a reference to the XMPie QLingo Extension as follows:
using XMPie.QLingo.Extension;
-
You are now ready to start creating your own classes and methods to achieve the functionality you want.
Creating the QLingo extension class (C#)
Either at the beginning or at the end of the development you should define an entry point to the QLingo extension. It is through this entry point that the QLingo environment will be able to call the desired functionality.
-
To create this entry point, define a class and set it up with the QlingoExtensionClass attribute. In the MySample.cs file that was created in the above section, I will add the following attribute to the MySampleClass:
CopynamespaceMySample
{
[QlingoExtensionClass]
publicclassMySampleClass
{
…methods to be called via QLingo…
}
}Note: There should be a single class in each .Net QLingo extension DLL marked as above.
-
In this class write your own custom methods, possibly using other classes to support the desired functionality.
Creating the QLingo extension method (C#)
A method needs the be defined that performs the calculation and makes it accessible to QLingo.
Any method in the class that you want to call from QLingo must be set with the QlingoExtensionMethod attribute, it must return a QlingoExtensionResult object, and values can be passed to the method as parameters, which will be exposed to the method as a List of Strings.
-
For this example, we will create a method called listSort:
Copy[QlingoExtensionMethod]
publicQlingoExtensionResultlistSort(List<String> inStrings)
{
…code to be executed when called from QLingo…
}Note: Your class can contain multiple methods that are available to QLingo for doing different things.
-
For the listSort method, we will sort the list of values passed from QLingo, and return a comma separated list in alphabetical order:
CopyinStrings.Sort();
stringreturnResult = string.Join(",", inStrings.ToArray());
return newQlingoExtensionResult(true, returnResult);Note: The above code uses the List Sort function to sort all the values passed from uPlan alphabetically. Next, a new string variable is created and set to be a comma separated list of all the sorted values. The last line returns the result to QLingo. The QlingoExtensionResult expects two parameters:
-
status– a Boolean value determining whether the function call succeeded or not. Return true for “successful”, and false for “failed”.
-
returnResult – a String value specifying the return result of the function.
If the status is set to true, then returnResult will be the actual value used in uPlan. (Note that currently the result of a .Net QLingo extension is always a string value).
If status is set to false, then the returnResult will be the error message displayed to the user.
-
Obviously, this is a very simple example and more sophisticated behaviors can be implemented. Anything that is supported by the .Net environment should work very well.
Important: Any method in the QLingo Extension class that has the signature of a QLingo method will be exposed, and may be called from the QLingo code.
If you happen to define a method that accepts as input a List<String> and returns a QlingoExtensionResult, but you don’t want to expose it, you should use the QlingoExtensionMethodattribute in the following manner:
[QlingoExtensionMethod(false)]
public QlingoExtensionResult Maximum(List<String> inStrings)
{
…Method code…
}
The Maximum method has the right signature for being a QLingo extension method. However, it has a QlingoExtensionMethod attribute defined for it with the value of false. This makes it “hidden” from the point of view of QLingo. Note that initializing this attribute with true is similar to not placing the attribute at all – it makes it available for calling via QLingo.
Complete code for this example (C#)
usingSystem;
usingSystem.Collections.Generic;
usingSystem.Linq;
using
 System.Text;
using
 System.Threading.Tasks;
usingXMPie.QLingo.Extension;

namespaceMySample
{
  [QlingoExtensionClass]
  publicclassMySampleClass
  {
    [QlingoExtensionMethod]
    publicQlingoExtensionResultlistSort(List<String> inStrings)
    {
      inStrings.Sort();
      string returnResult =string.Join(",", inStrings.ToArray());
      return newQlingoExtensionResult(true, returnResult);
    }
  }
}
Adding job context information (C#)
In addition to using values passed from uPlan when the method is called, you can also use job context information in your methods. Job context information includes data such as the production output format (for print) or Job ID (for uProduce jobs). Being able to receive such data in your method allows you to change the response of the method based on the job data. For instance, based on whether the job goes to print or web, you may want to create different text formatting.
To create a method that accepts job context, add an extra parameter of type QlingoExtensionJobContext. For example:
public QlingoExtensionResult ShowJobTicketInformation(
List<String>inStrings,
QlingoExtensionJobContext inJobContext)
{
  StringBuilder aBuilder = new StringBuilder();
  aBuilder.AppendFormat(
"Job information:\nCustomer ID = {0}\nCustomer
 Name = {1}\nAccount ID = {2}\nAccount Name = {3}\nCampaign ID = {4}\nCampaign
 Name = {5}\nContainer ID = {6}\nContainer Name = {7}\nContainer Type =
 {8}\nTouchPoint ID = {9}\nTouchPoint Name = {10}\nJob ID = {11}\nJob Name
 = {12}\nJob Type = {13}\nJob Output Type = {14}\nEstimated Record Count
 = {15}\n",
inJobContext.CustomerID,
inJobContext.CustomerName,
inJobContext.AccountID,
inJobContext.AccountName,
inJobContext.CampaignID,
inJobContext.CampaignName,
inJobContext.ContainerID,
inJobContext.ContainerName,
inJobContext.ContainerType,
inJobContext.TouchPointID,
inJobContext.TouchPointName,
inJobContext.JobID,
inJobContext.JobName,
inJobContext.JobType,
inJobContext.JobOutputType,
inJobContext.EstimatedRecordCount);
  returnnewQlingoExtensionResult(true, aBuilder.ToString());
}
In this example, the code constructs a string from all job parameters, and returns a single string that has the description of the entire job context.
Note that the method uses a similar signature to the method described in "Creating the QLingo Extension method (C#)", but for an extra parameter of type QlingoExtensionJobContext. The first parameter, list of strings, has the parameters that will be passed in the QLingo function call. The extra parameter will be passed by the QLingo extension system, and will contain the job context information.
The QlingoExtensionJobContext has the following members that you can use:
-
long AccountID – uProduce account ID
-
string AccountName – uProduce Account name
-
long CampaignID – uProduce campaign ID
-
string CampaignName – uProduce campaign name
-
long CustomerID – uProduce customer ID
-
string CustomerName – uProduce customer name
-
long JobID – uProduce job ID. Production from desktop will have -1.
-
string JobName – uProduce job name, as defined in the “Process” windows
-
long TouchPointID – touch-point ID for tracked jobs
-
string TouchPointName – touch-point name for tracked jobs
-
long ContainerID – uProduce template document ID
-
string ContainerName – Template document name
-
string ContainerType – Template document type (EMAIL, XLIM, PSD, INDD)
-
long EstimatedRecordCount - total record count for this job. This number does include records that may be skipped through production policies.
-
long JobType – enumerator value specifying the job type in which context the QLingo function is called. Can be one of:
-
Print. A Print Job
- Proof. A Proof job (print job from uProduce that’s submitted via the proof window)
-
Download Document. A document package (DPKG) download job
-
Download Campaign. A campaign package (CPKG) download job
-
Proof Set. A Proof Set generation job
-
ICP. An ICP call
-
Email batch. Email batch job
-
Email test. Email test job
-
Email preflight. Email preflight job
-
-
string JobOutputType – a string describing the job output type. Can be one of:
-
“PROOF_SET” – a Proof set job output
-
“VPS” – Scitex VPS print output
-
“PDF” – Adobe PDF print output
-
“PDF” – Adobe PDF print output, normally would be converted from postscript, other than in uProduce when production is for record count that is lower than 5 records, in which case it would be plain native PDF.
-
“PPML” – PODI PPML print output
-
“VDX” – Kodak VDX print output
-
“VIPP” – Xerox VIPP print output
-
“JPG” – JPG image output
-
“PS” – Adobe Postscript output
-
Installing the QLingo extension
In order to be able to use the QLingo extension in the XMPie environment, you should place the required DLLs in specific locations. The required DLLs and the necessary location varies depending on the type of extension you have created and the XMPie application that will run them.
Gathering the required files
C++ QLingo extension
When installing the C++ QLingo extension, you will need the following files:
-
XMPie.QLingo.Extension.dll (from the Binaries\DotNet folder)
-
Custom DLL that you created that contains the entry point for QLingo
-
Any additional dependent DLLs that your custom DLL requires
The location where you need to put the files depends on the XMPie application that you wish to use the QLingo extension with.
.NET QLingo extension
When installing the .NET QLingo extension, you will need the following files:
-
XMPie.QLingo.Extension.dll (from the Binaries\DotNet folder)
-
.NET bridge file QLingoDotNetBridge_R.dll (also from the Binaries\DotNet folder)
-
Custom DLL that you created containing the entry point for QLingo
-
Any additional dependent DLLs that your custom DLL requires
The location where you need to put the files depends on the XMPie application that you wish to use the QLingo extension with.
Installing the DLLs
After identifying the DLLs that you need, you should copy and paste them into the required location depending on which XMPie application you wish to use them with.
uPlan
The files need to be copied into the uPlan folder next to the XMPie uPlan.exe which should be located at:
C:\Program Files\XMPie\XMPie uPlan\
uCreate Print
The location where you copy the files for uCreate Print is different based on whether you have created a C++ or .NET extension.
uCreate Print with C++ extension:
The files need to be copied into the XMPie plug-ins bin folder. Depending on your InDesign version and installation drive, this should be located at:
Windows:
C:\Program Files\Adobe\Adobe InDesign CC 2023\Plug-Ins\XMPie\bin\
Macintosh:
/Applications/Adobe InDesign CC 2023/Plug-Ins/XMPie/bin/
uCreate Print with .NET extension:
The files need to be copied into the same folder as the InDesign.exe. Depending on your InDesign version and installation drive, this should be located at:
Windows:
C:\Program Files\Adobe\Adobe InDesign CC 2023\
Important:
-
QLingo Extensions created using .NET can only be used in Windows environments.
-
This version of the QLingoExtensionSDK is designed to work with uCreate Print installed with Adobe InDesign CC 2023 only.
uProduce
The files need to be copied into the XMPieExec folder on the uProduce server. Depending on your installation drive, this should be located at:
C:\XMPie\XMPieExec\
Important: If you have separate uProduce Director and one or more Extensions, the DLLs must be copied to all Directors and Extensions that are available in the XMPie environment.
Calling your QLingo extension in a QLingo expression
Calling a C++ QLingo extension
In general, the call for your C++ QLingo extension should be similar to the following:
Call yourExtensionDLLName.yourExtensionMethodName(
    …values to pass to the method…

)
Note: The call is the same for QLingo functions that use Job Context as a parameter. The Job Context information is provided via the internal mechanism, and not via user input.
To take the GetTextFileWithContent example we created earlier, we could call this method using the following QLingo expression:
Call QLingoCPPExtensionSample.GetTextFileWithContent(
    "a static value",   //values to pass to the method
    "some other value",
    |->[firstname],
    |->[lastname]
)
To call the extension method, we begin by using the Call reserved word. This is a QLingo language command that marks the call for an extension method. In this case the extension method called is QLingoCPPExtensionSample.GetTextFileWithContent method. This method is defined by the QLingoCPPExtensionSample.dll (the one built with the SDK).
The parameters to be passed to the method itself are the input parameters. The number of input parameters may vary according to the purpose of the method.
The return result from this expression is a string, which is the value returned by the method as the outResult output parameter.
Like any QLingo expression, this call can itself be included in an expression.
Calling a .NET QLingo extension
In general, the call for your .NET QLingo extension should be similar to the following:
Call QLingoDotNetBridge.ExecuteDotNet(
    "your .NET QLingo extension assembly name",
    "your .NET QLingo extension method name",
    …values to pass to the method…
)
Note: The call is the same for QLingo functions that use Job Context as a parameter. The Job Context information is provided via the internal mechanism, and not via user input.
To take the listSort example we created earlier, we could call this method using the following QLingo expression:
Call QLingoDotNetBridge.ExecuteDotNet(
    "MySample",         //the assembly name
    "listSort",         //the method name
    "a static value",   //values to pass to the method
    "some other value",
    |->[firstname],
    |->[lastname]
)
To call the extension method, we begin by using the Call reserved word. This is a QLingo language command that marks the call for an extension method. In this case the extension method called is QlingoDotNetBridge.ExecuteDotNet method. This method is defined by the QlingoDotNetBridge dll (the one provided with the SDK) and it allows QLingo to call .Net methods.
The specific method to call is defined by the first two parameters of the call. In this case they are MySample and listSort.
MySample, the first parameter, denotes the Assembly name, in which the .Net QLingo extension is defined.
Note: While this may be also the name of the QLingo extension class that we defined earlier, it does not have to be. Remember that the class itself is marked by an attribute, and therefore does not have to be mentioned here in the call. The assembly should be available to the QLingo environment as described in Installing the QLingo extension.
The second parameter is the name of the method itself. In this case listSort.
Following are parameters to be passed to the method itself as the List<String> input parameter. The number of additional parameters may vary according to the purpose of the method.
The return result from this expression is a string, which is the value returned by the method as the returnResult member of QlingoExtensionResult.
Like any QLingo expression, this call can itself be included in an expression quite easily. For instance, if you want to pass it as a parameter to another function you can do something like this:
UCase(
    Call QLingoDotNetBridge.ExecuteDotNet(
        "MySample",
        "listSort",
        "a static value",
        "some other value",
        |->[firstname],
        |->[lastname]
    )
)
In this example, there is a call to the UCase QLingo function with the result of the QLingo extension call, resulting in an upper casing of the result from the QLingo extension.
How does the .Net bridge work
This section is meant for those of you who are interested to learn how the .Net bridge works. The technique uses the existing QLingo Extension method available for C++ and the fact that you can call .Net code from C++. There is also some reflection going on. For the rest of you who are only interested in running .Net extensions, you may skip this section.
Let’s start with a diagram showing how the different components communicate:
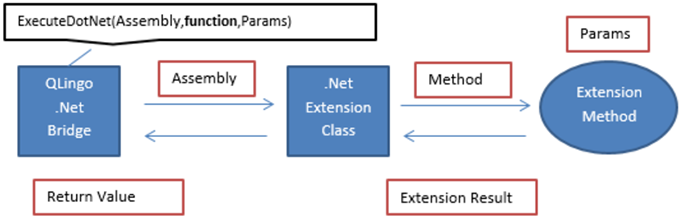
The above diagram illustrates what happens when a call is being made to the .Net bridge. This is how it works:
-
ExecuteDotNet is being called with at least 2 parameters. The first one is the identity of the DLL/Assembly which was implemented by the .Net extension writer. The bridge loads this DLL to memory (If you are looking at the code, this happens in
PluginBridge::Execute). The lookup is done automatically by the .Net environment through the available DLLs for the running application (hence the resulting installation instructions). -
In this DLL it looks for a class that is marked with the QLingoExtensionClass Attribute. This is the extension class. This class should include all of the extension method.
-
The second parameter is now used as the method name. The extension class is queried for a method with this name. It then verifies that it has the right signature, with accepting list of strings (and optionally a QLingoExtensionJobContext parameter) and returning a QLingoExtensionResult. It also checks that this method if valid, not having a QLingoExtenionMethod attribute defined for it with the value of false.
-
The extension method with a list of strings that is formed from all but the first two parameters to the initial ExecuteDotNet call. If the method has a second parameter of type QLingoExtensionJobContext, then the bridge will create an instance of this type, input the job context information and pass it to the method as well.
-
The extension method returns a QLingoExtensionResult object which serves as the return result of the ExecuteDotNet call. The returnValue member is delivered as an output parameter, and the Boolean status is returned as the return value of the call.