uProduce REST API
Introduction
uProduce REST API exposes uProduce functionality via REST API calls.
After activating the uProduce REST API license on your uProduce server, you can access the full documentation by browsing to your server with:
http://<your server IP address or hostname>/XMPieRestApi/
The documentation provides the full Open API Specification (both v2 and v3 with and without inheritance) detailing all controller endpoints and actions as well as the schema of each model or entity in the system.
The documentation also includes a “Try it out” feature allowing developers to test each controller action from within the documentation itself.
API structure
The basic structures (models) in the API build the basic information for each entity in the system, such as an account or campaign. The information of each entity is expressed by the model’s properties. Some of these properties are common among all entities (i.e. the “name” property), while some are unique.
The overall model is a construct of relationships between entities. Most entities hold the information of their owner (called the “Parent”), of their creator, and of their last modifier, all of which are considered properties of the entity. An entity does not hold information about its siblings. Siblings should be queried via their actions.
API actions are grouped into controllers. The name of the controller is the plural form of the entity which it controls. For example, the Accounts controller controls actions of account entities.
Within a controller are actions to create, fetch, delete and update a single entity, and actions to execute on a list of entities. When executing an action on a list of entities, the notion of filter will be of importance. Read the List filter section for more details.
All entities can hold custom user data. You can add, fetch, and delete custom user data for an entity or entities. Read the Custom user data section for more details.
Some entity types can hold settings information. Read the Entity settings section for more details.
Some entities are more complex than others. For example, the JobTicket and the PlanData entities. While they are very structured and can be easily used, they hold a lot of information.
The PlanData entity is a model of the plan file. To understand the PlanData, you must first be familiar with general XMPie concepts like ADORs, and specifically the separation of data, logic, and design. The logic in XMPie is held by a plan file, and the PlanData model is just a simple and structured information entity of that plan.
The JobTicket entity is a structured information entity of a production request, and is used to create jobs to fulfill the production. Read the Job ticket section for more details.
To use the API actions, you must have a user in the system. You can then use one of the available authentication methods to be authenticated and authorized for the called action. Read the Authentication section for more details.
Authentication
Authentication is the act of validating that users are who they claim to be, which is the first step in any security process. Note that authentication differs from authorization, which is the process of giving the user permission to access a specific resource or function. While authorization is part of the API action verification process, it will not be explained here, as the authorization capabilities are explained in the uProduce help and are not related directly to the APIs.
It is also worth mentioning that authentication and authorization are not the only level of security that needs to be employed. Other considerations must be taken to fully secure your API gateway, such as employing SSL certificate and using secure channel (HTTPS).
Two uProduce REST APIs authentication methods are available:
Basic authentication
This is the easiest and most straightforward method. The sender places a “username:password” value in the request “Authorization” header. The username and password are encoded with Base64, which is an encoding technique that converts the string into a set of 64 characters to ensure safe transmission.
This method does not require cookies, session IDs, login pages or other specialized solutions, and because it uses the HTTP header itself, there is no need for handshakes or other complex response systems.
Here is an example of a basic authentication in a request header:
Authorization: Basic aGVsbG8gdG8geW91IHRvbw==
Bearer authentication
Bearer authentication (also known as token authentication) is an HTTP authentication scheme that involves security tokens called bearer tokens.
The name “Bearer authentication” can be understood as “give access to the bearer of this token.” The bearer token, which allows access to a certain resource or URL, is a cryptic string, generated by the server in response to a login request.
Here is an example of a bearer authentication in a request header:
Authorization: Bearer <token>
Other token transmit options
While the formal and suggested way of using tokens in the process of authentication and authorization is via the Bearer Authentication scheme, there are additional ways to transmit the bearer token:
-
The basic authentication method: Use a user named “token” whose password is the token value.
-
Using cookies: Use a cookie named “uProduceRestAPIToken” with the token as its value.
-
Using Query String: Use a query string parameter named “uProduceRestAPIToken” with the token as its value.
Each of these methods has its benefits in certain scenarios, for example:
-
Browsers support challenge response only for basic authentication. When a challenge is returned to the browser, it presents a dialog for entering the username and password. In this case you can use a token instead. This is usually useful for testing purposes.
-
Cookies is a way in which browsers save information and send it in each call, without explicitly requesting it.
-
Using a query string can be helpful to construct a single get URL request, including the authentication token, that can be used without the need of meta information, such as headers in the request.
List filter
Within a controller there are actions to get, delete and update a list of entities, such as accounts and campaigns. When executing an action on a list of entities, you will need to define a subset of entities on which the action will be performed. This is done using the Filter model.
Filtering is defined by the filter model’s “Where” property, which is a where condition following the general syntax of T-SQL. The field names in the T-SQL syntax are actually the property names of the filtered entity. The name of a sub-property (a property of a property) in the T-SQL syntax is the concatenation of the property names, without any space between them.
For instance, filtering the campaigns of a specific account created by a specific user will be done by the “ParentId = <accountid> AND CreatorId = <userid>” filter.
In addition, under the same syntax guidelines, you can use the “OrderBy” filter model to order the filtered results.
The T-SQL syntax is first parsed and validated so as not to hold any non-authorized or hazardous operations.
Note that regardless of the filter you have defined, the list is always filtered to show entities that are authorized to be seen by the requesting user, i.e., there is an additional inexplicit filtering done by the system.
Another inexplicit filtering is that any entity marked as deleted is filtered out. To include the entities marked as deleted, you can use the “IncludeDeleted” filter model property.
List operations can be carried out on a subset of the list, defined by the “Offset” and “Limit” filter properties. The maximal value of the “Limit” property is 500. If you need to operate on more items than 500, you will need to do so in batches.
For more information, see T-SQL Filter Query Language Reference.
Custom user data
Each controller group has special actions to set, get and delete custom user information on the entity or on all entities of this type (also the default for new entities). When getting custom user data for an entity, if such data does not exist for the entity, but does exist for the entity type, this value will be fetched instead.
In addition, administrators can set default custom information for all users in the system, which will be fetched by a user get request, if no data is saved specifically for the user.
Fetching custom data is done in the following order:
-
If the specific entity has information for this specific user, this information will be fetched.
-
If the entity type group has information for this specific user, this information will be fetched.
-
If the specific entity has information for any user, this information will be fetched.
-
If the entity type group has information for any user, this information will be fetched.
Job ticket
As the main purpose of the uProduce system is to function as a production system, one of its basic functionalities is to create a JobTicket model and submit it to production, producing a Job model.
A good way to understand the basics of the job ticket structure is by creating a new job using the uProduce dashboard and then examining the job ticket. Getting the job ticket of a job is a simple call to fetch the Job model via the API, with the extended information, which includes the JobTicket model as a property.
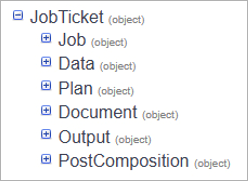
After you understand the basics, you can review the job ticket model to better understand its structure. Use the below tree view as a convenient way to go through the JobTicket structure.
Notice that many properties and attributes are mutually exclusive, so while the tree shows the full structure, a valid tree never has all this information.
Entity settings
Some controller groups have special actions to set, get and delete settings information on the entity. When getting the settings data for an entity, if such data does not exist for the entity, but does exist for one of the entity ancestors, this value will be fetched instead.
This means that settings are inherited from the ancestor and can be overridden by an entity. This affects all descendants of the entity unless they are being overridden by the descendant itself.
Settings, in contrary to custom user data, is information that the system acknowledges and uses, hence it is of a closed set of options, and cannot be dynamically extended. Yet it can be extended from one version to the other. This should be considered when developing using the APIs.
Upload tasks
There are several uProduce REST API endpoints that provide a shortcut or one-step process to upload campaign components, for example assets, data sources, documents, and more.
These endpoints end with "/upload", take only a few parameters and no object schema in the request body to define the object settings. They are designed for convenience and will automatically upload the component and create it on the uProduce server with the same name as the uploaded file.
If you wish to upload a component but set a different name, first POST your file to the /v1/temp-storage/file/upload endpoint to get a file token. Then use the POST endpoint that does not end with "/upload". For example, instead of using /v1/documents/upload use /v1/documents
The endpoint without the "/upload" takes the file token as the fileDescriptor parameter and can include the object schema in the body of the request to specify the Name, or other properties to set on the object in uProduce.
Adding Post Composition Operations to a job ticket
The uProduce REST API can apply Post Composition Operations onto a JobTicket when programmatically submitting documents to production. The documentation notes the items in the PostComposition node of the JobTicket that are deprecated by the addition of Operations, and provides the structure required for the new PostCompositionOperation object.
The simplest method to apply Post Composition Operations to a JobTicket is to define the operation(s) to be performed in the dashboard, identify the ID of the operation(s), and set the required ID(s) on the JobTicket like this:
"PostComposition": {
    "Operations": [ {"Id": 1},{"Id": 4}]
}
However, it is also possible to add operations to the ticket when they are not already defined in the uProduce dashboard. For example:
"PostComposition": {
    "Operations": [{
        "Name": "My compression task",
        "TypeName": "XMPieCompressOutputOperation",
        "TypeProperties": {"CompressionLevel": "Optimal"},
        "Parameters": ""
    }]
}
Because the permitted TypeProperties are different for each operation type, they are not listed in the REST API documentation. The following information is provided to explain the available TypeNames and TypeProperties required for the Post Composition Operations provided by XMPie. The details for custom Post Composition Operations will need to be sourced from the developer.
Note: The Post Composition Operations provided by XMPie in v.25.2 and later do not include runtime Parameters. An example of Parameters is provided in the Post Composition Operations SDK.
|
TypeName |
TypeProperties |
TypeProperty Values |
|
XMPieCompressOutputOperation |
CompressionLevel |
"Optimal"* |
|
XMPieCopyToNetworkPathOperation |
NetworkPath |
The network folder path. For example: "c:\path" or "\\server\share\path" |
|
SubFolder |
"None"* |
|
|
SubFolderFormat |
The string format to use to name the folder. For example: "JobId_00000" or "dd-MM-yyyy HH:mm:ss" |
|
|
AuthenticationUsername |
The username |
|
|
AuthenticationPassword |
The password |
|
|
XMPieCopyOutputToFtpOperation |
FtpUri |
The FTP URL. For example: |
|
UsePassive |
1 = true |
|
|
EnableSsl |
1 = true |
|
|
SubFolder |
"None" * |
|
|
SubFolderFormat |
The string format to use to name the folder. For example: "JobId_00000" or "dd-MM-yyyy HH:mm:ss" |
|
|
AuthenticationUsername |
The ftp username |
|
|
AuthenticationPassword |
The ftp password |
|
|
XMPieCopyToAwsS3Operation |
AccessKey |
The AWS Access Key |
|
SecretKey |
The AWS Secret Key |
|
|
RegionSystemName |
The AWS region. For example: "us-east-2" or "eu-west-1" |
|
|
BucketName |
The AWS Bucket Name |
|
|
BucketBaseFolder |
The base folder path into which the output file(s) or subfolder should be created. |
|
|
SubFolder |
"None" * |
|
|
SubFolderFormat |
The string format to use to name the folder. For example: "JobId_00000" or "dd-MM-yyyy HH:mm:ss" |
|
|
XMPieDeleteOutputOperation |
(no TypeProperties) |
|
|
XMPieCopyOutputToSFtpOperation |
SFtpUri |
The SFTP URL. For example: |
|
SubFolder |
"None" * |
|
|
SubFolderFormat |
The string format to use to name the folder. For example: "JobId_00000" or "dd-MM-yyyy HH:mm:ss" |
|
|
AuthenticationUsername |
The sftp username |
|
|
AuthenticationPassword |
The sftp password |
|
|
AuthenticationPrivateKey |
The private key file Base64 encoded |
|
|
XMPieCreateJDFOperation |
XSLT |
The XSLT to transfer the JobTicket XML to the required JDF. |
* If TypeProperty is not provided, the default setting used is highlighted by "*".
Job ticket XSLT
Post Composition Operations include a type that can transform job details XML into JDF or Job Definition File which can be used to pass information about the job to printers or finishing equipment.
The features and capability of JDF are expansive and well beyond the scope of this document. If you need information about the JDF specification, you can find it at the CIP4 organization website: Specifications - CIP4 Organization.
You should also refer to the manufacturer's documentation for information on the JDF nodes and attributes supported by your specific press and finishing equipment as this will vary from vendor to vendor and model to model.
Post Composition Operations use XSLT to transform the job details XML to JDF.
When creating an operation to create JDF, the uProduce dashboard UI provides a link to load a sample XSLT which is shown below:
<?xml version="1.0" encoding="utf-8" ?>
<xsl:stylesheet version="1.0" xmlns:xsl="http://www.w3.org/1999/XSL/Transform">
  <xsl:output method="xml" encoding="UTF-8"/>
  <xsl:template match="JobDetails">
    <JDF ID="uid_{./@FriendlyId}_0" JobID="{./@FriendlyId}" JobPartID="1" MaxVersion="1.8" Status="Waiting" Type="Product" Version="1.1" xmlns="http://www.CIP4.org/JDFSchema_1_1" xmlns:xsi="http://www.w3.org/2001/XMLSchema-instance">
      <ResourcePool>
        <Component Class="Quantity" ComponentType="FinalProduct" ID="OutputComponent" Status="Unavailable"/>
        <Component Class="Quantity" ComponentType="PartialProduct" ID="uid_{./@FriendlyId}_1" ProductType="Body" Status="Unavailable"/>
        <BindingIntent Class="Intent" ID="uid_{./@FriendlyId}_5" Status="Available">
          <BindingType DataType="EnumerationSpan" Preferred="SideStitch"/>
          <SideStitching>
            <StitchNumber DataType="IntegerSpan" Preferred="111"/>
          </SideStitching>
          <BindingSide DataType="EnumerationSpan" Preferred="Left"/>
        </BindingIntent>
      </ResourcePool>
      <ResourceLinkPool>
        <ComponentLink Amount="1" Usage="Output" rRef="OutputComponent"/>
        <ComponentLink Usage="Input" rRef="uid_{./@FriendlyId}_1"/>
        <BindingIntentLink Usage="Input" rRef="uid_{./@FriendlyId}_5"/>
      </ResourceLinkPool>
      <JDF ID="uid_{./@FriendlyId}_0" Status="Waiting" Type="Product">
        <ResourceLinkPool>
          <ComponentLink Usage="Output" rRef="uid_{./@FriendlyId}_1"/>
          <ArtDeliveryIntentLink Usage="Input" rRef="uid_{./@FriendlyId}_6"/>
        </ResourceLinkPool>
        <ResourcePool>
          <ArtDeliveryIntent Class="Intent" ID="uid_{./@FriendlyId}_6" Status="Available" rRefs="uid_{./@FriendlyId}_7">
            <ArtDelivery ArtDeliveryType="DigitalFile">
              <RunListRef rRef="uid_{./@FriendlyId}_7"/>
            </ArtDelivery>
          </ArtDeliveryIntent>
          <RunList Class="Parameter" ID="uid_{./@FriendlyId}_7" NPage="0" Status="Available">
            <LayoutElement>
              <FileSpec URL="{./Output/File[1]/@FileName}"/>
            </LayoutElement>
          </RunList>
        </ResourcePool>
      </JDF>
      <CustomerInfo BillingCode="{./Account/@FriendlyId}" CustomerID="{./Account/@FriendlyId}" CustomerJobName="{./@Name}" CustomerOrderID="{./@FriendlyId}"/>
    </JDF>
  </xsl:template>
</xsl:stylesheet>
You can add, delete and edit nodes and attributes to suit your workflow needs. In addition to the static values you create, it is also possible to obtain values from an XML containing details of the job that was processed.
The XSLT includes this line which sets the base XML node from which nodes and attributes should be accessed:
<xsl:template match="JobDetails">
Values can then be referenced with the braces or curly brackets. For example, the FriendlyId attribute from the root JobDetails node can be accessed like this:
JobID="{./@FriendlyId}"
To find other values that can be used in the JDF, first use the job center to identify the ID of a job that you would like to see the job details of.
Open a web browser and enter the following URL substituting <uProduce> with the hostname of your uProduce server and <123> with the job ID you want the details of.
http://<uProduce>/xmpierestapi/v1/jobs/extended-details-xml/<123>?includeOutput=true&includeMessages=true
You will be prompted to enter a uProduce dashboard username and password, then the browser will display the XML that would be used together with the XSLT to create the JDF file for that job ID.
You can now reference the nodes or attributes from the XML in the JDF file.
In addition, it is possible to use logical operators with XSLT for example:
<xsl:if test="expression">
  … some JDF output to add if the expression is true…
</xsl:if>
For more information, refer to the tutorial video XMPie e-Learning - PersonalEffect Print Training - Creating JDF or Job Definition Files.