Best Practices for Variable Data Print (VDP) Design
Summary: This articles provides best practices for VDP design to ensure maximum print production performance.
Audience: Graphic designers and prepress production staff who are responsible for the creation, preparation and/or production of documents for XMPie variable data print.
Prerequisites: This article assumes knowledge of XMPie products, Adobe Photoshop, Illustrator and InDesign as well as general prepress skills.
Overview
Adobe InDesign is a very flexible product and it has many features to make it quick for non-technical people to create beautifully designed documents. However, many of these features can add complexity to the document that causes
-
Increase in the time it takes to create the print output.
-
Increase in the size of the output file (and, therefore, the time it takes to send to the printer).
-
Output files which are not efficiently processed on the printer, causing the printer to run slower than its rated speed.
In static or one-off print jobs, these tend to be minor indiscretions that we can live with, but when printing variable or dynamic print jobs with thousands of records, we need to ensure these issues don’t create exponential problems with file size or production speed.
This article lists many common things to look out for to prevent these issues. Much of this is just “good prepress” that should be done for any digital print, but there are also some points which are unique to variable data print.
Designing for VDP
XMPie provides a number of different ADORs or content object types, and in many cases there are different ways to achieve the same output. For example, to create a brochure with different company logo and text, you could:
-
Create different layers in InDesign for each design and use Visibility ADORs to turn on or off the layers.
-
Create different pages in InDesign for each design and use Visibility ADORs to turn off or off the pages.
-
Have only one page and layer in InDesign, and use a Graphic ADOR and a Text ADOR to change the content on the page.
-
Have only one page and layer in InDesign and use a Graphic ADOR and a Text-File ADOR to change the content on the page.
-
Export out the whole brochure page for each company as a graphic, and create another template in InDesign which uses one Graphic ADOR to load the right graphic for each company.
All the above options are valid and would result in the same output. However, what would happen if your brochure had say 50 different company logo/text combinations to manage instead of just 2 or 3? In this case, options 1 and 2, would result in many pages or layers in the InDesign document and maintaining or editing the document would become difficult.
Even option 5 (which would result in the smallest and fastest processing document) would take much longer to setup and also be very difficult to maintain changes.
So, in this example, options 3 or 4 are most sensible since they result in a document which is easier to manage and update over time and still produce efficient output. The difference between the two options is whether to use a Text ADOR (where the variable text is coming from the database or plan file) or Text File ADOR (where the text is coming from a text file asset). The decision here would depend on the amount of text and how you wanted to make updates/changes in future. In general, Text File ADORs are a better solution when there is a lot of text since they are cached more efficiently. But, for small amounts of text, Text ADORs can be easier to update by changing the database, or the plan file.
The point to be made here is that there are many ways to create variable documents, and success will come from having at the start, a clear understanding of what will be changing in the document, how the document will be updated in the future and which ADOR types are most efficient.
Watch a video
Transparency
Transparency is the number one cause for slow production, large output files, and slow print processing times. InDesign provides many different effects that involve transparency and can be applied to either text or graphic boxes. Here are just two:
Feather |
Drop Shadow |
The problem with transparency is that many printers or output devices cannot correctly reproduce transparency between different objects, so to ensure that you get printed what you see on screen, Adobe InDesign “flattens” or combines these objects into one object when you print it. Naturally, this process takes some time, and even when you’re printing a normal static InDesign document you’ll notice that it takes a bit longer if there are transparent effects in the document.
XMPie works perfectly well with transparency, and if it is needed for your design it is certainly possible. But, as a designer, you need to be aware of the impact of transparency on production time so that you can allow additional production time, or minimize the impact by identifying and changing the way the transparent effect is used.
The biggest issue for transparency in variable data printing comes into effect if one or more of the boxes that need to be flattened contain variable data – either image or text.
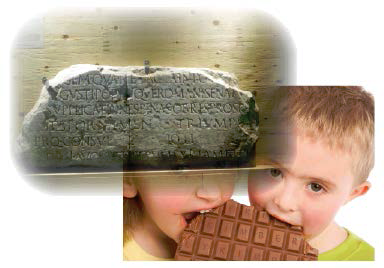
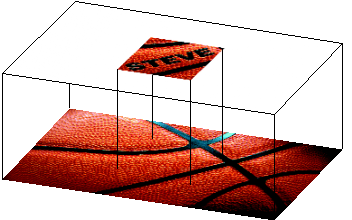
Example 1: Flattening boxes with variable data

The image above shows a text box (with a drop shadow) containing the “first name” ADOR which overlays a graphic box that contains a static image. To reproduce this transparency effect, XMPie has to flatten the text box and graphic box together. Since the first name can be different for every record in the database, this multiplies the time needed to flatten the image for all the different names, and multiplies the size of the output file.
Let’s assume that the image size is 1MB, that you are printing 1500 records, and that 200 people in the database have the same first name as someone else already processed:
InDesign & XMPie have to flatten the two boxes 1500 – 200 = 1300 times.
If it takes 1 second to flatten the image with the transparent effect, then this will add 1300 seconds or 21.6 minutes to the total job processing time.
And, the output print stream has to include the 1300 flattened 1MB images (approx. 1.26GB) of data just for this graphic - not including any other pictures, text, etc.!!!
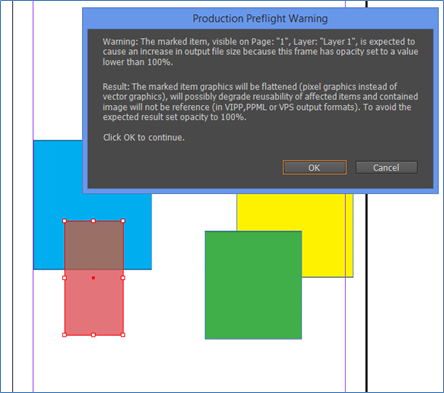
Detecting transparency issues
The first step to optimizing is to identify which elements contain transparency effects. XMPie provides a preflight tool which will do this. Select Preflight from the uCreate Print panel:
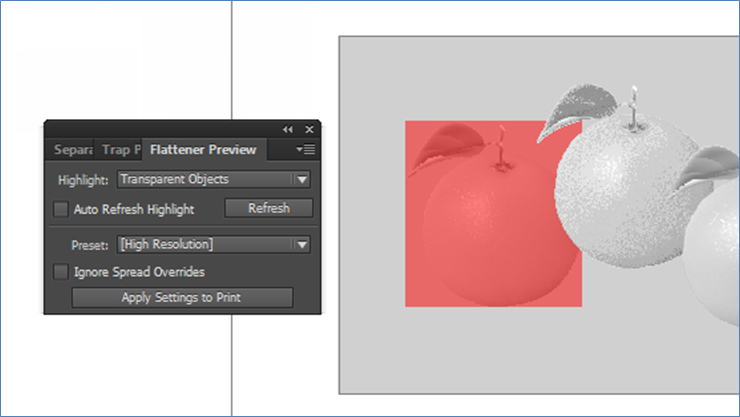
Another method for detecting transparent effects in your design is to use the InDesign Flattener Preview panel:
Optimizing transparency issues
Once you have identified the offending object you can take steps to remove or reduce the performance problem:
-
If the overlapping transparent objects are static, consider flattening them in Photoshop and placing it into InDesign as a graphic which is already flattened.
-
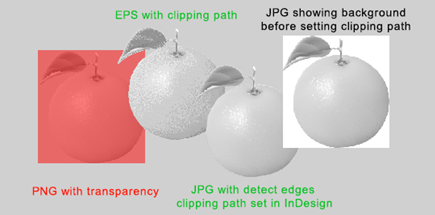
When a placed graphic contains transparency – for example the PNG graphic shown in the image above – there are two better ways to achieve the same effect without transparency and without impacting performance:
-
Open the graphic in Photoshop, create a path around the object (an orange in this example). Set the path as a clipping path, and save the image as an EPS with the clipping path.
-
Resave the graphic as a JPG image. This will remove the transparency. Then in InDesign, select the graphic box and choose Clipping Path from the Object menu. Use the Detect Edges option to automatically create a clipping path around the object, and you can then use the pen tool to adjust the clipping path if necessary.
-
-
If possible, move the box with transparency so that it does not overlap other boxes – especially boxes containing dynamic content.
-
Consider not using the transparent effect.
-
If there is a bitmap graphic in one of the affected boxes, reduce the graphics file size to the minimum by ensuring that it is correctly cropped, scaled and is at the lowest possible resolution to provide the necessary print quality. (This will help reduce the flattening time and output file size.)
-
If the box with the transparent effect overlays more than one box, try to reduce this to the minimum.
Example 2: Transparent effect overlaying more than one box
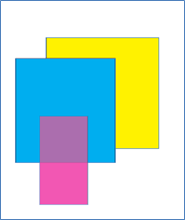
In the Example 2, all three boxes would be treated as one object. Now, if the yellow box was actually a large graphic which was static for all records and the blue and/or pink boxes contained variable content, we would again encounter the problem discussed in Example 1.
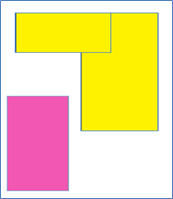
However, depending on the design of your document, it might be possible to make a change so that only two objects have to be combined (blue and pink in the below example):
Example 3: Splitting the yellow box into two boxes
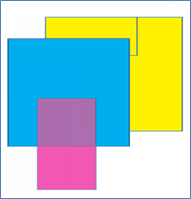
Example 4: Placing the blue box back
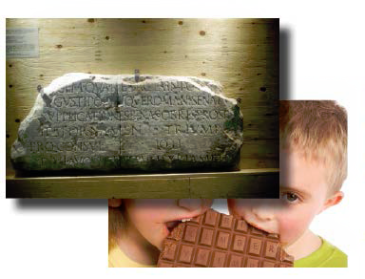
Evaluate and minimize the problem effect where it affects dynamic content. For example, in Example 5:
On the left is one text box placed over an image and set with 80% transparency. Because the text box contains the First Name ADOR, the transparency effect on the text box will be applied to the text it contains. And, because of the variability every unique first name will have to be flattened with the background image increasing production time, and increasing the output file size.
On the right, are two boxes – one just for the white background which has the 80% transparency applied. The second box placed over the top has the text containing the First Name ADOR. In this case, the white box and background image will be flattened once.
Example 5: Minimizing transparency effect on variable content
![]()
While the effect is not exactly the same (the text is 100% opaque and there is no building showing through the text) it is very similar and perhaps the customer would accept this slight design change – if so, the savings in production time and output file size would be significant.
Production options for managing transparency
XMPie provides a powerful production option called X-DOT (XMPie Dynamic Object Transparency) which enables you to quickly and easily control transparency at production time without having to modify the InDesign document.
X-DOT provides three options:
-
Use X-DOT – the output will honor all transparency setup in the InDesign file.
-
Ignore X-DOT – the production engine will remove all transparency effects in the file.
-
Ignore X-DOT where needed – this option applies intelligence to determine if the transparent effect will impact performance by interacting with a variable object. With this option, individual transparent effects will only be removed if they will impact performance. Those which don’t impact production speed will remain.
Output format considerations for transparency
XMPie provides several different output formats for use when you are creating the final print file. Different output formats have different options available.
When selecting PDF/VT-1 as the output format, the INDD Document Advanced Parameters> Transparency Implementation section shows an option to tell XMPie not to flatten the transparency, and to leave this to the RIP/printer.
Naturally, this will make the XMPie production much faster, but may increase the processing time on your printer – assuming that your printer will handle PDF/VT-1 files with transparency.
Watch a video
Impact of transparency on dynamic print productions
uImage performance
Creating personalized images is another time consuming task. Also, since there will be individual images for each recipient in the database, output file size can be large and print production time long because of amount of data to process.
-
Ensure Photoshop is set up and configured as efficiently as possible, as per Adobe’s recommendations (https://helpx.adobe.com/photoshop/kb/optimize-photoshop-cc-performance.html).
-
Reduce the physical size/scale of the Photoshop template so will be placed into InDesign at 100%.
-
Remove any extraneous image in Photoshop, rather than cropping in InDesign.
-
Reduce the resolution of the Photoshop template to the minimum necessary for the required output print quality. (For digital print this should be about 150-200 dpi. Any more resolution will not increase the visible print quality, but will impact output file size and printer performance.)
-
Minimize the number of layers in the Photoshop template by flattening or merging layers where possible.
-
If using actions, remove any unnecessary steps, and test different options that provide similar effect (especially filters) to see if one is faster than another.
-
Only use uImage where necessary – if you can achieve a similar effect by overlaying text on the image in InDesign, you will save time.
-
Make sure you use the “OPT:” Optimize option in uPlan. This first checks to see if there is already a personalized image for the recipient, so it will not waste time creating images that already exist.
-
If the area of personalization on the image is only a small part of the whole image, consider using the uImage Optimize option. This creates a smaller overlay image for each recipient, so the amount of extraneous image being duplicated in the output stream is dramatically reduced:
Watch a video
Optimizing uImage files to get the fastest production and smallest output file
Choosing the right output format
To get shortest time between click and clunk – the time between your click of the Generate VDP Output option and clunk of the print landing in the printer’s output tray – you will also need to choose the best output format for your printer.
XMPie provides several different output formats. Here is a table showing the available output types and their advantages and disadvantages:
|
Output Type |
Advantages |
Disadvantages |
|
PDF/VT-1 |
|
|
|
PostScript |
|
|
|
Adobe PDF |
|
|
Things to be considered when selecting the output format include:
-
The time it takes XMPie to produce the output format.
-
The size of the output file (and therefore the time to get it across the network to your printer).
-
Whether your RIP can process the particular output format.
-
The speed at which your RIP or printer can process the output format.
Splitting into batches
On the uProduce server, if you have extension servers, or a multiple instance (MI) license of InDesign Server, you are able to process multiple jobs at the same time.
By splitting a large job into multiple batches, means that as the first batch completes on the uProduce server, it can be sent to the printer and start processing/printing while remaining batches are being prepared on the uProduce server.
In other words, the printer is able to start printing, while at the same time, the job is still being produced.
This feature does have one drawback. XMPie is able to optimize the caching of image assets in the output file, so that if many records use the same image asset, it is only placed into the output file once. However, when you split into batches, the same image asset will need to be placed into each batch where the image is required. If your RIP supports global caching, this is less of a problem.
InDesign image rendering
The uProduce setting INDD Document Advanced Parameters > Image Rendering enables faster performance. XMPie can insert all images (both image assets, and non-variable image resources) directly into the output file. This means there is no production delay while we programmatically load the images into InDesign and export them out again.
However, when you select the performance option, XMPie puts the linked images into the output file as-is, without making any changes to the images. This means there are some important things to note:
-
You should crop your images in an image editing application rather than using InDesign to crop images. Failing to crop images and using the non-InDesign Rendering option will result in larger print output files.
-
When using PDF files as an image, the non-InDesign Rendering option will put the entire PDF file into the print output file. So you should ensure that the PDF image file has only one page, and is optimized. If necessary, place the PDF into InDesign and export out a new PDF. Then, use this PDF as the image asset.
-
If you are using JPG images, and you need to apply ICC profiles to the image in InDesign for color management reasons, then you need to select the Require InDesign Rendering option or the ICC profile will not be applied.
Step and repeat imposition
If you select to do imposition in XMPie, this process happens at the end of all the normal production. Therefore, adding step and repeat, will increase the total processing time. For large jobs, you may find it is more efficient to use the RIP’s imposition features, or using 3rd party imposition tools.
Text wrapping
If there is an ADOR object involved in text wrap (either static text wrapped around a variable image or variable text around a static or variable image) the text flow may have to be evaluated for every record being processed. While not involving a huge amount of processing time, it can also affect the reusability of objects in the print stream, so may increase the amount of data being sent to the printer, in addition to the processing time.
Image assets
-
XMPie provides greater optimization with PDF assets when creating PDF-based output formats (Adobe PDF and PDF/VT-1). If using PDF/VT-1 output type, try to ensure that the assets are PDF for better performance.
-
XMPie provides greater optimization with EPS assets when creating PostScript-based output formats (PPML, VPS, VIPP, Optimized PostScript). If using one of these output formats, try to ensure that assets are EPS for better performance.
-
Avoid using native Photoshop or Illustrator files as assets. Especially if they include transparency effects. “Export” or “Save As” in Illustrator/Photoshop and save to JPG, EPS or PDF. Remember to choose an image file format which can be referenced outside of the print stream if you wish to take advantage of this feature. Refer to choosing the right output format.
-
If you need to mask an image, use the EPS clipping path method. This will use efficient PostScript to achieve the masking rather than an inefficient transparency effect that will cause production performance problems.
-
Reduce layers by flattening, or merging layers in bitmap graphics to reduce file size before exporting.

-
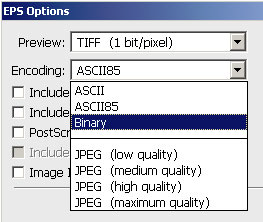
When exporting/saving image assets, use Binary (rather than ASCII) encoding methods when possible – this will reduce file size. (Binary/ASCII options are usually offered when exporting to EPS, but may also be offered with other formats depending on your image editing software.)
-
Ensure that placed bitmap images are cropped to the right size for placement in InDesign. Excess image in the print file contributes to large, slow print files.
-
Don’t place EPS files within other EPS files.
-
It is preferred to convert fonts to outlines in your vector EPS files.
-
In vector graphics, use a specific line width rather than “hairline”. EG use “0.25pt”.
-
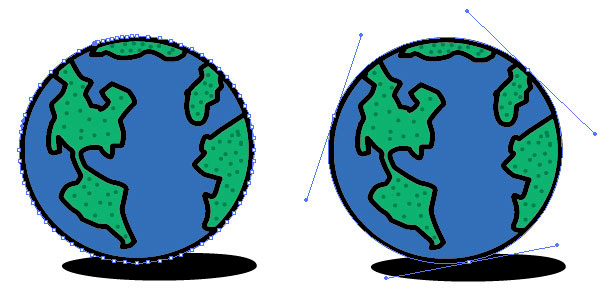
Reduce the number of points in your vector artwork.
The complex vector path on the left can be reduced to just three points:
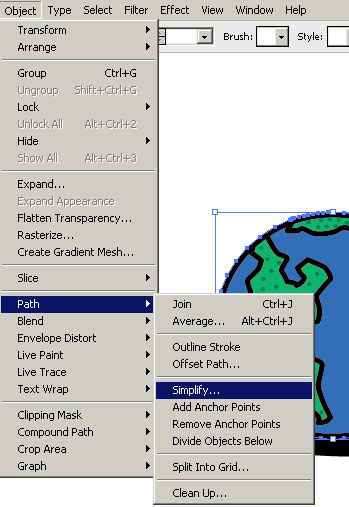
The Illustrator's Simplify option makes easy work of optimizing vector paths:
ADOR caching
One of the most powerful features of XMPie's patented dynamic print technology is the ability to cache objects in the output stream so that reusable objects are placed into the output file only once and are referenced for all additional records/recipients that use the same object. This means that the print file is created faster, is smaller in size, can be sent to the printer faster and processes faster on the printer or RIP.
XMPie makes the decision which objects are cached automatically, based on the ADOR type. Usually, Graphic and Text file ADORs are reusable objects, and are thus cached. Text ADORs, on the other hand, are usually unique and will not be cached. However, occasionally, it may be desirable to change this automatic behavior for certain ADORs.
Important! It is recommended that you change this automatic behavior only if you fully understand the caching mechanism, and the impact of the change.
InDesign objects
XMPie treats objects in the InDesign document in one of three ways:
-
Fixed: When the object contains no ADORs.
-
Reusable: When the object contains a file-based ADOR, such as a Graphic ADOR or a Text File ADOR.
-
Unique: When the object contains any other type of ADOR, such as a Text ADOR.
An "object" in InDesign is a text frame or a graphic frame.
How are reusable objects used?
Records/recipients to be processed are checked to see if the same Graphic or Text File ADORs contain a file that is used for more than one record/recipient in the database being processed. Reusable object information is stored in memory as the production job is processed. This process is designed to work where Graphic or Text File ADORs contain a file that is used for more than one record/recipient.
In some unusual circumstances, it is possible for a Graphic or Text File ADOR to call an asset which is unique for every record or recipient in the database, for example a personal photo of each recipient. In this case, storing the InDesign object in memory serves no purpose and for particularly large databases, and large asset sizes, can lead to excessive memory use.
If your Graphic or Text File ADOR will be unique for every record/recipient in the database, then you can disable the caching mechanism by renaming the ADOR to include .unique at the end of the ADOR name. For example, a Graphic ADOR named "photo" can be renamed "photo.unique" to disable the caching mechanism.
Risks of disabling the caching on an ADOR
If you add .unique to the name of a Graphic or Text File ADOR which contains an asset that is used by multiple records/recipients in the database, then the InDesign object will not be cached and the object will be added to the output file for each record/recipient. This means that the print production will be slower and create a significantly larger print file than needed.
How are Unique objects used?
Unique objects are inserted directly into the output file for each record/recipient processed and are not cached. For example, an InDesign text frame that contains the body of a letter with static text as well as some Text ADOR, is considered unique since the chance of another record/recipient with the exact same values in each Text ADOR used in the text frame, is very low.
In some occasions, it is possible for a Text ADOR to contain a value which is reusable by some records/recipients in the database. For example, a Text ADOR "club level" could contain the values "Gold", "Silver" or "Bronze", where many recipients will use one of these values. If this Text ADOR is used in a text frame in InDesign either by itself, or with only static text (meaning that the text frame does not contain other unique ADORs) then it is possible to enable the caching mechanism by adding .reusable at the end of the ADOR name. For example, "club level" can be renamed "club level.reusable" to enable the caching mechanism.
Risks of enabling the caching on an ADOR
If you add .reusable to the name of an ADOR, then InDesign objects that use that ADOR will be cached and stored in memory to check for other records using that InDesign object with the same ADOR value. This means that more objects will be stored in memory, and for large databases, if used incorrectly, this increases the risk that the available memory may not be sufficient to complete the entire production job.
Asset management
Manage your assets wisely. When uCreate or uProduce processes a print file that has image or text file assets, it will search through the assets folder to confirm the required asset exists, and to set the file path and extension in the output file. If you set the assets folder to c:\ or have thousands of unnecessary files and folders in the assets folder, then it will take longer for XMPie to find and reference each asset.
In uCreate, correctly set the assets folder, and ensure it does not contain irrelevant files and folders.
In uProduce, it is possible to set many different assets folders. Before processing in uProduce, you can change the search order, or enable/disable different asset folders (e.g. for lowres and highres assets). If only a part of the campaign’s assets are required for a specific production job / document - create a designated assets source for it. Change the assets sources order or disable unnecessary asset sources, if you can, for the duration of the production.
Windows Search Indexing
Currently, the File System asset source type, which is not managed by XMPie but rather by the customer, can contain many folders and subfolders in a deep hierarchy. During production, searching for the required files may take a long time, and could thus affect asset-resolving performance.
It is possible to use Windows Indexing, when using the File System asset source type, to improve search performance. If you observe poor performance when searching for asset files, it is advisable to use Windows Indexing. For more information, see Improving Search Performance using Windows Indexing.
Table ADORs
Table ADORs are not cached as reusable objects in the print stream – they are evaluated for every recipient. Where performance is critical, avoid Table ADORs.
Production will be especially slow if the Table ADOR includes an image. The entire table is treated as unique for each recipient, so any images placed in the table will be embedded in the output for each recipient. IE if multiple recipients have the same image in their table, the image will be included in the output file multiple times.
Customers often think that using a table ADOR is the only way to add a variable number of dynamic images to the design. It is much better to use a few graphic ADORs and where the customer requires less images than the number of graphic ADORs, use simple logic to place a 1px x 1px transparent or white image instead.
Visibility ADORs
It is very common for people who are not familiar with designing for variable data publishing, to create an InDesign document with several pages or layers – each of which represents a different market segment - For example, one page/layer for male recipients; and a second for female recipients.
When the XMPie operator gets this document, it can be very easy (and lazy) to simply create a visibility rule to turn on/off the relevant page/layer in the design.
It is much more efficient to take a “template” approach and create “containers” on the page which hold text or graphics that change based on the database logic.
Use layer and page visibility only where there are significant design changes to the document layout which cannot be achieved with text/graphic/style ADORs.
XLIM
If you have XMPie PersonalEffect (and therefore have uProduce server), then you also have a feature called XLIM (pronounced “slim”).
XLIM is XMPie’s own document composition engine, similar to InDesign, but with a reduced number of design features.
Despite having a few less design options, XLIM provides a tremendous boost to performance with most documents process at least 30 times faster in XLIM.
XLIM still uses Adobe InDesign’s desktop version to create the design, but when exporting the document to a Campaign Package (CPKG) or Document Package (DPKG) to upload it to uProduce, you also have the option to save your design as a XLIM document or package.
Also, the uCreate Print's Dynamic Content panel has some options to either:
-
Check the InDesign document to see if it is compatible with XLIM.
-
Work in XLIM design mode – which warns you if you create an object which cannot be supported in XLIM.
The speed improvements offered by XLIM are so large, that many of the other performance tips suggested in this document are almost insignificant. If performance is critical for your job, then you should be working with XLIM . However, this feature is only available with the server versions of XMPie.
General prepress tips
-
Try to place ADOR objects in individual text or graphic boxes. If possible, don’t place text boxes or image boxes that contain ADORs “inline” in another text box. If there is an ADOR object in any of the boxes, it will causes the entire group to be treated as unique for each recipient, rather than just the smaller box containing the ADOR object. This will result in poor performance.
-
When placing images/graphics into the InDesign file, place them in using the Ctrl-D keyboard shortcut or File->Place menu option. Don’t copy and paste from other applications.
-
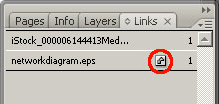
Use the Links palette to ensure that all images are “linked”. Don’t “Embed” images into the document. The icon in the image below shows that this image is embedded in the InDesign file.
-
InDesign provides some drawing tools for boxes, lines etc. Use these only for simple tasks. If you are creating more complex drawings, use Illustrator or Photoshop to create the image, and place that one item into InDesign.
-
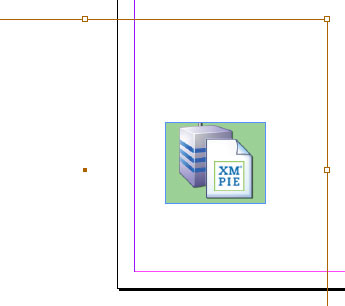
Use the Direct Selection Tool (white arrow) in InDesign to click on graphic boxes. The red line in the image below shows the full dimension of an image which has been cropped significantly in InDesign. It should be opened in Photoshop, cropped, resaved and placed again into InDesign. This will prevent excess data being sent to the printer, decrease output file size and increases performance.
-
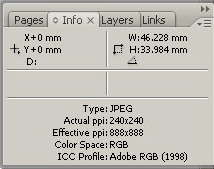
Ensure that placed bitmap images are scaled to the right size for placement in InDesign. Excess image in the print file is a main contributor to large print files. By using the “Effective Resolution” details in the Info panel you can see that the image selected in image below was originally 240dpi, but has been scaled down in InDesign and is now 888dpi which means that more than three times the amount of data necessary will be sent to the printer.
-
Don’t rotate images in InDesign other than 90 degree increments. If you need to rotate a graphic other than 0/90/180/270 degrees – reopen the graphic in Photoshop/Illustrator, rotate, save and replace in InDesign. InDesign sends the rotation instruction to the RIP. 90 degree rotations are easy mathematically for the RIP. Other increments will cause degradation in RIP performance.
Watch a video
Font tips
-
If your design includes many fonts, you may find it is faster to have your fonts already installed on the RIP, and to exclude the fonts from the print stream.
-
When designing on a Macintosh, remember that if you are going to process the document on a uProduce server, or if you wish to exclude the fonts from the print stream and load them separately to the RIP – remember that not all Macintosh fonts can be used on a Windows server. Preferably keep to OpenType (OTF) or TrueType (TTF) fonts which are cross platform compatible.
-
InDesign is not able to omit double-byte fonts from the print file. If you choose not to embed fonts, single-byte fonts will be omitted, but double-byte fonts will still be embedded, but will be subsetted. (Note: In v4.5 and earlier, when creating PDF output there is no option to omit (or subset fonts). Contact XMPie support for information on how to setup subsetting of fonts with PDF output.)
Glossary
ADOR
Automatic Dynamic Object Replacement – Also known as "Content Object". This is the XMPie object which is placed into the InDesign layout and is replaced with information from a database at the time of production.
RIP
Raster Image Processor – Most production printers will have a dedicated PC or server known as a RIP which receives the print file and process it in preparation for printing.
Subsetted / subsetting fonts
The print output file normally includes or excludes the fonts required for the job. Another option is to include only those font outlines for the characters that are actually used in the print job. This is called font subsetting. This is particularly useful for double-byte fonts which can be very large files because of the huge number of characters in the font set.
VDP
Variable Data Print – The art of combining a print design with a database. Also known as VI (Variable Information), 121 (one to one) and several other acronyms.
X-DOT
XMPie Dynamic Object Transparency – a powerful XMPie feature which enables management of transparency related issues automatically at production time.
XLIM
XMPie Less Is More – XLIM is XMPie’s own document composition engine. Similar to Adobe InDesign Server, XLIM is able to take a document and a database and create variable data print output. Because XLIM has a smaller overhead than InDesign Server, it is able to compose output much faster, but with less design features.
Watch a webinar
Designing for Performance: Optimizing VDP Designs
High volume creative VDP campaigns
Created by: Stephen Couch, last updated by Mohammad Mansour: January 2023