Advanced RIP-specific features with XMPie
Summary: This article explains advanced XMPie features, such as Dynamic Media Selection and external or references images for popular RIPs and printers.
Audience: Pre-press production staff who are responsible for creating the variable data output from XMPie and setting up the files for production on the RIP.
Prerequisites: This article assumes knowledge of XMPie products, basic Windows/Solaris Operating System skills, as required by your RIP, and experience with your RIP's user interface.
Overview
XMPie provides some output options which take advantage of different RIPs features including:
-
Dynamic Media Selection – to change paper trays for different pages in the job for each recipient.
-
Image Referencing – the ability to omit images from the output file so the data being sent to the printer is smaller and quicker to move across the network. Also some RIPs may process images faster when they are referenced outside of the print file.
This article aims to show how to use these features with a selection of different RIP/Printer combinations, highlighting common mistakes and how to avoid them.
It should be noted that while XMPie provides access to these features, it does not control the way the features are implemented on different RIPs. This article is a guide only, and some testing will be necessary to determine the best performance for your individual job, and the setup required on your RIP.
Dynamic Media Selection
XMPie enables two primary types of Dynamic Media Selection:
-
You can set a specific media type to a particular page in the InDesign template. That page will then use that paper type for each recipient. For example, page 1 will be plain paper; page 2 will be gloss paper; and this will apply to all recipients in the database. In this document, we’ll refer to this as static media selection.
-
You can also use business rules in an ADOR object to dynamically change the paper type for a particular page based on a value in the database. For example: page 1 for recipient 1 might be plain paper; but, for recipient 2, page 1 might be gloss paper. In this document, we’ll refer to this as dynamic media selection.
To achieve media selection with XMPie:
-
Set up the required media selections in the InDesign document.
-
Create the print file in a format which supports media selection.
-
Load the required paper stocks to the printer.
-
Configure your RIP and print queue to support the media selection calls.
-
Submit the print file.
The following sections describe these steps with a variety of different production RIP and printer combinations.
Setting the media selection in InDesign
Static Media Selection
-
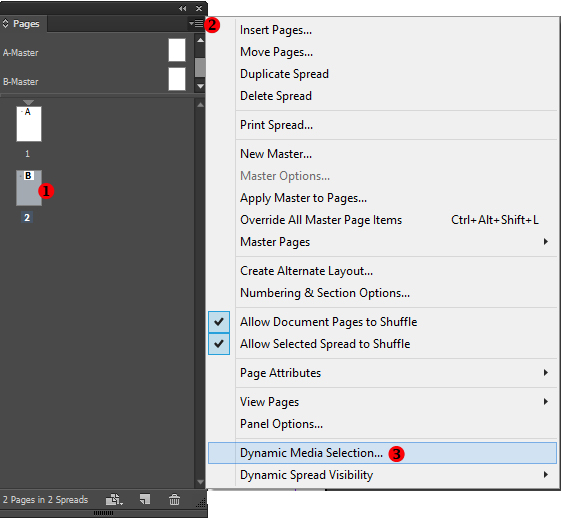
Open the Pages palette in InDesign, and select (by double-clicking) the spread or page that you want to assign to a specific media. In the example below we are setting the media for spread/page 2.
-
In the fly-out menu on the Pages palette, select Dynamic Media Selection.
This option will only appear if the InDesign document has already been connected to a database or plan file in the uCreate Print palette.
-
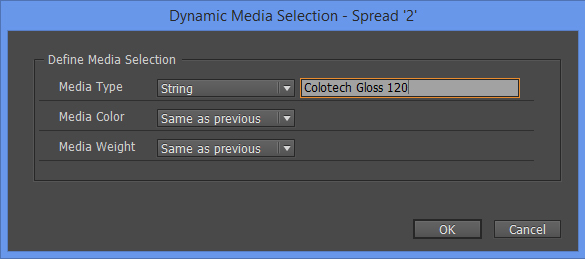
In the Dynamic Media Selection dialog, select the Media Type, Color or Weight option and enter the required value for your chosen output method as described in Entering the right media value for your output type.
.
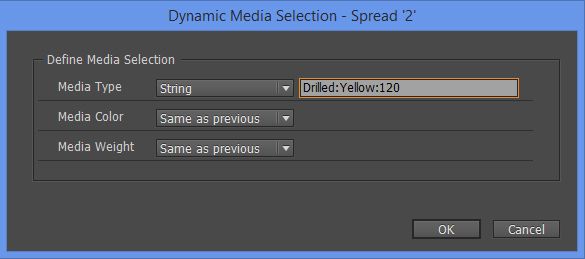
Dynamic Media Selection
-
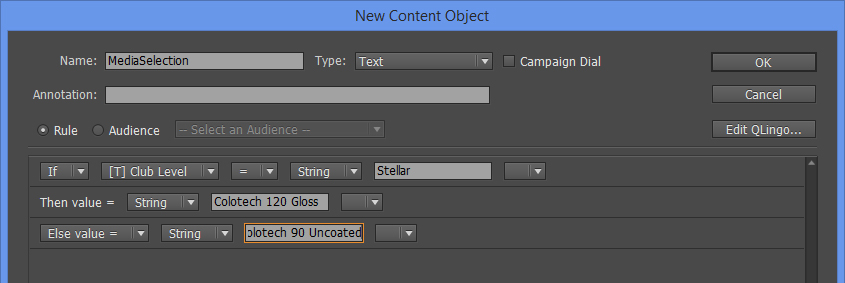
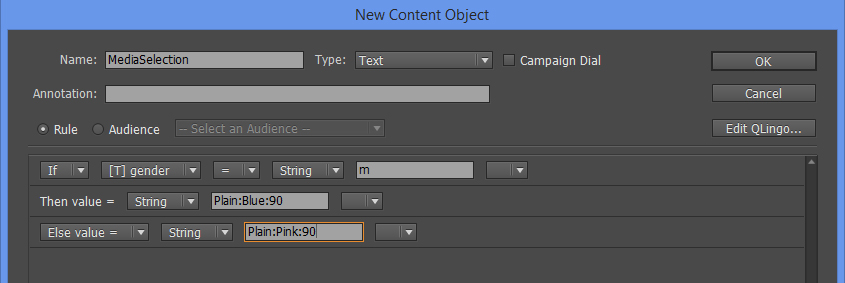
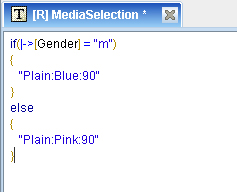
First create an ADOR object with the required logic. The value the ADOR returns should be a string value in the required format described in Entering the right media value for your output type.
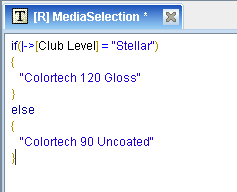
Examples of an expression to select different media based on the gender database column are presented below:
uCreate Print:
uPlan:
-
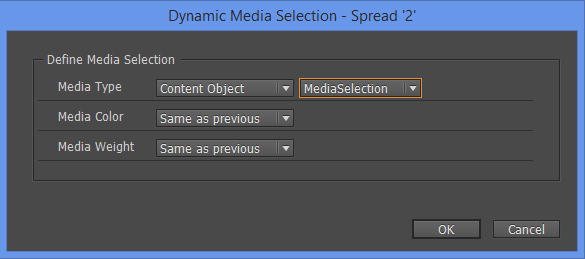
Open the Pages palette in InDesign, and select (by double-clicking) the spread or page that you want to assign the media to. In the following example we are setting the media for spread/page 2.


-
In the fly-out menu on the Pages palette, select Dynamic Media Selection.
This option will only appear if the document has already been connected to a database or plan file in the uCreate Print palette.
-
Use the Media Type, Color or Weight option to select the ADOR object you created in step 1. This is shown in Figure 5.
Entering the right media value for your output type
The trick now, is to know what media type value to enter in the Dynamic Media Selection textbox, or the ADOR object, as this will vary depending on your RIP or output device and the output format that you will choose to print.
Choosing the output format
Dynamic Media Selection is available with VIPP, VPS, PostScript, PDF/VT-1 and PPML/VDX output formats.
-
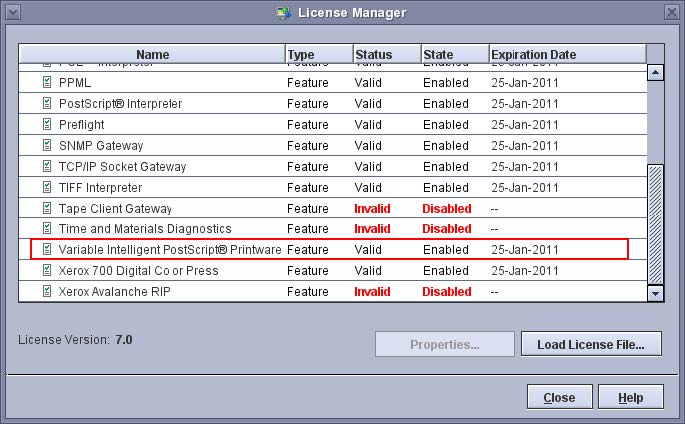
If you have a Xerox FreeFlow Print Server (FFPS), VIPP should be the most efficient output format for you. First, check that you have a VIPP license enabled on your RIP. From the Setup menu, choose Feature Licenses.
-
If you see Enabled next to Variable Intelligent PostScript Printware, then you can use VIPP output from XMPie.
-
If VIPP is Disabled, then you should use PostScript or PDF/VT-1 output from XMPie.
-
-
If you have a Creo Spire print server, then VPS should be the most efficient output method for you. VPS is available on all Creo Spire RIPs.
-
If you have a Kodak or Xeikon print server, check if it supports PPML/VDX. If so, then this should be the most efficient output method for you.
-
If you have a different print server to those listed above, check the documentation to see if it supports VIPP, VPS or PDF/VT-1 output formats. These should be most efficient if they are available. Alternatively, select PostScript.
Media type value required for VIPP output for Xerox FFPM
For VIPP output, you need to select the Media Type option, and set a value in the following format: MediaType:MediaColor:MediaWeight
Examples:
Plain:White:90
Drilled:Yellow:120
It is also possible to specify only certain media parameters, in which case you should ensure to enter the parameter in the correct place:
Examples:
Change type only: Plain::
Change color only: :Red:
Change weight only: ::90
Media type value required for VIPP output for Xerox iGen FFPM
With the Xerox iGen, the required Media Type value is almost identical to the previous example. However, the iGen requires two additional parameters in the media value:
MediaType:MediaColor:MediaWeight:MediaFrontCoating:MediaBackCoating
Examples:
Plain:White:90:Uncoated:Uncoated
Plain:White:120:Gloss:Uncoated
By default the valid settings for iGen coatings are: Uncoated, Glossy, HighGloss, SemiGloss, Satin, and Matte. It is also possible to use other coating settings, but these must first be setup on the iGen Press Interface (not the FFPM).
Media type value required for VPS output to Creo Spire print servers
For VPS output format, the Media Type value can be any text value. You can use spaces and other characters, but you must be careful that you replicate the name exactly in both Dynamic Media Selection dialog in InDesign and in the media library on the Creo RIP.
Media type value required for PPML/VDX output
The VDX output by XMPie complies with the PDM2 specification. This specification provides three media types, which can be referenced in the output:
-
Body
-
Insert
-
Cover
If you wish to output VDX for your RIP, you can enter any of these three media types in the Dynamic Media Selection dialog in InDesign, and set the appropriate media settings for the corresponding media type on your RIP.
Note that the Body/Insert/Cover keywords are case sensitive.
If your RIP processes a later specification of VDX (eg ANSI rather than PDM2), then you are not restricted to these three media types. However, to get XMPie to use media calls that are not PDM2 compliant, you must contact XMPie Support to have a registry setting changed so uCreate Print or uProduce will put non PDM2 compliant media calls into your VDX output.
Media type value required for PostScript output to Fiery EX-P2100
The EX-P2100 has pre-configured media types already defined. You must use one of: Plain, Transparency, Preprinted, Tabstock, Labels, Recycled, Heavy, Extraheavy, Lightpaper, HeavyTabstock, Usertype1, Usertype2, Usertype3, Usertype4, and Usertype5.
You can use any of these pre-defined media type values. You will later remap these values to stocks that you define. For example you can use Heavy, and later map it to a stock which is normal weight.
Media type value required for PostScript output to Xerox FFPS
FFPS has some pre-configured media types already defined. For example: Plain, Transparency, Preprinted, Postcard, Labels, Recycled, Adhesive, etc. You can choose to use one of these predefined values, or to define a custom media type. If you choose to use a custom value, you can use any string value, but you must name it exactly the same in both the Dynamic Media Selection dialog in InDesign and on the RIP stock settings. Also, remember that the values will be case sensitive on FFPS.
Note that while most Xerox FFPS rips support Media Type, some (for example Xerox Color 1000 Press) do not support Media Type, and Media Color and/or Media Weight must be used instead.
Media type value required for PDF/VT-1 output to Xerox FFPS
Only FFPS versions after v7 will support dynamic media selection with PDF/VT-1 output format. The Media Type, Media Color and Media Weight values can be either a pre-configured name or custom – same as for PostScript output type described above in section 3.2.7.
Note that while most Xerox FFPS rips support Media Type, some (for example Xerox Color 1000 Press) do not support Media Type, and Media Color and/or Media Weight must be used instead.
Media value required for PostScript output to other devices/printers
It is possible that other printers which are PostScript-compatible may be able to use Dynamic Media Selection from XMPie PostScript output. You will have to refer to your printer’s documentation or contact the manufacturer.
XMPie puts the media call into the PostScript in the following format:
<</MediaType (xxx)>> setpagedevice
Where xxx will be the value you enter into the Dynamic Media Selection dialog. You will have to determine whether your RIP/printer will support the MediaType parameter of the setpagedevice PostScript call, and what value is required to achieve the selection of the media you want on your printer.
If your printer does not support media selection based on the MediaType setpagedevice PostScript call, it is also possible to enter more complex PostScript commands which will replace or redefine the setpagedevice operator. This requires a strong knowledge of PostScript programming, and a registry change which instructs XMPie to accept PostScript commands in the Dynamic Media Selection dialog, or ADOR object.
To set this registry setting, create a new string value called:
UserWritesCompleteMediaCommand
At this location:
\\HKEY_LOCAL_MACHINE\SOFTWARE\Wow6432Node\XMPie\Common\1.00.000
Set the data value to: 1

For uProduce servers with extension servers, the registry setting needs to be made on all servers Directors and Extensions.
Note: It is recommended to make a backup of the registry before making changes. Errors in the registry can make the system inoperable.
To use custom PostScript setpagedevice commands with uCreate Print on Macintosh, edit:
Library->Application Support->XMPie->XMPRegistry.plist
Create two new lines as below:
<key> UserWritesCompleteMediaCommand </key> <string>1</string>
Note: Customizations to the registry and the XMPRegistry.plist files will be removed if you “repair” or “modify” the uProduce Server or uCreate Print installer, or if you upgrade to a newer version.
Now that you have set the registry to accept custom PostScript commands, you need to identify from your RIP vendor the setpagedevice command that is needed in the PostScript.
For example, for the EFI Fiery RIP on a Xerox 700 DCP, the values that should be entered into the Dynamic Media Selection dialog to select different trays with XMPie PostScript output are:
<< /XJXsettrayselV2 [ 1 ] >> XJXEFIsetpageproperties %%Tray 1
<< /XJXsettrayselV2 [ 4 ] >> XJXEFIsetpageproperties %%Tray 2
<< /XJXsettrayselV2 [ 5 ] >> XJXEFIsetpageproperties %%Tray 3
<< /XJXsettrayselV2 [ 20 ] >> XJXEFIsetpageproperties %%Tray 4
<< /XJXsettrayselV2 [ 2 ] >> XJXEFIsetpageproperties %%Tray 5
As you can see, these settings are very specific to the RIP/printer involved. Therefore, you need to get this information from your RIP/Printer vendor and it is not possible for XMPie Support to provide advice on this.
Creating the print file with XMPie
uCreate Print
-
On the uCreate Print fly-out menu, choose Dynamic Print and select required output Format. The image below shows the selection of VIPP output from uCreate Print.

uProduce Server
-
Select the document in uProduce and click Process. Select the required Print Format. The image below shows the selection of VIPP output.
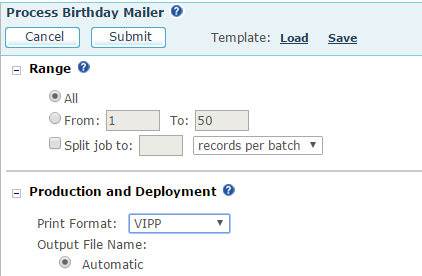
VIPP Project Container option
If you are printing to VIPP output on uProduce, there is another option which you may choose to select. XMPie provides an option to create a VI Container or VPC (VIPP Project Container) as shown below:
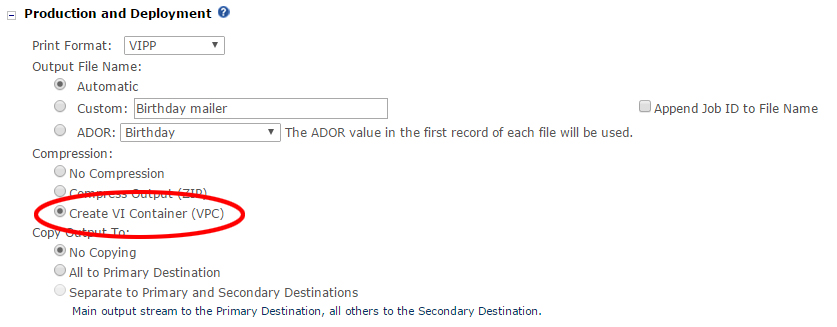
A VPC is a zip file containing the print file, plus assets and resources separate to the print file, but included in the zip. If you choose to use this feature, the print queue that you submit the job to must be setup to receive a VPC so the assets and resources will be unzipped and placed into the correct places on the RIP. For more information the RIP settings to use for VPC, refer to Section 3.4.2.
RIP setup for Dynamic Media Selection
Setup on FFPS for VIPP job submission
-
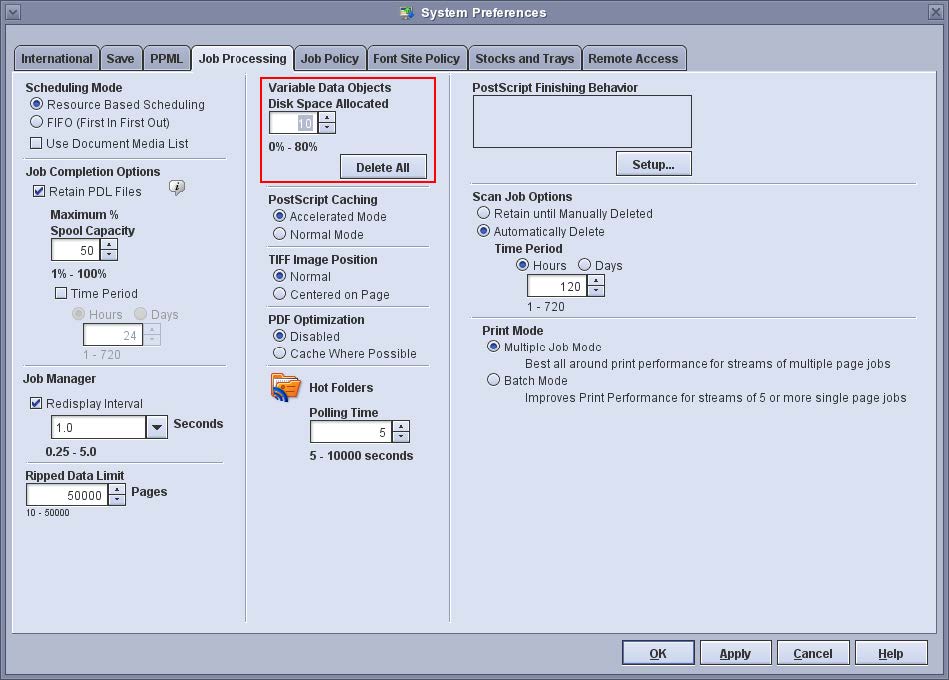
Firstly, under Setup select System Preferences, on the Job Processing tab is a setting which requires some thought. The setting highlighted in the image below enables you to determine how much disk space will be allocated to Variable Data Objects. The more disk space you allocate to Variable Data Objects, the more images can be cached. But, the more disk space you allocate to Variable Data Objects means less disk space for holding print jobs in the completed queue.
-
Create a new Queue to submit your VIPP jobs to. From the FFPS Queue menu select New Queue.
-
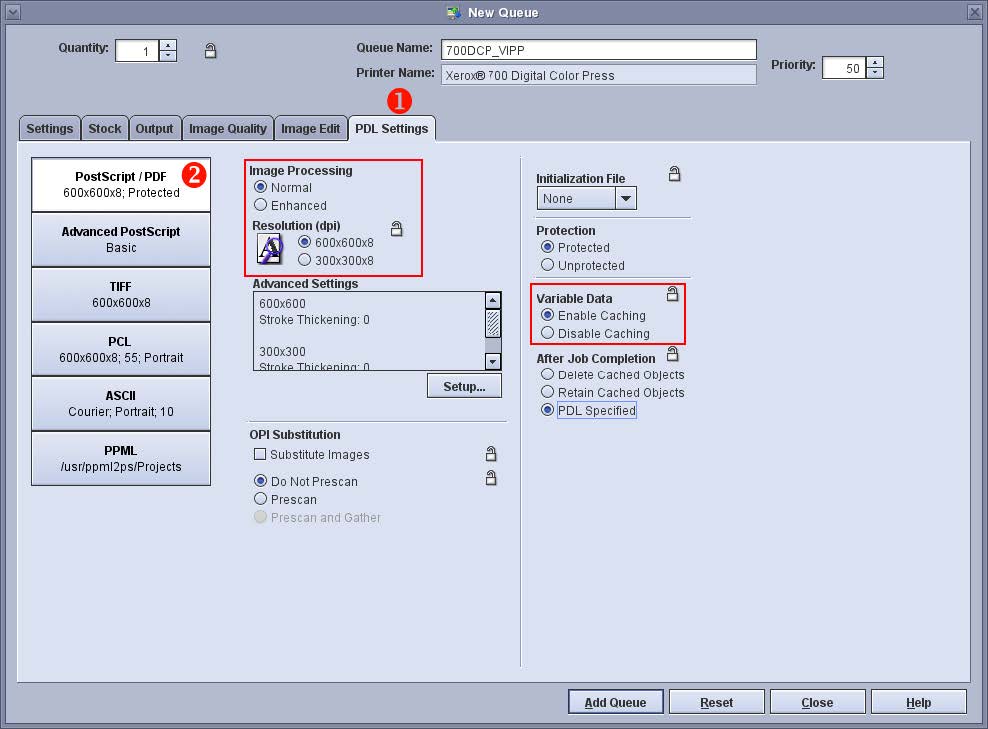
On the PDL Settings tab, PostScript / PDF section. There some more settings which need some thought and consideration. Refer to the image below.
-
Image Processing sets the resolution that will be used when the VIPP/PostScript will be processed. The default setting is Enhanced, which processes at 600x600 dpi. Normal will process at 300x300 dpi. Enhanced provides slightly better image quality, but takes significantly longer to process. It is recommended to test Normal to see if it suits your needs. (Note that most other comparative RIPs eg Creo/Fiery use 300x300 dpi processing.)
-
Resolution is the resolution that the job will be sent to the printer. All Xerox production printers print native 600x600 dpi. Reducing this resolution will not save you much time, but will cost you in print quality.
-
Under Variable Data, you need to ensure Caching is Enabled. (This is the default when creating a new queue.)
-
-
Load the required media into the printer. Note: all media for the job must be the same sheet size.
-
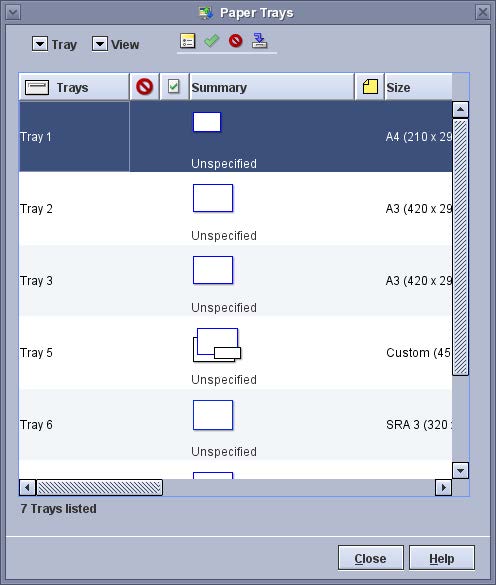
From the Printer menu on the RIP, select Paper trays.
-
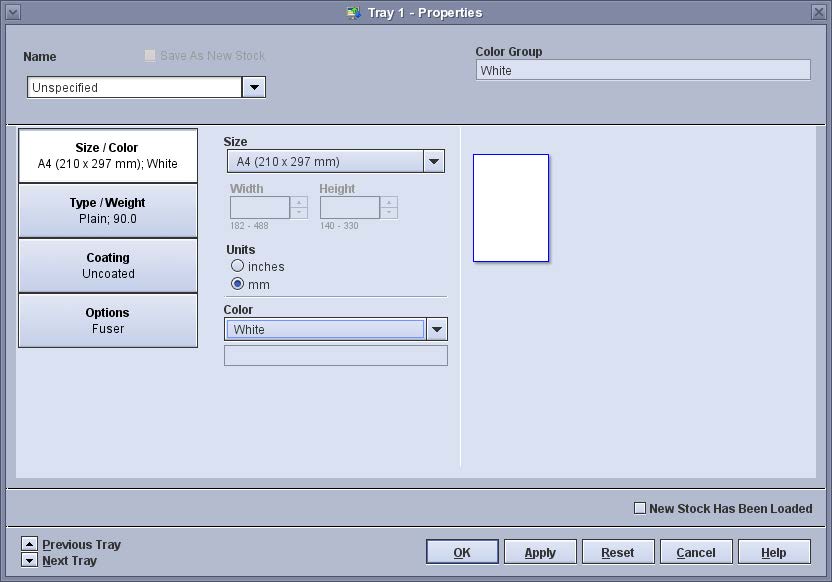
Double click the first tray you loaded media into.
-
Ensure the name is set to Unspecified. Set the Media Type, Media Color, Media Weight. Note: the values you set here must be the same as the values you entered into the Dynamic Media Selection dialog in InDesign or set in the ADOR object.
-
Set any other paper attributes relevant to your media – e.g. coating, and sheet size etc.
-
Click OK and repeat for any additional paper trays required for your job.
-
You are now able to submit the job to the new queue.
Additional setup on FFPS for VPC job submission
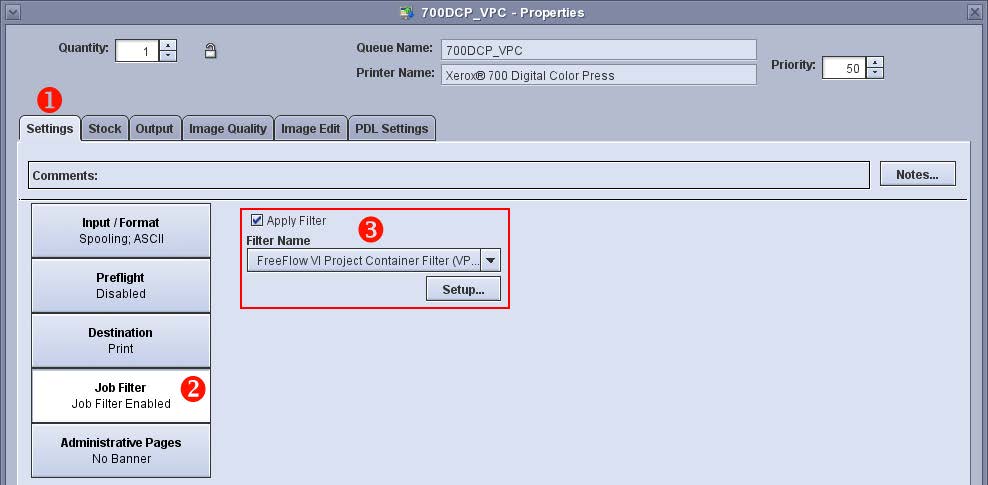
When processing to VIPP on the uProduce Server, XMPie provides an option to create a VPC (VIPP Project Container). In order to use the VPC file on your FFPS, you need to follow the same steps as outline above, plus, there is one additional setting you need to make to the Queue.
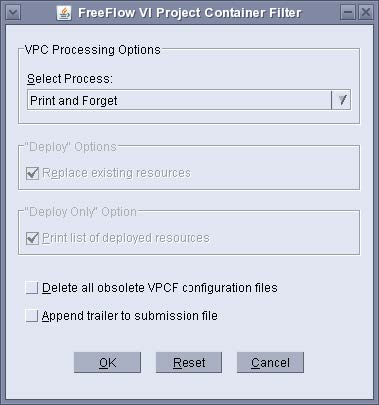
In the Queue Properties dialog, on the Settings tab, click the Job Filter section. Click Apply Filter and select the FreeFlow VI Project Container Filter as shown below:
Setup on the Creo Spire for VPS job submission
To use XMPie Dynamic Media Selection with Creo VPS, you can follow these steps:
-
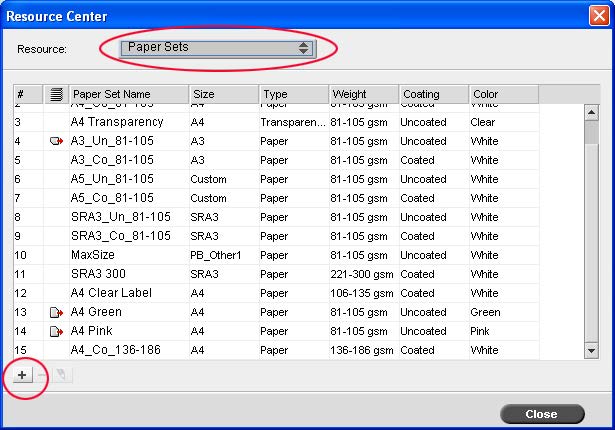
On the Creo, open the Resource Center by clicking on the relevant icon, or select Resource Center… from the Tools menu.
-
Change the Resource drop-down from Virtual Printers to Paper Sets.
Depending on the version of your Creo, this may be called Paper Stocks.
-
Click the + icon in the lower left corner to create a new paper set with the required attributes. In the example pictured, we are using two paper sets: “Colotech 120 Gloss” and “Colortech 90 uncoated”:
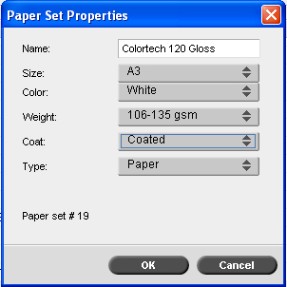
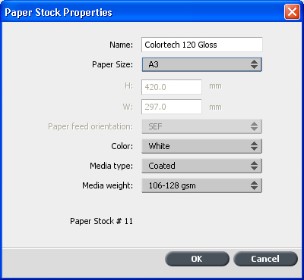
-
Click OK to create your new paper set, and repeat for any additional stocks required for your job.
-
In the Resource Center dialog, change the Resource drop-down to Virtual Printers. Click the + icon in the lower left to create a new virtual printer.
-
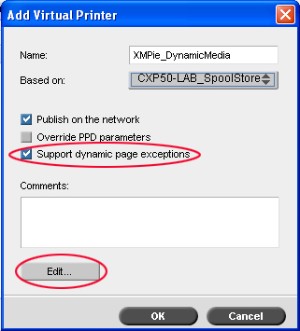
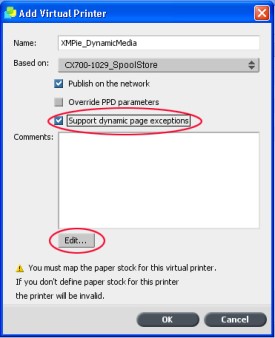
Enter a name for your virtual printer and check the box to Support dynamic page exceptions as shown below.
-
In the Based on drop-down list, select an existing queue for this one to be based on (e.g., SpoolStore/ProcessPrint/ProcessStore).
-
Click the Edit button to set defaults for this new virtual printer.
-
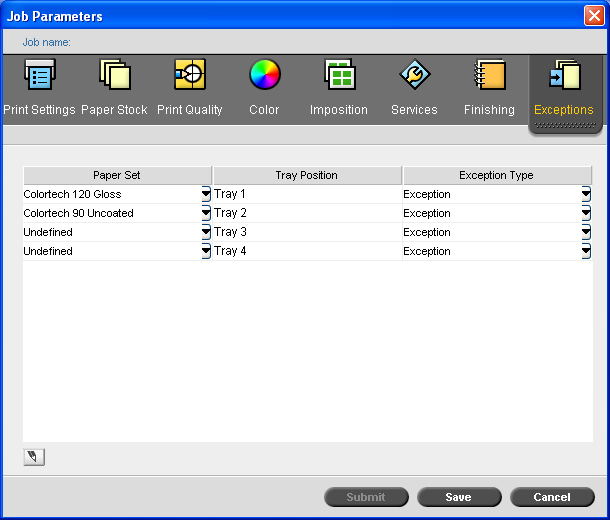
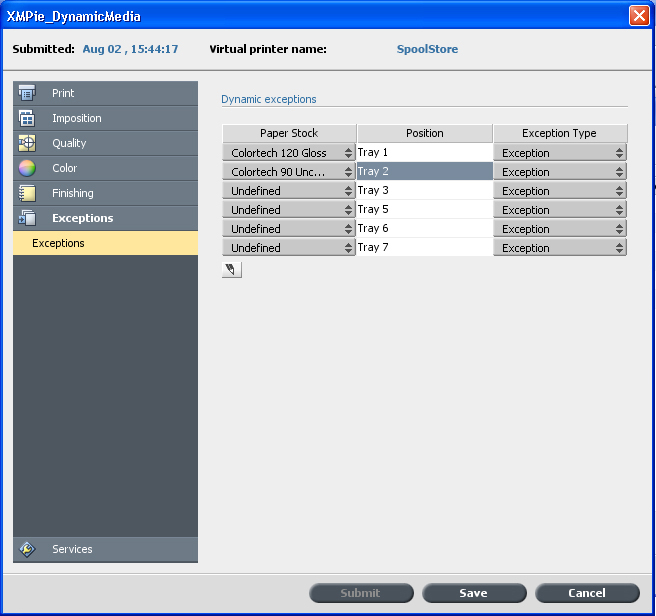
On the Exceptions tab, select the paper set required for your job, and assign it to the tray that you will load this paper to in the printer as shown below:
-
On the Paper Stock tab select the paper set that will be used for the first sheet of your job as shown below.
If you do not do this step, you will have to make this setting on the job after you submit it to the queue
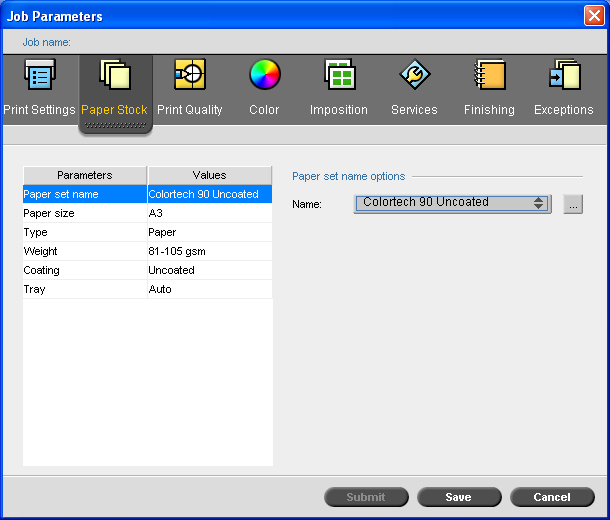
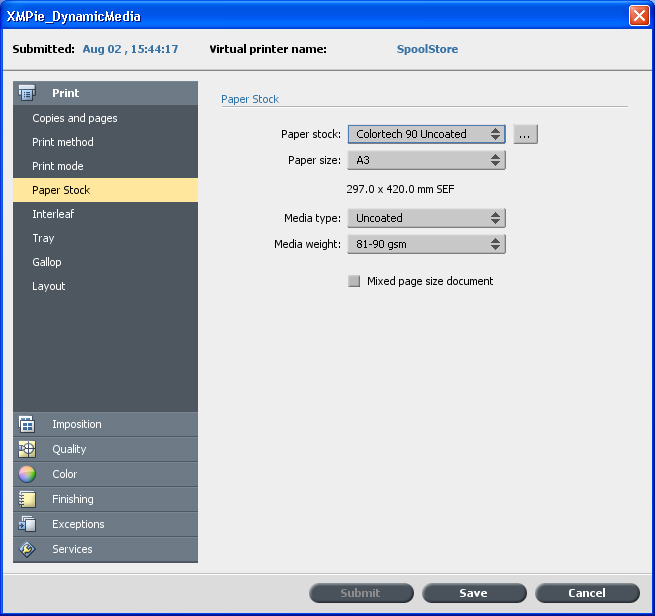
-
Click Save, to exit the settings, click OK to save your new virtual printer, and then close the Resource Center.
-
You are now able to submit the job to the new virtual printer.
Setup on the Xerox FFPS v8 and later for PostScript job submission
-
Load the stocks required for your job into the printer. If you are prompted to set the stock attributes when you close the tray, then do so.
-
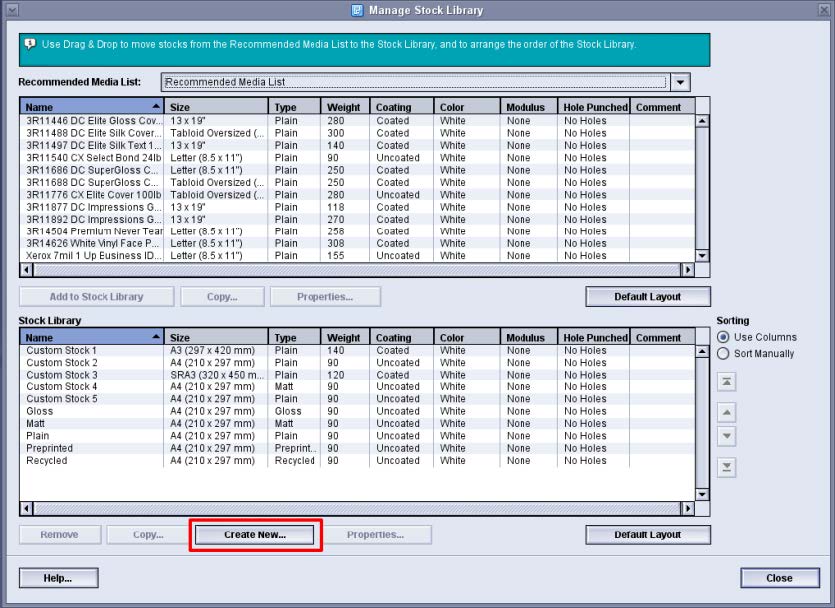
Open the Stock Library Manager. Click the Stock Library… button.

-
Click the Create new… button.
-
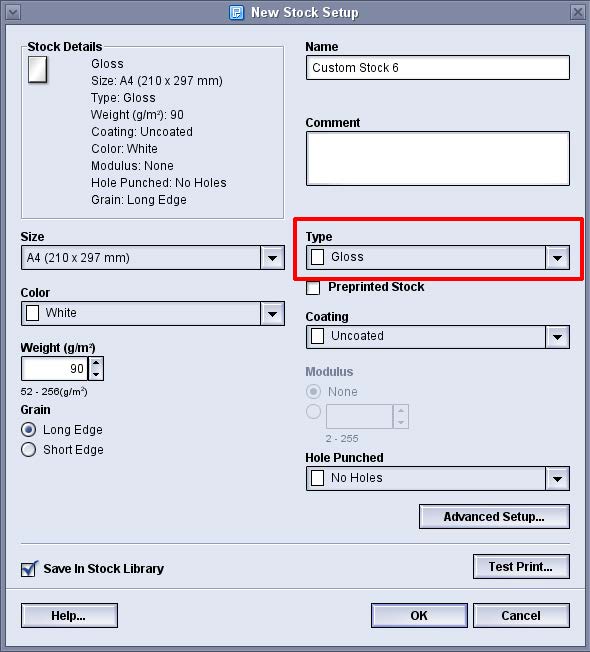
From the Type drop-down, select the same name that you entered into the Dynamic Media Selection dialog in InDesign, or in the ADOR object.
-
If the media type you used is not available in the drop-down list, select Custom from the drop-down. In the next dialog, enter the New Stock Type Name, and click the Add Type >>> button until all the required stock names are in the custom stock list. After closing the dialog, they will appear in the drop-down list. Select one for this new stock definition.
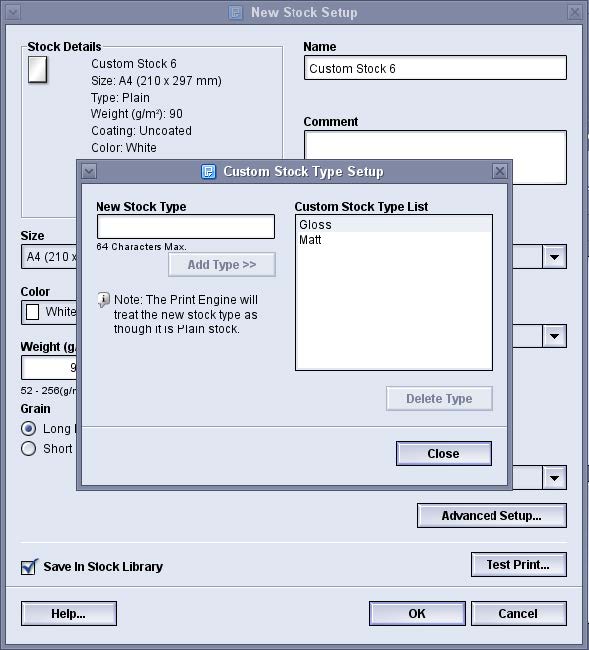
-
Click Advanced Setup. Ensure the Stock by Name Only checkbox is NOT checked. Click OK.
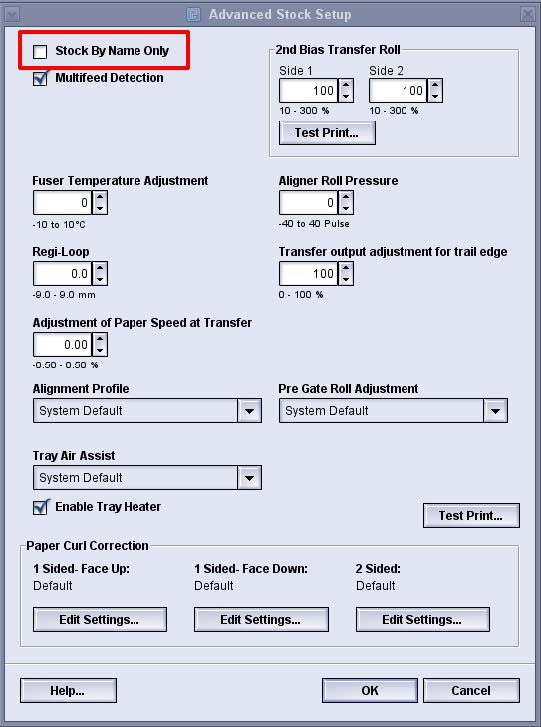
-
Enter a descriptive Name for your new stock type, and define the other stock settings eg sheet size, orientation, weight, coating, etc. Then Save the new stock type.
-
In the Stock Library Manager, click the tray where you loaded your stock, and select your newly defined stock name from the library list. In the image below, Matt is in tray 1 and Gloss is in Tray 3.
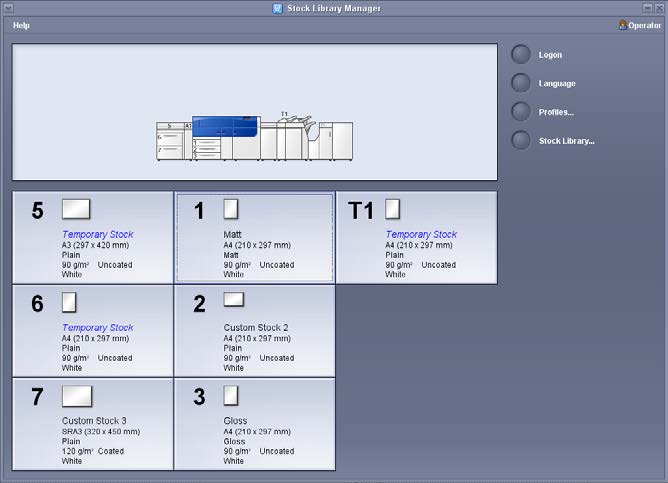
-
Create a new Queue for your job submission. On the Settings tab, Input format section, set the Format to PostScript.
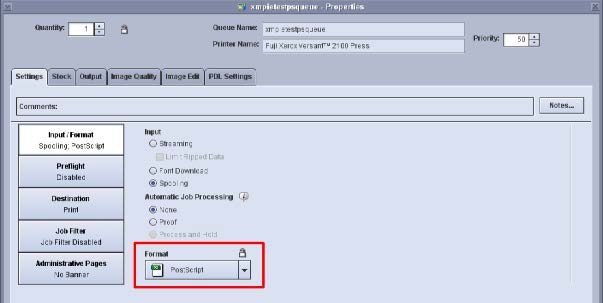
-
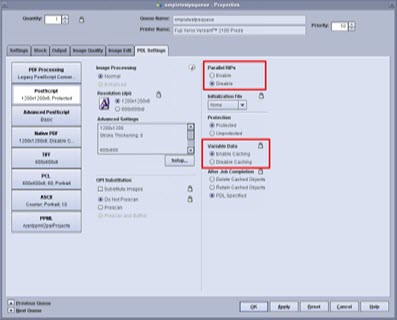
On the PDL Settings tab, Postscript section, disable Parallel RIPs and enable Variable Data Caching. You may also want to test reducing the Resolution to 300dpi instead of 600dpi. Reducing the resolution will make processing faster if you feel the image quality is sufficient at 300dpi.
-
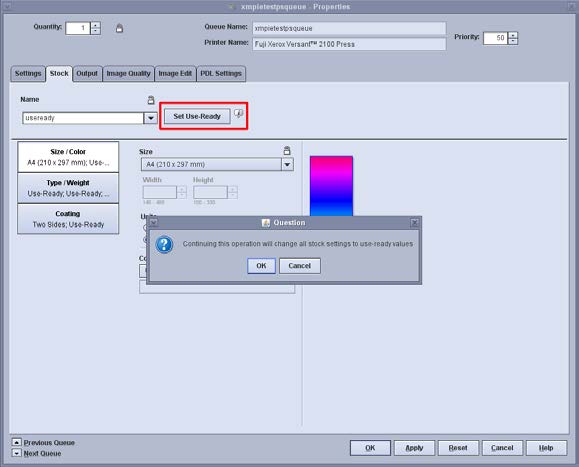
On the Stock tab, click the Set Use Ready button. Then click OK to the confirmation dialog. You queue is now ready. Enter a descriptive Name for the queue, and save it.
-
Submit your job to this queue as per normal.
Setup on the Xerox FFPS v8 and later for PDF/VT-1 job submissions
-
Load the stocks required for your job into the printer. If you are prompted to set the stock attributes when you close the tray, then do so.
-
Open the Stock Library Manager. Click the Stock Library… button:

-
Click the Add new… button:

-
From the Type drop-down, select the same name that you entered into the Dynamic Media Selection dialog in InDesign, or in the ADOR object:

-
If the media type you used is not available in the drop-down list, select Custom from the drop-down. In the next dialog, enter the new stock type Name, and click the Add Type >>> button until all the required stock names are in the custom stock list. After closing the dialog, they will appear in the drop-down list. Select one for this new stock definition:

-
Click Advanced Setup. Ensure the Stock by Name Only checkbox is NOT checked. Click OK:

-
Enter a descriptive Name for your new stock type, and define the other stock settings, such as sheet size, orientation, weight, coating, etc. Then save the new stock type.
-
In the Stock Library Manager, click the tray where you loaded your stock, and select your newly defined stock name from the library list. In the image below, Matt is in tray 1 and Gloss is in Tray 3.

-
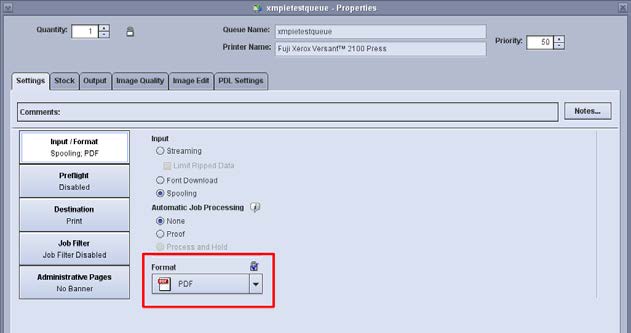
Create a new Queue for your job submission. On the Settings tab, Input format section, set the format to PDF and lock it.
-
On the PDL Settings tab, PDF Processing section, set to use the Adobe PDF Print Engine.

-
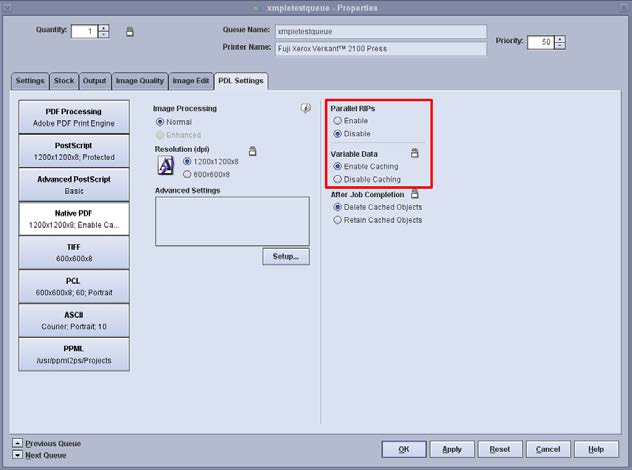
On the PDL Settings tab, Native PDF section, select Disable for Parallel RIPs, and select Enable Caching for Variable Data.
-
On the Stock tab, click the Set Use Ready button. Then click OK to the confirmation dialog. Enter a descriptive Name for the queue, and save it:

-
Submit your job as per normal.
Setup on the Xerox FFPS v7 and earlier for PostScript job submission
-
Load the stocks required for your job into the printer. If you are prompted to set the stock attributes when you close the tray, then do so.
Note 1: All sheet sizes should be the same.
Note 2: When using PostScript output type and named media type with your FFPS, you must use the same stock color/weight/coating for all stocks required in the tray. (Of course you can load different colored stock in one tray, but you need to set the printer and RIP saying it is the same color as the other media. Loading paper that has a different weight or coating than what you specify is NOT recommended.)
-
Depending on your output device, you may need to configure Custom Paper Types on the Printer. (EG, this step is not necessary for Nuvera, but is required for DocuColor 700.) On the DC700 you must login to the printer console as administrator and enter Tools mode to set up the custom paper settings. Refer to your printer’s documentation for more information.
-
Follow steps 1-3 as described in Setup on FFPS for VIPP job submission.
-
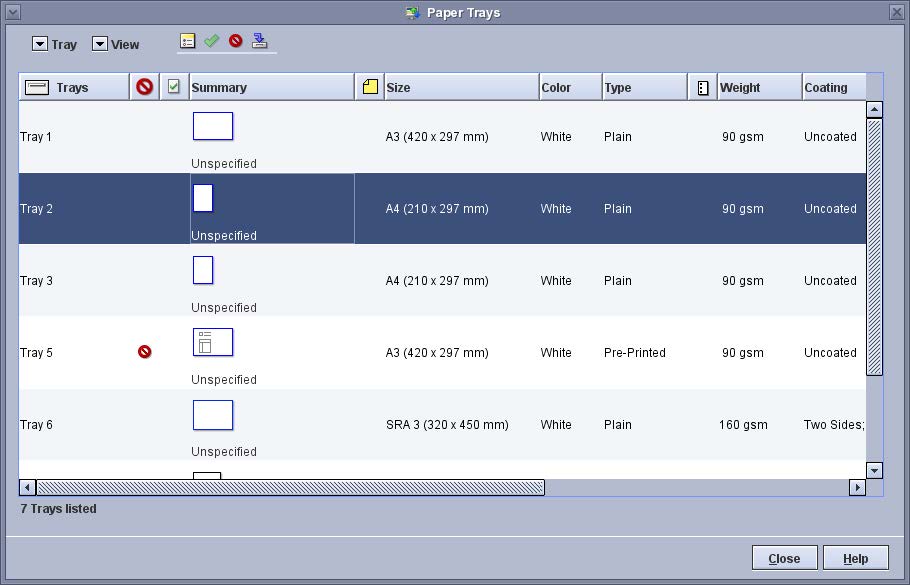
On the RIP, select Paper Trays from the Printer menu.
-
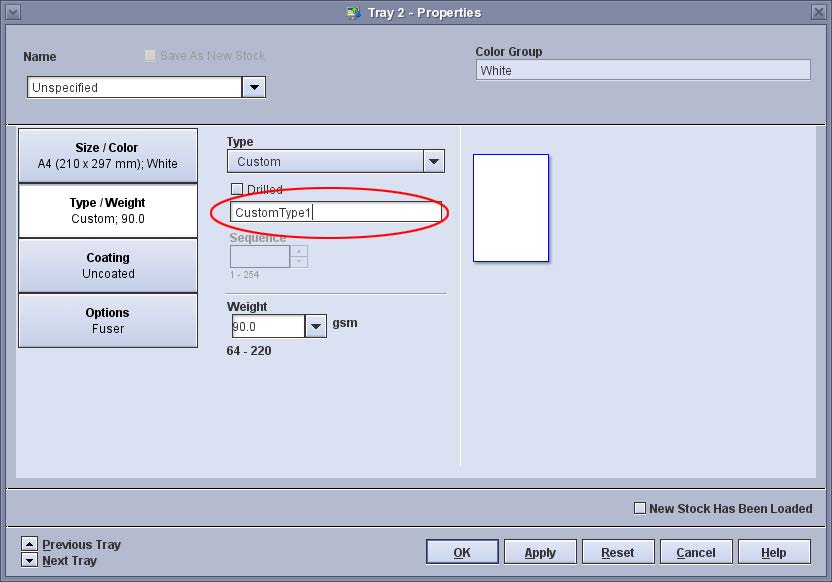
Double-click on the tray which you loaded the first stock. Leave the stock name as default or Unspecified. Set the size/color. Click Type/Weight, select Custom from the Type menu. Enter the name of the stock exactly as you did in the Dynamic Media Selection dialog InDesign, or in the ADOR you are using for media selection.
-
Click OK, and repeat step 5 for additional media required for your job.
For PostScript output, only the custom name can be different. Size/Color/Weight/Coating options must be the same. (Of course you can load different colored stock in one tray, but you need to set the printer and RIP saying it is the same color as the other media. Loading paper that has a different weight or coating than what you specify is NOT recommended.)
-
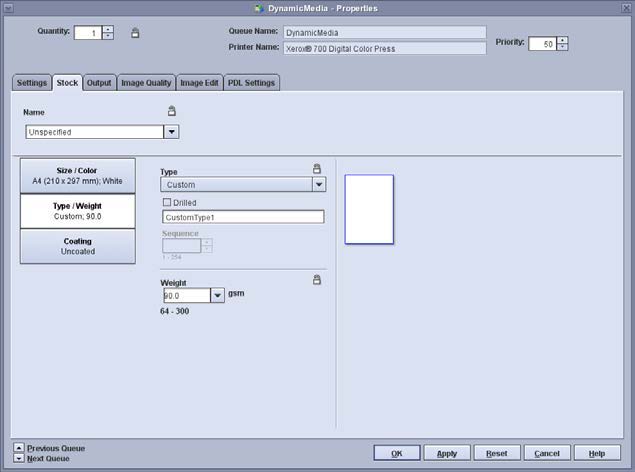
Create a new queue to (see Setup_on_FFPS_for_VIPP_job_submission). On the Stock tab, ensure that the media is set for the first page of your job.
-
You are now able to submit the job to the new virtual printer.
Setup on the Fiery EX-P2100 for PostScript job submission
-
Load the stocks required for your job into the printer. If you are prompted to set the stock attributes when you close the tray, then do so.
-
Open the Stock Library Manager. Click the Stock Library button.

-
Click the Create new … button.

-
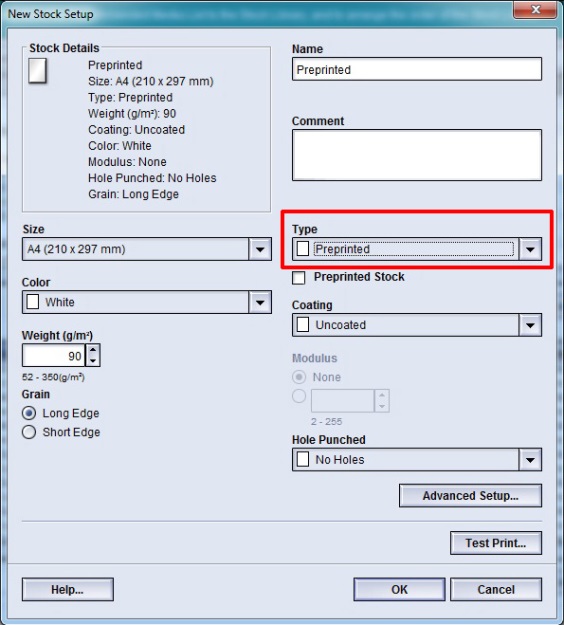
From the Type drop-down, select the same name that you entered into the Dynamic Media Selection dialog in InDesign.
The Fiery does not permit custom media type names. You must use one of the media types predefined by EFI.
-
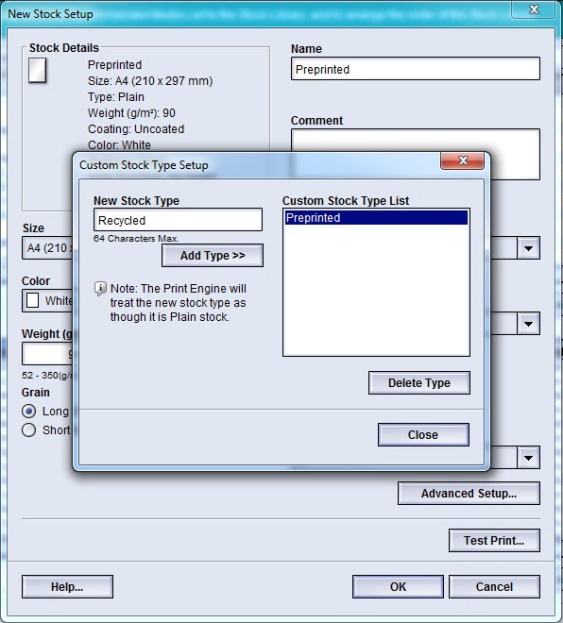
If the EFI Media Type name is not available in the Versant stock library Type drop-down list, select Custom. In the next dialog, enter the new media type Name, and click the Add Type >>> button. Repeat until the required stock names are in the custom stock list. After closing the dialog, they will appear in the drop-down list.
-
Click Advanced Setup. Ensure the Stock by Name Only checkbox is NOT checked. Click OK.

-
Enter a descriptive Name for your new stock type, and define the other stock settings eg sheet size, orientation, weight, coating, etc. Then save the new stock type.
-
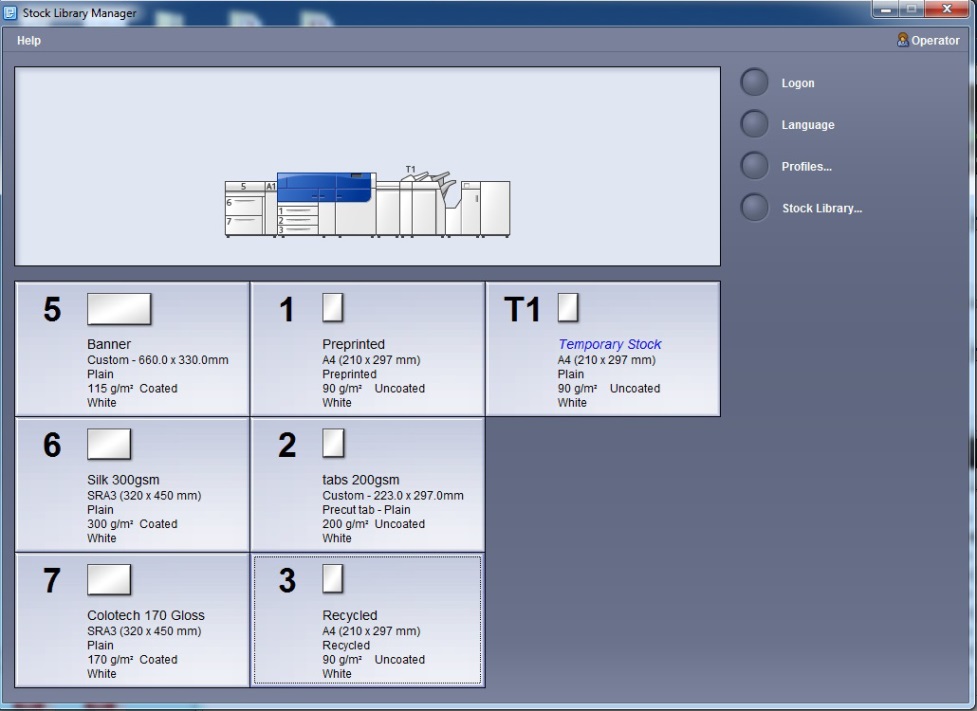
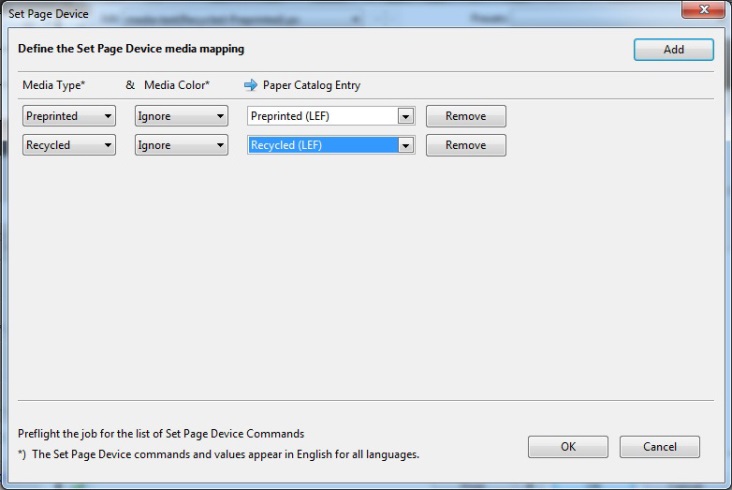
In the Stock Library Manager, click the tray where you loaded your stock, and select your new stock. In the example pictured below, we have Preprinted in tray 1, and Recycled in tray 3.
-
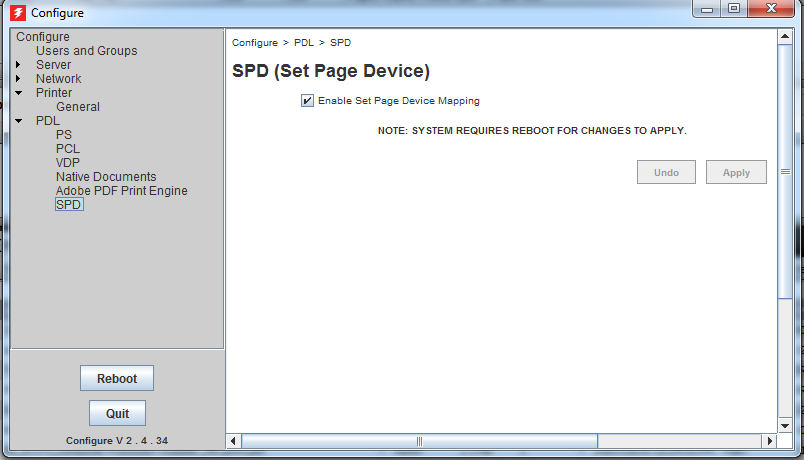
Login to Command Workstation and select Configure from the Server menu.
-
Click PDL and then click SPD. Check the box to Enable Set Page Device Mapping, and Apply your change. If you needed to enable this setting, click Reboot.
-
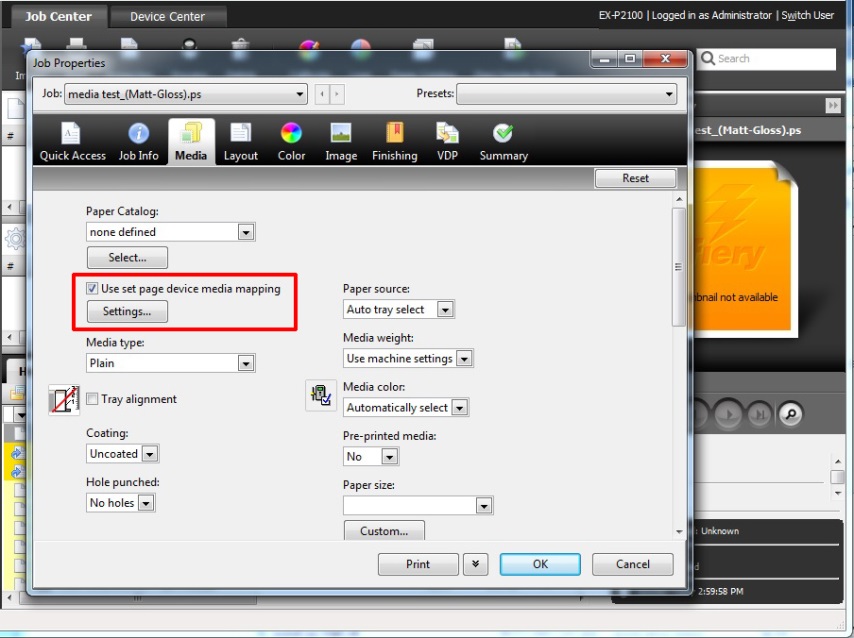
Import your PostScript file into the Command Workstation Hold Queue, and double click to open the Job Properties dialog.
-
On the Media tab, check the Use set page device media mapping box. Then click the Settings… button.
-
For each of the media types defined in your job, click Add. From the Media type drop-down, select the media type name that you entered into the Dynamic Media Selection dialog in InDesign. From the Paper Catalog Entry drop-down, select the name of the stock that you just created in the Versant stock library.
-
Click OK and submit your job.
Dynamic Media Selection limitations
-
At the time of writing, Dynamic Media Selection is only supported with VIPP, VPS, PS, PDF/VT-1 and PPML/VDX output types. IE other output formats (PPML/PS, PDF, Adobe PDF, and Legacy PDF) do NOT support Dynamic Media Selection.
-
Do not use XMPie’s Step and Repeat feature, or your RIP’s imposition feature when using Dynamic Media Selection.
-
All required media trays in the RIP/Printer must be the same size. It is a limitation of PostScript that all pages in the document must be the same size.
-
Some RIPs will not automatically rotate the output image to suit mixed portrait/landscape loading of media in one job. If you experience problems, ensure that all media trays are loaded in the same orientation. (IE all long-edge feed, or all short-edge feed.)
Image Referencing
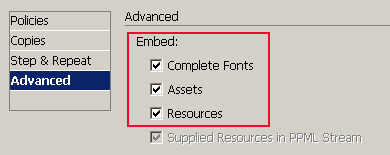
Normally, when creating your print output from XMPie, you will choose to Embed the Assets and Resources as shown in Figures 48 and 49. This means that the images will be included in the output file which you have to send to the printer.
Note: Even if you choose to embed images in the output stream, if your document contains the same image in several places, XMPie includes the image in the output stream only once, and references the object for subsequent appearances.
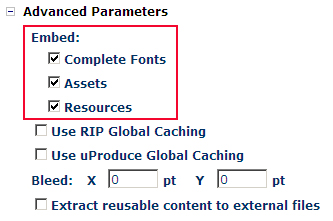
But, in some cases, for example when you have a document that you print regularly against different databases, if it includes several large images, it could be more efficient to store the images on the RIP, and exclude them from the output file. This means the output file will be much smaller and take less time to send to the printer.
To exclude the images from the output file, and insert “references” to the image name, simply uncheck the Assets and/or Resources checkbox.
-
Assets refers to images which are variable in your document (where a graphic ADOR is selecting the image to display for each recipient), while
-
Resources refers to images which are static – they are not Graphic ADORs and will be the same for all recipients.
If your print job is only ever run once, then it is not particularly efficient since you still need to copy the images to the RIP – although you may choose to do this via external media rather than copying them over the network.
Referenced images with Xerox FFPS and VIPP
To process your VIPP output file when images are omitted from the print stream, follow these steps:
-
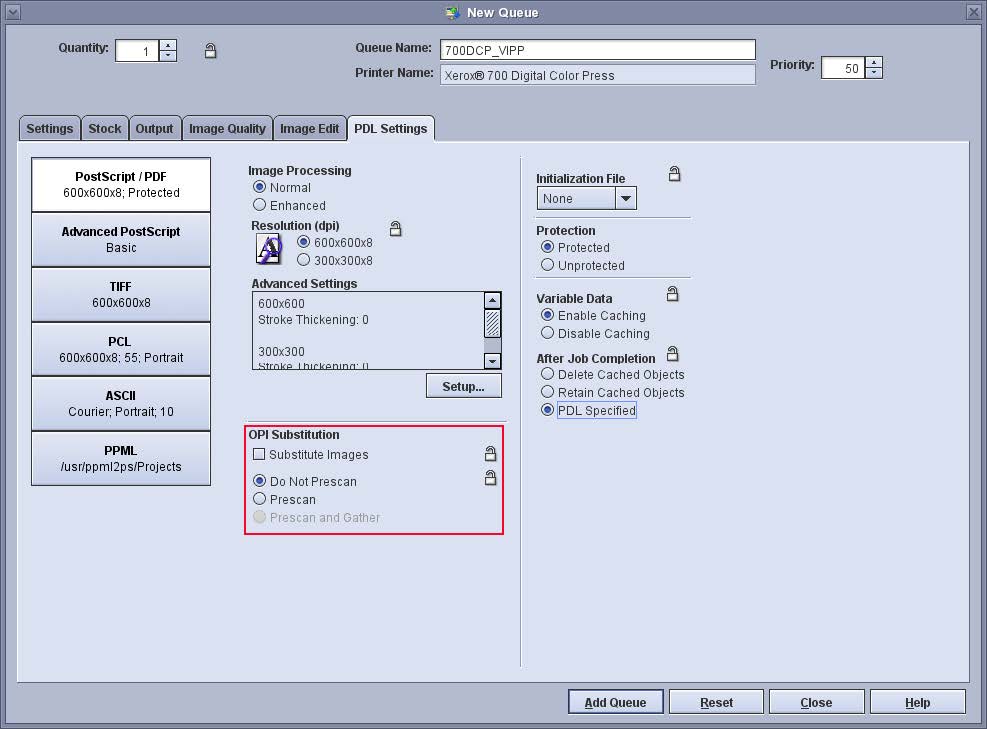
Create a new print queue on the RIP as described in section Setup on FFPS for VIPP job submission.
You do not need to enable the OPI (Open Prepress Interface) setting which is used by some print systems to replace low resolution images with high resolution versions at the time of production.
-
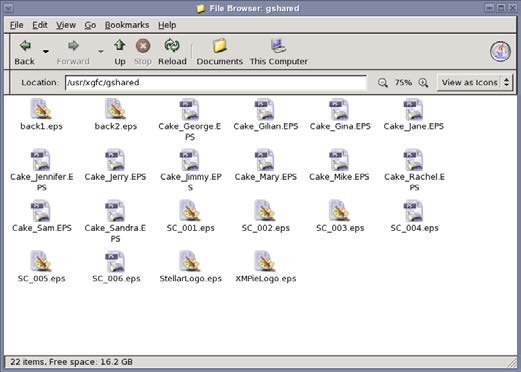
Copy the required images to the FFPS. You can move the files to the server via CD/USB/FTP/SMB – whatever medium is convenient. (Refer to the FFPS User Guide for more information on how to connect to the RIP’s file system.) The place to put the image files on the RIP is: /usr/xgfc/gshared.
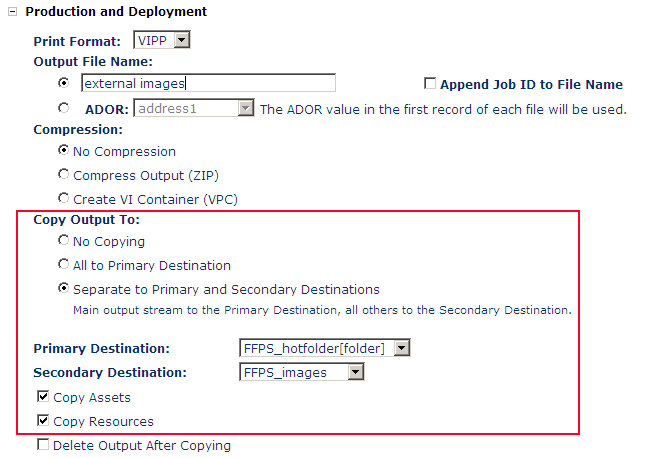
When processing the VIPP output from uProduce, it is possible to send the output file and images to the RIP automatically during production. To do this, first create two output destinations in uProduce:
-
One being an FTP site, network path or network printer – to send the output print file to.
-
One being a network path – to send the assets and resources to the required images folder on the RIP.
This feature requires you to setup an SMB share on the FFPS using Samba. Refer to the FFPS User Guide for more information on how to do this. Once you first print the job to both destinations, if there are no additional assets or resources, you can choose to send only the print file.
-
-
If creating output via uCreate Print, or uProduce (without copying to a secondary destination) you can submit your print file normally, once you have copied all the required images to the gshared folder.
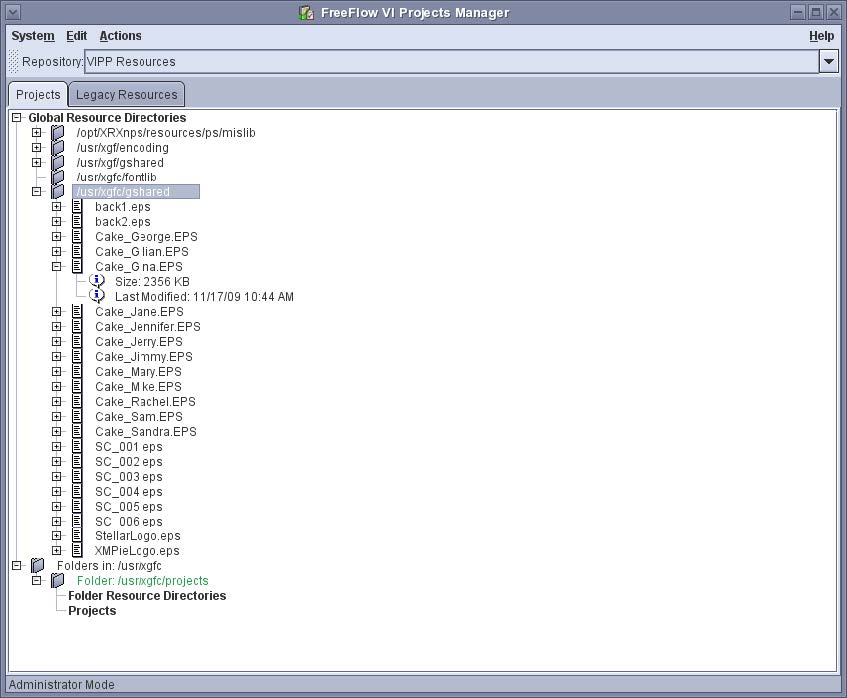
It is also possible for you to manage the images you have on the RIP, by selecting VI Projects Manager from the System menu.
Using VI Project Container (VPC) with FFPS
When producing VIPP output with uProduce, you also have the option of creating a VPC file.

A VPC is a zip file containing the print file, plus assets and resources separate to the print file, but included in the zip. If you choose to use this feature, the print queue that you submit the job to must be setup to receive a VPC so the assets and resources will be unzipped and placed into the correct places on the RIP. For more information the RIP settings to use for VPC, refer to Section Additional setup on FFPS for VPC job submission.
Referenced images with Creo Spire and VPS output
To process your VIPP output file when images are omitted from the print stream, follow these steps:
-
Create a new print queue on the RIP as described in section Setup on the Creo Spire for VPS job submission.
-
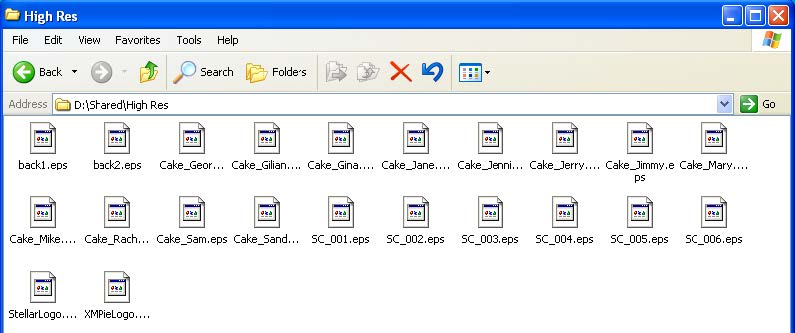
Copy the required images to the Creo. You can move the files to the server via CD/USB/FTP/SMB – whatever medium is convenient. (Refer to the User Guide for more information.) The place to put the image files on the RIP is: D:\Shared\High Res or \\<servername>\Shared\High Res.
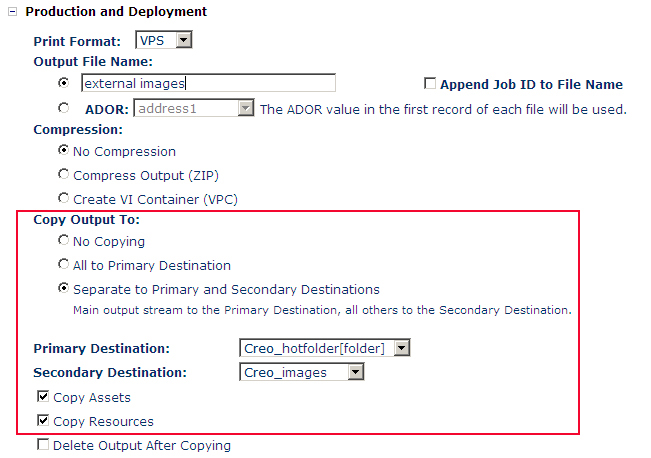
When processing the VPS output from uProduce, it is also possible to send the output file and images to the RIP automatically at the same time.

To do this, first create two output destinations in uProduce:
-
One being an ftp site, network path or network printer – to send the output print file to.
-
One being a network path – to send the assets and resources to the required images folder on the RIP.
Once you first print the job to both destinations, if there are no additional assets or resources, you can choose to send only the print file.
-
-
If creating output via uCreate Print, or uProduce (without copying to a secondary destination) you can submit your print file normally, once you have copied all the required images to the High Res folder.
Tips and tricks with image referencing
I made a change in my image, but I still get the old image when I print
One of the most common problems reported by customers when they start to use externally referenced images, is that they will update an image on the local computer and print the document from InDesign, but the image remains the same on the print out.
You must also remember to update the copy of the image which is on the RIP!
Images are reported missing on FFPS, but they’re there
Remember that the FFPS uses a Solaris operating system, which has case-sensitive file names. It is common for customers to copy the files to the correct spot on the file system, and get confused when the RIP reports some images as missing. Closely double check the case of any images reported missing...
I selected to not embed images, but the output file size is the same
Only certain image types can be excluded from the print file:
-
VPS and VIPP support EPS/JPG/TIFF outside of the print file.
-
PPML supports only EPS outside of the print file.
Check your image assets and resources types to ensure that they can be supported outside of the print file.
Glossary
ADOR
Automatic Dynamic Object Replacement – Also known as “Content Object”. This is the XMPie object which is placed into the InDesign layout and is replaced with information from a database at the time of production.
Cache / Caching
When a RIP processes an element which is tagged as reusable, it will hold this element in its processed state, so that when the next time this element is required in the job, it is already processed and ready to go.
FFPS
FreeFlow Print Server – A Xerox RIP or print server, originally called DocuSP, later versions are known as FreeFlow Print Server.
DPI
Dots Per Inch / Pixels Per Inch – this is a measure of the resolution or quality of an image. The higher the resolution, the higher the DPI, and the larger the file size.
Global Cache
Caching is normally done on a job-by-job basis, however some RIPs support global caching which enables the RIP to hold a processed copy of the element to use in following print jobs. This is useful when processing multiple batches of the same job, but can cause problems/confusion if the image is later changed and the job reprinted...
PDF/VT-1
A format of PDF designed for variable data or transactional print. It can include additional information such as recipient meta data.
PDM2
PDM2 is a specification of the VDX output format. Refer to VDX for more information.
Pixel
The smallest, most basic unit of an image. Rows of pixels of different color and density make up images for digital print, television and computer display.
PPML
Personalised Print Markup Language – PPML is an XML-based output format developed by the Digital Print Initiative (PODi).
Raster
To convert page text and graphic data to lines of pixels which a printer can transfer to paper.
RIP
Raster Image Processor – Most production printers will have a dedicated PC or server known as a RIP which receives the print file and process it (rasters it) in preparation for printing.
Reference / Referencing
VIPP, VPS and PPML output formats have a feature called “referencing” which enables for certain image types to be omitted from the main print file and found in a separate file which is “referenced” from the main print file.
VDX
Variable Data eXchange – (Also called PPML/VDX), is based on a subset of the PPML specification and is developed by the Committee for Graphic Arts Technologies Standards (CGATS). XMPie outputs VDX which is PDM2-compliant. PDM2 provides legacy support for PPML v1.5. Later versions of VDX are ANSI-compliant, which supports PPML v2.0.
VIPP
Variable-data Intelligent PostScript Printware – Developed by Xerox, VIPP is an output format based on PostScript, but with some additional features to address PostScript’s limitations for variable data print.
VPC
VIPP Project Container – a zip file which contains a print file and the resources (images etc) required to print. The Xerox FFPS (with a properly configured print queue) will extract the resources into the necessary folders on the RIP.
VPS
Variable Print Specification – VPS is a PostScript-based output format developed by Scitex (now Print On Demand Solutions, a Kodak company). Like VIPP it includes some additional features to better support variable data print.
Additional information
For more information, refer to the relevant user guide:
-
uProduce Reference Manual
-
uCreate Print User Guide
-
Your RIP User Guide
Created by: Steve Couch, last updated: February 29, 2016

