Creating Custom uStore Reports
Summary: This article describes how to create a custom uStore report.
Audience: XMPie customers wishing to create custom reports in uStore.
Prerequisites: Knowledge of XMPie products and MS SQL queries is required to create custom reports for uStore, but no additional knowledge is required for this walkthrough.
The sample SQL query in this document links to multiple tables within the uStore data structure. In order to modify or create reports tailored to your business, SQL knowledge is essential.
Note that the data structure of the XMPie system may change with future upgrades, so some modification of custom reports may be necessary to ensure operability after upgrades.
Overview
In this walkthrough, we will create a custom report for uStore that will be available via the uStore Back Office Reports page.
The sample report in this document incorporates the additional data needed to do a monthly Cost Center report. This report can be filtered by Store and Date Range, and then exported to Excel for further formatting and manipulation.
Advanced Reports
If you have an understanding of the uStore custom reports structure but still require additional help, either for more complex reports or some custom integration, you can contact XMPie Professional Services.
XMPie Professional Services is a contract service offered to our customers that require custom integrations or solutions.
SQL Query
The first thing required for your custom report is the SQL query to retrieve the necessary data. In this example, we will be creating a report to return Billing Information relating to Cost Centres used within a specified Store and Date Range.
When the uStore Admin user runs the report, they need to be able to choose the store and the date range that is of interest to them. To do this, we add three parameters to the query, @Store which will be used to select the store, @StartDate which will be used to enter the earliest date to include in the report, and @EndDate which will be used to enter the last date to include in the report.
The query has been tested against the uStore Database and is ready to have the three parameters mentioned above added to the WHERE statement in order to retrieve the necessary records.
SELECT
CONVERT(char(11),o.[DateOrderCreated],113) AS "Order Date",
CONVERT(char(5),o.[DateOrderCreated],108) AS "Time",
CAST(u.[FirstName] + ' ' + u.[LastName] AS varchar(100)) AS "Name",
CAST(o.[ClearingResult] AS XML).value('(/UserData//CostCenter/node())[1]', 'varchar(max)') AS "Cost Centre",
o.[EncryptedOrderID] AS "Order ID",
op.[TotalQuantity] AS "Total Pages",
CONVERT(decimal(10,2),o.[BillAmount]) AS "Total Price"
FROM [uStore].[dbo].[Orders] o
LEFT OUTER JOIN [uStore].[dbo].[Province_Culture] bst ON (o.[Bill_State] = bst.[ProvinceID] AND bst.[CultureID] = [uStore].[dbo].fn_StoreSetupCulture(o.[StoreID]))
INNER JOIN [uStore].[dbo].[Store] s ON (s.[StoreID]=o.[StoreID])
INNER JOIN [uStore].[dbo].[Store_Culture] sc on (s.[StoreID]=sc.[StoreID] and sc.[CultureID]=[uStore].[dbo].fn_StoreSetupCulture(o.[StoreID]))
LEFT OUTER JOIN [uStore].[dbo].[Customer] c ON (o.[CustomerID] = c.[CustomerID])
INNER JOIN [uStore].[dbo].[Users] u ON (c.[UserID] = u.[UserID])
LEFT OUTER JOIN [uStore].[dbo].[Coupon] cpn ON (o.CouponID = cpn.CouponID)
LEFT OUTER JOIN [uStore].[dbo].[CouponBatch] cpnb ON (cpn.CouponBatchID = cpnb.CouponBatchID)
LEFT OUTER JOIN [uStore].[dbo].[ClearingConfig] cc ON (o.PaymentMethodId = cc.ClearingConfigId)
LEFT OUTER JOIN [uStore].[dbo].[OrderProduct] op ON (o.OrderID = op.OrderID)
WHERE
o.[IsCart]=0 AND
op.[IsDraft]=0 AND
o.[IsSaveForLater]=0 AND
o.[StoreID]=1 AND
o.[DateOrderCreated]>=’01/01/2012’ AND
o.[DateOrderCreated]<DATEADD(d,1,’01/01/2015’) AND
op.[TotalQuantity] IS NOT NULL
ORDER BY o.[DateOrderCreated], u.[FirstName]
To prepare the SQL query for the report parameters, we will replace the SQL values for the uStore Parameters in the following lines.
o.[StoreID]=@StoreIDAND
o.[DateOrderCreated]>=@StartDate AND
o.[DateOrderCreated]<DATEADD(d,1,@EndDate) AND
The uStore Reports page will automatically add three user controls where the uStore Admin user can choose the store, the report start date and the report end date. There is no special coding required to add these three user controls to the uStore Reports page.
Adding the Report
To add a new report to the uStore Reports page:
-
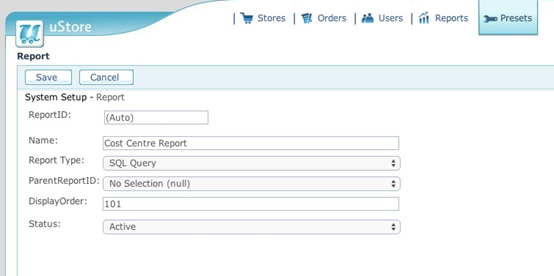
Create a new report in Presets > System Setup > Report.
-
Fill in the following information:
-
Name: Cost Center Report
-
Report Type: SQL Query
-
ParentReportID: No Selection (Null)
-
DisplayOrder: 101
-
Status: Active
-
-
Click the Savebutton:
-
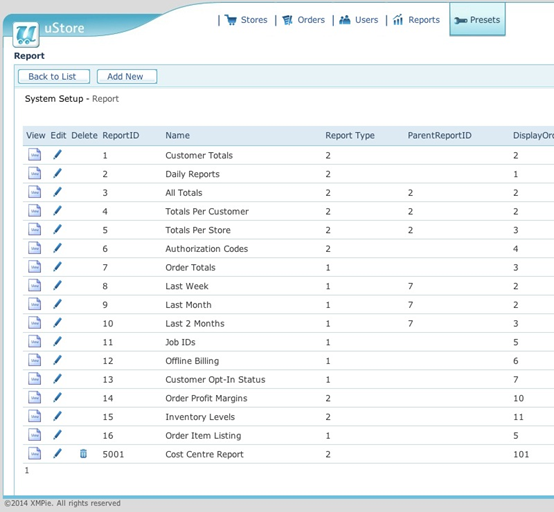
When you are returned to the Report list, take note of the ReportID for the report you have just created, we will need that number later. In this walkthrough the ReportID is 5001:
-
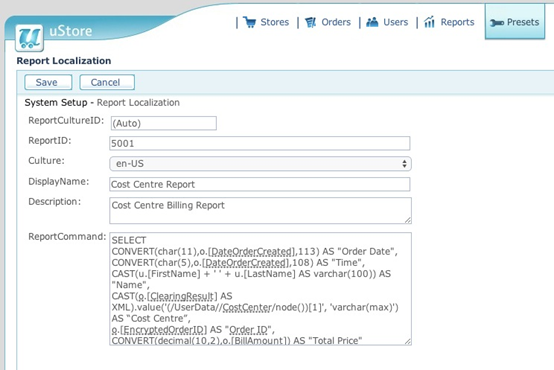
Add the SQL query to the language localizations for the new report.
In this example, the uStore Admin only has “US English” localization enabled. If you have additional languages enabled in your uStore Admin, you must add the reports for each localization. If the SQL query is not added to the language localization you use in uStore Admin, the report will not appear in that language.
The following steps should be repeated for each language localization used in uStore Admin.
-
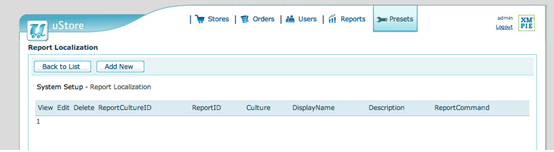
Click the Add New button on the System Setup – Report Localization page:
-
Fill in the following information:
-
ReportID: 5001
-
Culture: en-US
-
Display Name: Cost Centre Report
-
Description: Cost Centre Billing Report
-
ReportCommand: PASTE THE SQL QUERY HERE
-
-
Click the Save button:
-
Adding the Report Parameters
We now need to define the Report Parameters we added to the WHERE statement of the SQL query (@StoreID, @StartDate, @EndDate).
These report parameters will allow the logged in Admin user to select the Store and the Date range to run the report for so we retrieve only the information we require.
We are going to create a Drop Down List that will be populated with only the Stores that the logged in Admin user has access to, as well as two text fields to enter a Start Date and End Date for the report. The Start Date and End Date need to be entered using the US date format i.e. the 1st of May 2014 will be entered thus: 05/01/2014.
To add report parameters:
-
Go to Presets -> System Setup -> Report Parameter.
-
Click the Add New button:
-
Enter the following information for the new StoreID Report Parameter.
The ReportID number is the number we took note of in the first step.
-
ReportID: 5001
-
Name: StoreID
-
IsUserEditable: True
-
DisplayOrder: 1
-
Status: Active
-
IsViewable: True
-
ControlName: ParamListBox
-
ValueLookUpQuery:
SELECT 'Value' = S.StoreID, 'Name'=SC.Name, 'Selected' = 0 from Store S join Store_Culture SC ON (S.StoreID=SC.StoreID and SC.CultureID=dbo.fn_StoreSetupCulture(S.StoreID)) JOIN fn_UserStores(@ActiveUserId, 12) US ON (S.StoreID = US.StoreId) WHERE S.StatusID <> 2 ORDER BY SC.Name ASC
-
-
Click the Save button:

-
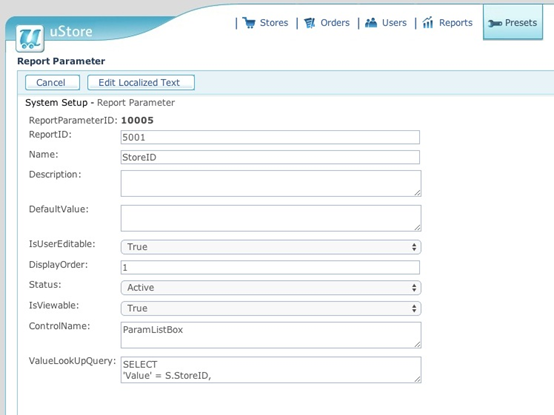
Go back to the Report Parameter list, and click the Edit icon (the pencil) for your newly created “StoreID” parameter.
-
On the Report Parameter Edit screen, note the ReportParameterID number, as you will need it shortly. In this walkthrough the ReportParameterID is 10005:
-
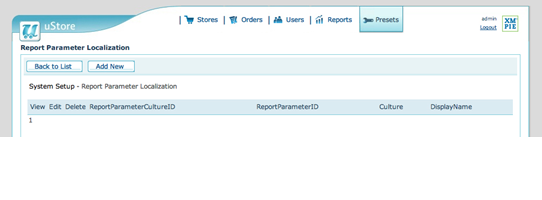
You will now see a new button labelled Edit Localized Text. Click the Edit Localization Text button.
-
On the Report Parameter Localization list page, click the Add New button to add a new Report Parameter Localization entry:
-
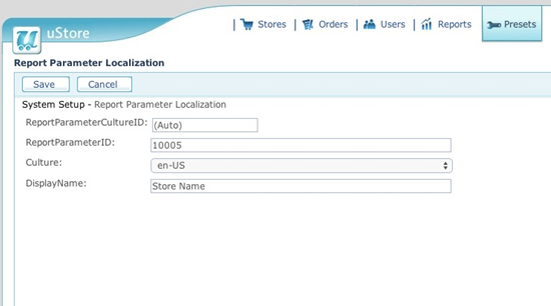
Enter the ReportParameterID number that you noted earlier. In this walkthrough the ReportParameterID number is 10005.
-
Select the Culture from the drop-down list. In case the en-US culture has been renamed, it will be the first culture in the list.
-
Enter your Display Name. This is the human readable label that will be shown to the Admin user in the uStore Admin Report selection page.
-
Click the Save button:
-
To add other localization parameter labels, click the Add New button on the Report Parameter Localization page (Figure 8) and repeat the above steps. You would then enter the DisplayName written in the appropriate Culture language.
-
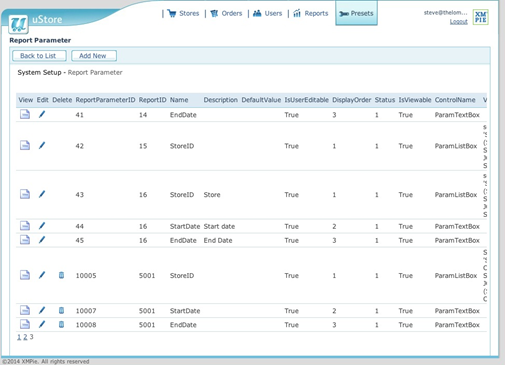
Go back to the Report Parameter list (Figure 5) and we will now add the remaining “StartDate” and “EndDate” parameters. Because the steps are the same as the “StoreID” parameter, simply use the parameters below:
-
ReportID: 5001
-
Name: StartDate
-
IsUserEditable: True
-
DisplayOrder: 2
-
Status: Active
-
IsViewable: True
-
ControlName: ParamTextBox
-
ValueLookUpQuery: LEAVE BLANK - Do not add anything in the form field.
-
ReportID: 5001
-
Name: EndDate
-
IsUserEditable: True
-
DisplayOrder: 3
-
Status: Active
-
IsViewable: True
-
ControlName: ParamTextBox
-
ValueLookUpQuery: LEAVE BLANK - Do not add anything in the form field.
-
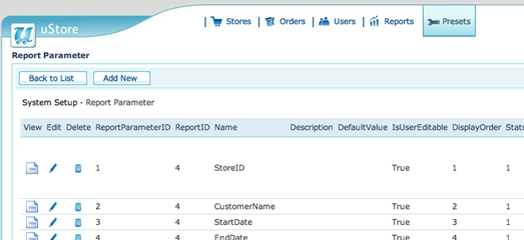
Once completed, your Report Parameter list page should show the following parameters in the last page. Notice that the ReportID’s are all referencing ReportID 5001:
Accessing the New Cost Center Report
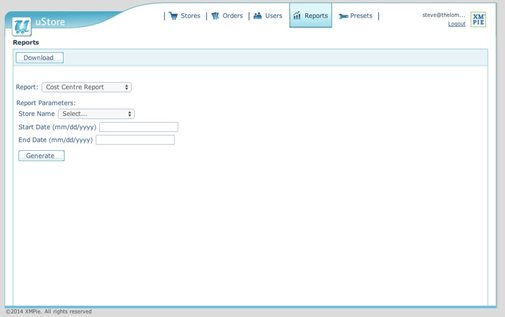
You can now test the custom report by accessing it via the uStore Back Office Reports page. The new report will be available via the Report drop-down list under Order Details.
When you choose the Cost Centre report, the 3 parameters (StoreID, StartDate and EndDate) will show with the label localization that you entered earlier.
The Start Date and End Date need to be entered using the US date format i.e. the 1st of May 2014 will be entered thus: 05/01/2014.
Created by: Steve Lomax, last updated: July 2, 2014