XMPie Support for Encrypted File System (EFS)
Summary: This document describes how to configure an Encrypted File System (EFS) and how to apply the EFS technology to XMPie products. This document is intended for Domain Controller-based networks.
Audience: XMPie customers who have a Domain Controller and who wish to encrypt their XMPie application file system data files.
Important: It is the full responsibility of the IT department to configure the EFS. XMPie does not provide support for this process, nor is XMPie liable in any way for its results.
What is EFS?
According to Microsoft:
The Encrypted File System, or EFS, provides an additional level of security for files and directories. It provides cryptographic protection of individual files on NTFS file system volumes using a public-key system.
Typically, the access control to file and directory objects provided by the Windows security model is sufficient to protect unauthorized access to sensitive information. However, if a laptop that contains sensitive data is lost or stolen, the security protection of that data may be compromised. Encrypting the files increases security. (Microsoft - File Encryption)
This document provides a step-by-step guide to configuring EFS and applying EFS technology to XMPie products.
Hardware and Software Requirements
The following are the minimal hardware and software requirements for configuring EFS:
-
A Windows 2012 or above domain controller
-
At least one server with Windows 2012 server or later
-
At least 50GB of storage per Windows server and/or shared folder that are formatted as NTFS for the EFS storage
Domain Controller Configuration
Adding a Certification Authority on the DC
Install the following roles and features:
-
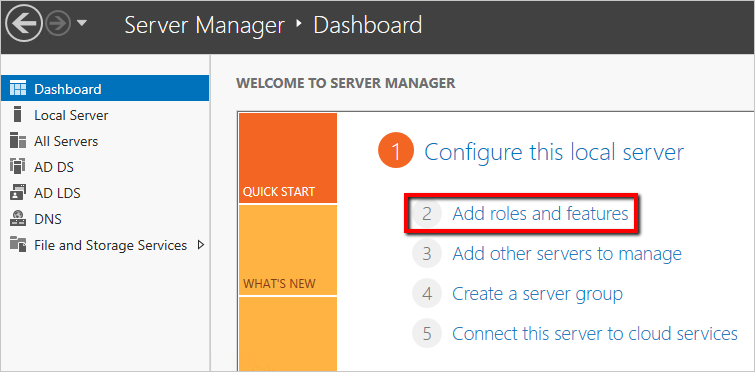
In Server Manager, click Add roles and features.
The Add Roles and Features Wizard opens.
-
In the Before you begin screen, click Next.
-
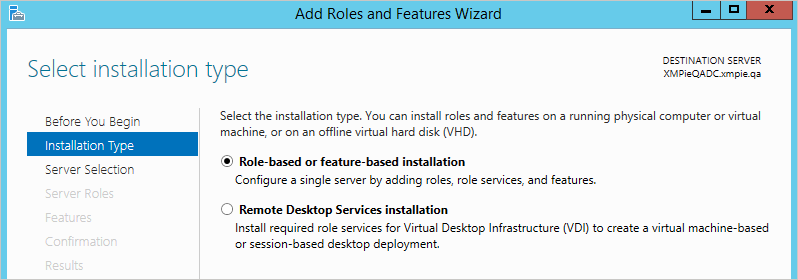
In the Installation Type screen, select Role-based or feature-based installation.
-
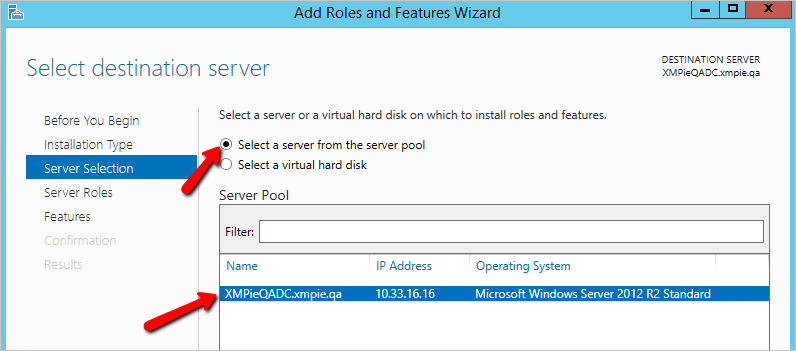
In the ServerSelection screen, select the server on which to install the roles and features.
-
In the Server Roles screen, select the required server roles and then select the Active Directory Certificate Services check box.
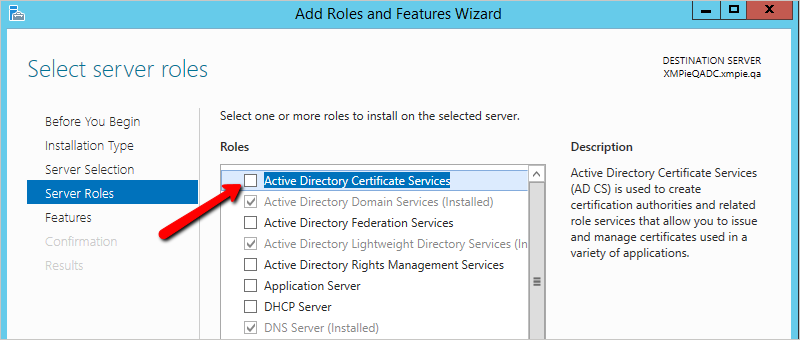
A screen appears for adding additional roles and features.
-
Select the Include management tools check box, and then click Add Features.
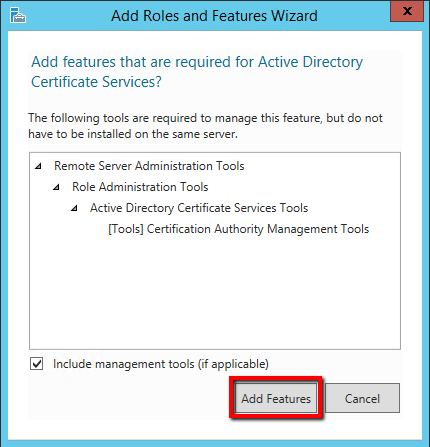
You return to the Server Roles screen. Click Next.
-
In the Features screen, click Next.
-
In the AD CS (Active Directory Certificate Services) screen, click Next.
-
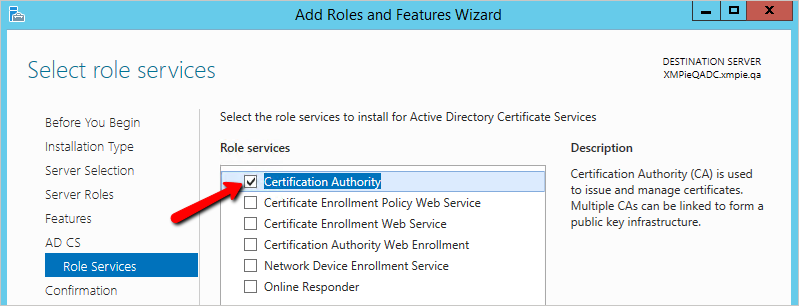
In the Role Services screen, select Certification Authority.
The minimal settings require the Certification Authority service only. These additional settings are primarily intended for servers.
-
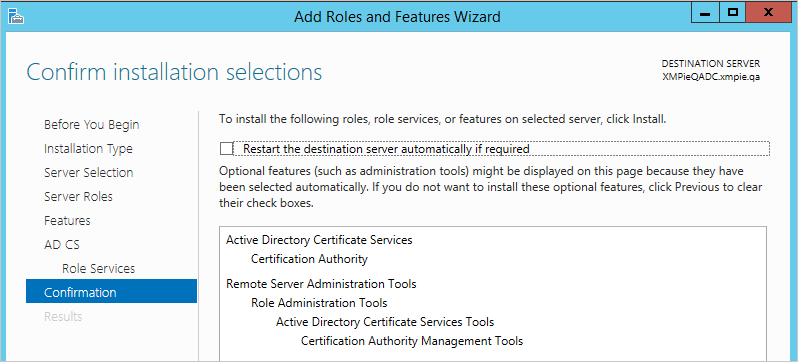
Confirm the installation selections and click Install.
-
After Roles and Features have been added, proceed to configuration of the Active Directory.
In Server Manager, on the left panel, select AD CS, and then click More.

-
Click Configure Active Directory Certificate Services.

-
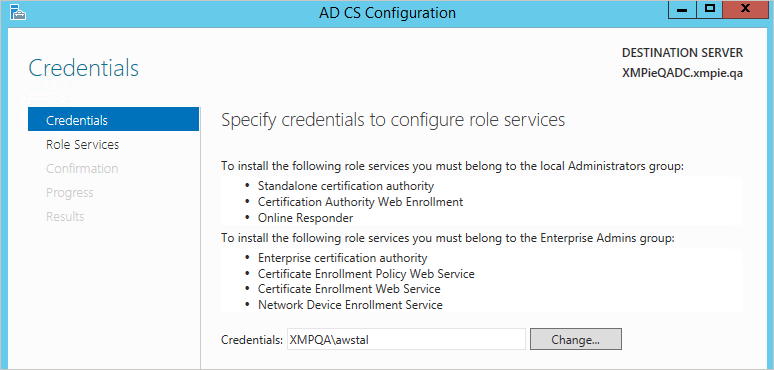
In the Credentials screen, provide the domain administrator credentials to configure the service.
-
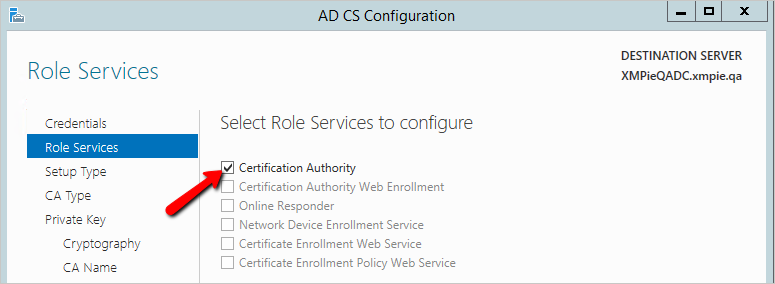
In the Role Services screen, select the Certification Authority check box.
-
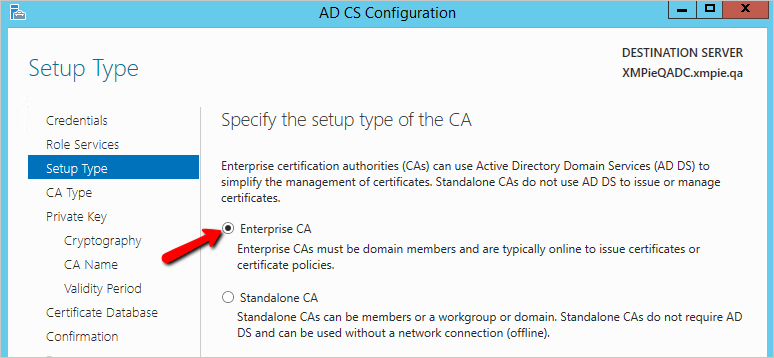
In the Setup Type screen, select Enterprise CA to enable encryption using domain certificates.
-
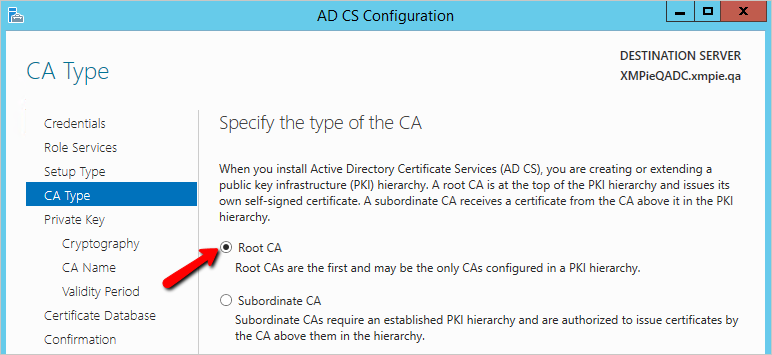
In the CA Type screen, specify the certificate authority for the service. Root CA is applicable for most scenarios.
-
In the Private Key screen select Create a new private key.
-
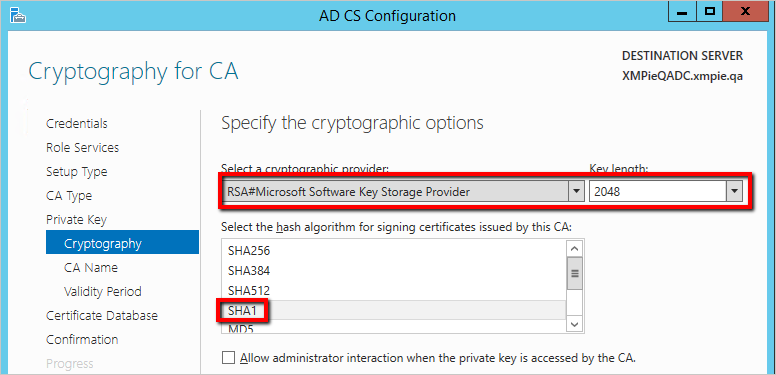
In the Cryptography screen, select RSA > SHA1 with key length of 2048.
-
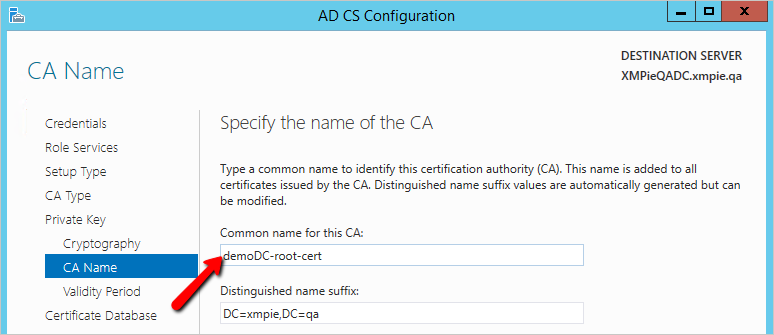
In the CA Name screen, specify the name of the CA.
-
In the Validity Period screen, specify 10 Years to guarantee continuous operation for the next 10 years.
-
In the Certificate Database screen, click Next.
-
In the Confirmation screen, click Configure.
After configuration succeeds, the certificate service is ready and can be used by all servers connected to the DC.
-
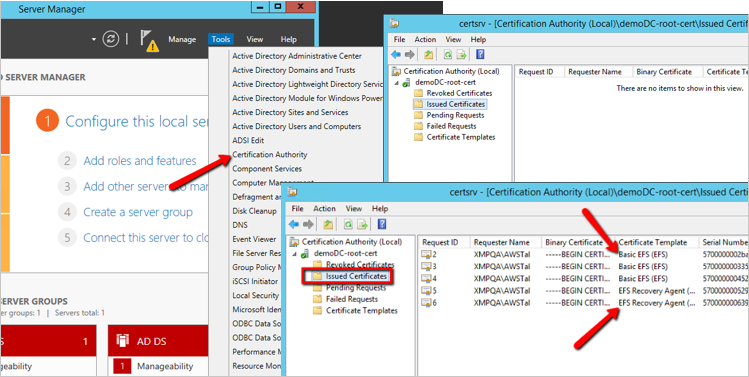
Verify that the installation of the certificates succeeded as follows:
In the Server Manger go to Tools > Certification Authority > Issued Certificates.
Creating a Data Recovery Agent on the DC
Follow these steps to create a data recovery agent that will allow the recovery of user encrypted data by the domain administrator. This will enable the recovery of data encrypted by domain users.
-
Open the Local Group Policy Editor and in the command line type "gpedit.msc"
-
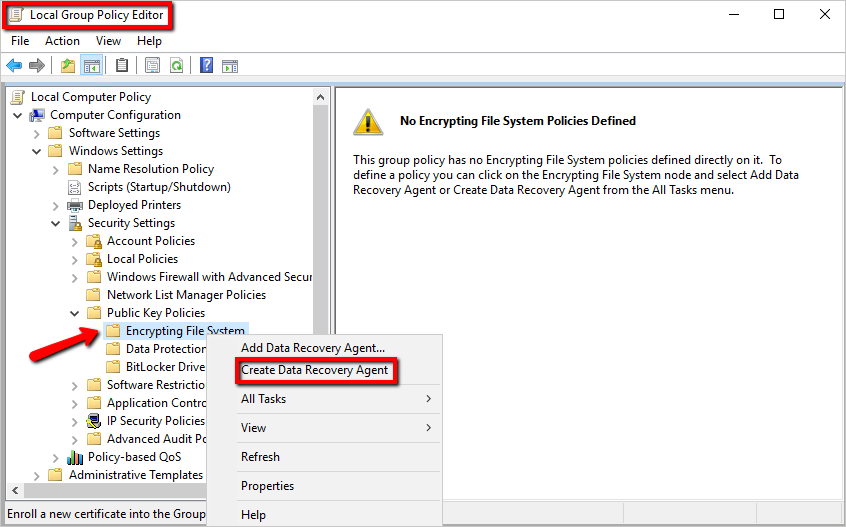
Expand the editor as follows: Computer Configuration > Windows Settings > Security Settings > Public Key Policies > Encrypting File System.
-
Delete the existing Data Recovery Agent and then create a Data Recovery Agent.
-
In command line run “gpupdate /force” to update certificate in DC.
The file recovery certificate is created.

-
Export the certificate as follows: right click the file recovery certificate, and then select All Tasks > Export.
The Certificate Export Wizard opens.
-
In the Export Private Key screen, select Yes, export the private key.
-
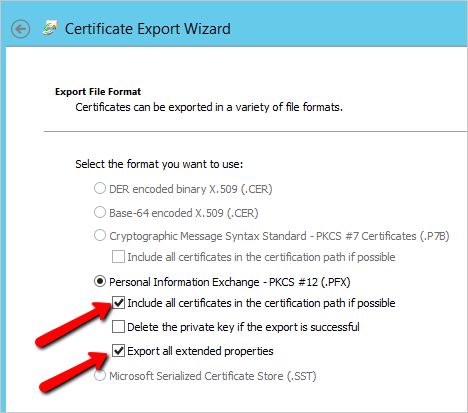
In the Export File Format screen, select the following options:
-
In the Security screen, provide a password.
-
In the File to Export screen, specify the file for export.
-
In the Completing the Certificate Export Wizard screen, click Finish.
-
Back up the certificate you have just created, and use for recovery when necessary.
Windows Server Configuration
Once you have XMPie software installed, you will need to set the folders that contain Personally identifiable information (PII) to be encrypted.
Encrypting uProduce Data Folders
-
Sign in to the XMPie Director server with the user that was used during the XMPie products installation.
-
Follow these steps to discover this user:
-
Go to the XMPie Director server and open a command prompt.
-
In the command prompt, type the following: sc qc XMPServiceQueueMgr
The user is found under SERVICE_START_NAME

-
-
Once signed in to the XMPie Director server, you can set EFS Encryption for folders used by XMPie products. You can encrypt all or some of these folders. Depending on the installation, the folders might be located side by side with the XMPie application, or in a separate location.
-
Encrypt each of these folders:
On the shared folder (or locally on a solo uProduce server):
-
XMPieAssets
-
XMPieData
-
XMPieOnDemand
-
XMPieOutput
-
XMPieTempStorage
-
On any uProduce server:
-
XMPieTempOutput
Note that these folders are relevant for PersonalEffect 9.4. In future version additional folders may require encryption.
-
-
Right click the folder you wish to encrypt and then select Properties > Advanced.
-
Select Encrypt contents to secure data and click OK > Apply.
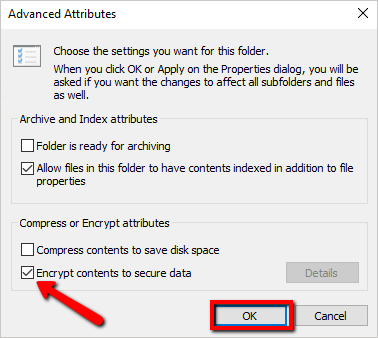
The existing content of the folder is encrypted as well as any additional files that may be added.
Encrypting uStore Data Folders
-
Locate the uStoreShared folder (usually under C:\XMPie\uStore\App) and follow the above procedure to encrypt it
Managing the EFS Certificate
This section describes how to issue a new encryption certificate on a Windows server.
-
Open the Control Panel and select User Accounts.
-
On the left panel, select Manage your file encryption certificates > Next.
-
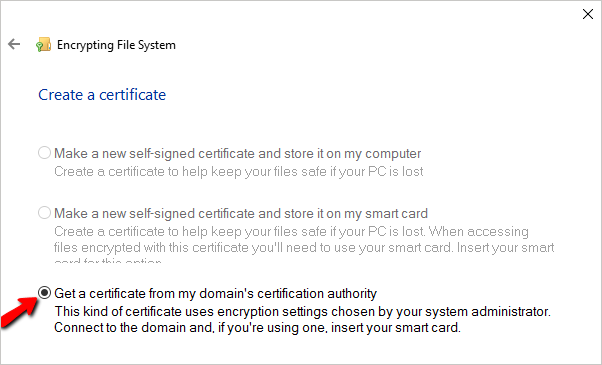
In the Select or create a file encryption certificate screen, select Create a new certificate.
-
In the Create certificate screen, select Get a domain from my domain's certification authority.
-
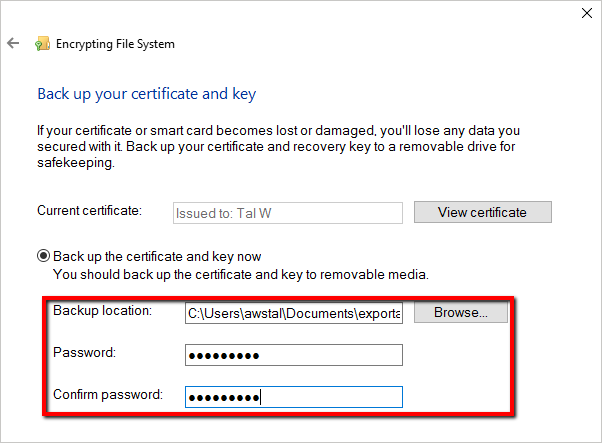
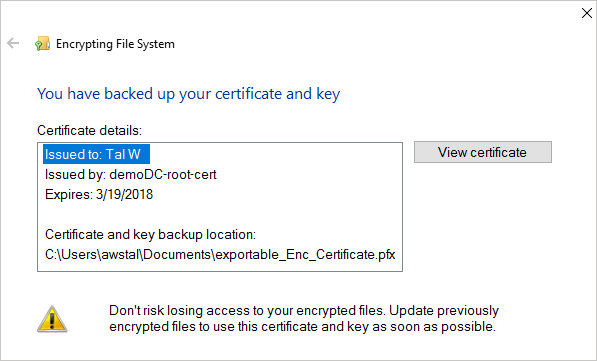
Back up your certificate and key.
This step can be used to enable multiple users to access the encrypted content.
Specify the backup location and password.
-
Update your previously encrypted files.
Specify encrypted folders that you wish to preserve or select the I’ll update my encrypted files later if you backed up the current certificate. You will not be able to access their content if you don’t have a backup of the current EFS certificate.
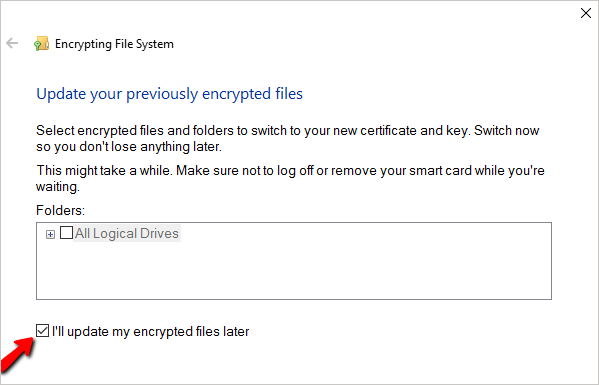
Your certificate and key are now backed up. The new certificate is ready and can be used to encrypt new folders.
XMPL and Other XMPie Software (excluding uProduce and uStore)
Installation of these products does not require EFS as they do not contain sensitive/confidential data. If you require to install these applications on an EFS folder, you will need to register the encryption certificate to both IUSR and Network Service. This is not recommended by XMPie.
Created by: Tal Weinstein, last updated: January 15, 2019
