Generating PDFs with embedded ICC profiles
Summary:This document summarizes how to set up uCreate Print and uProduce to embed ICC profiles in the PDF output.
Sample application
The application we will be testing is a simple variable postcard containing a single variable text frame and a variable (CMYK) image.

Installing the ICC profile on the client (PC)
-
Download the eci_offset_2009.zip file from the http://www.eci.org/doku.php?id=en:downloads site.
-
Install the ISOcoated_v2_300_eci.icc file on the local machine (right-click > Install Profile).
On Windows, profiles are saved in C:\Windows\System32\spool\drivers\color
Generating in uCreate Print a PDF file without an embedded ICC profile
-
From the uCreate Print panel, select Dynamic Print.
-
On the left, click the Advanced tab.
-
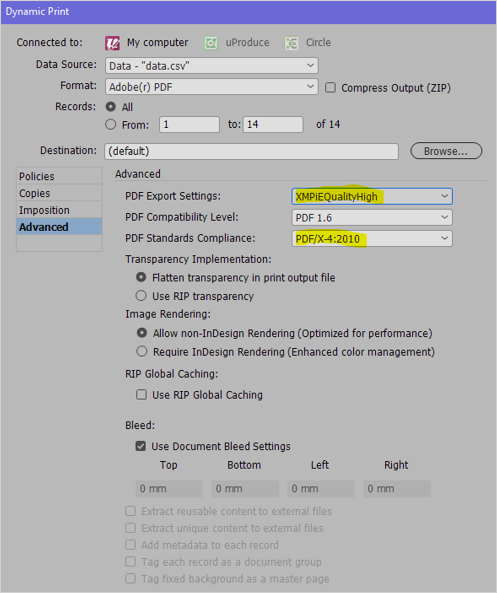
Select the options as indicated in the following screen, and click OK to generate the PDF file.
-
The generated file is a "vanilla" CMYK PDF file without any embedded color profile.
Generating in uCreate Print a PDF file with an embedded ICC profile
-
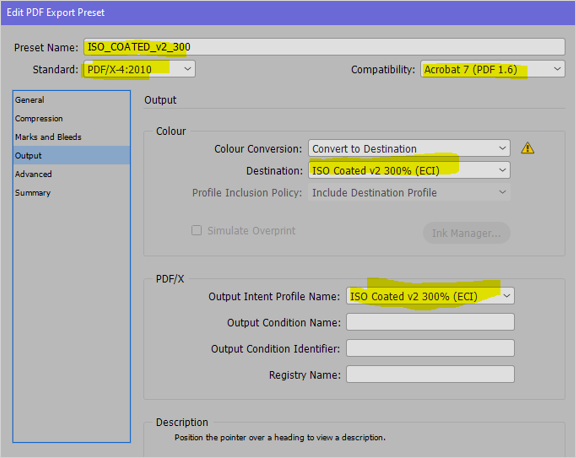
In InDesign, select File > Adobe PDF Presets > Define, and based on the XMPieQualityHighpreset,, create a new joboptions file with the output parameters as indicated in the following screen.
-
Save the file asISO_COATED_V2_300.
The joboptions file is saved on the local machine under C:\Users\<user name>\AppData\Roaming\Adobe\Adobe PDF\Settings\ ISO_COATED_V2_300.joboptions
-
When printing the document using uCreate Print, set this options file for the dynamic print and generate the PDF document (images must be in CMYK format) as follows:
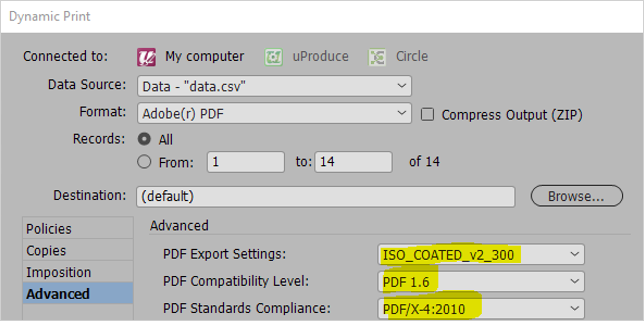
The color profile is embedded in the PDF document.
Generating in uProduce a PDF file with an embedded ICC profile from an InDesign document type
Preparation
-
Copy ISOcoated_v2_300_eci.icc to the uProduce server and install it as described above.
It will be copied to the <Drive>:\XMPie\XMPieExec\Normalizer\ICCProfiles directory.
-
Copy the ISO_COATED_V2_300.joboptions file to the <XMPie Installation Drive>:\XMPie\XMPieData\Shared\Settings\JobOptions directory on the uProduce server.
-
Reboot the uProduce server.
Running the application
-
Log in to the dashboard, install the CPKG, and submit the job.
-
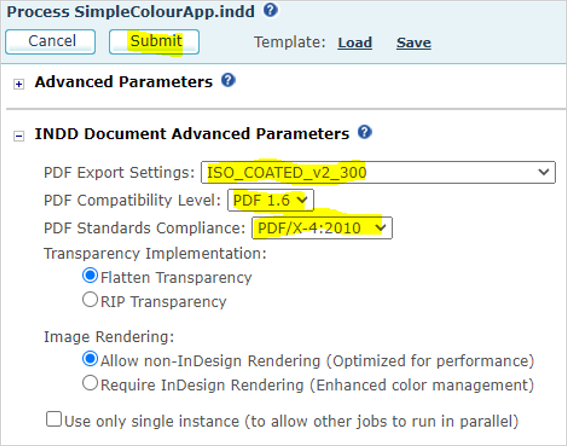
In the INDD Document Advanced Parameters section, make sure the PDF Export settings are set to the joboptions name copied to the server.
The PDF file will be generated as a PDF/X-4and will embed the ICC profile. Note that images must be in CMYK format.
Generating a PDF file with an embedded ICC profile using FreeFlow Core
We will use Xerox FreeFlow core to add the required ICC profile to the PDF file.
We will create a workflow to process the PDF files and save them to an output folder. We will then create a hot folder to allow automatic PDF file submission.
-
Log in to FreeFlow Core, go to Workflow Setup, the click the Add button to create a new workflow.
The workflow will consist of 2 nodes:
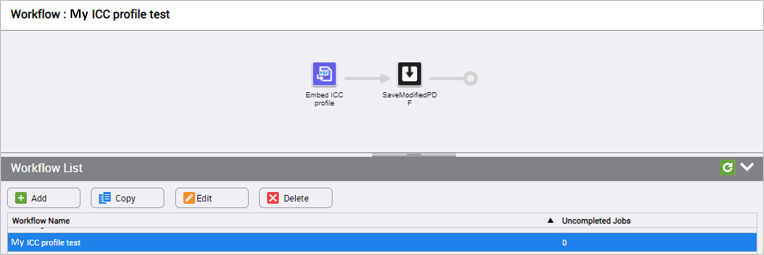
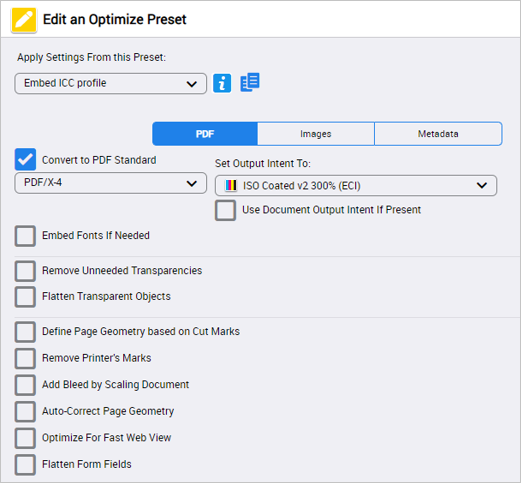
The Optimize node will be used to add the "ISO Coated v2 300% (ECI)" ICC profile and make the PDF file PDF/X-4 compliant:
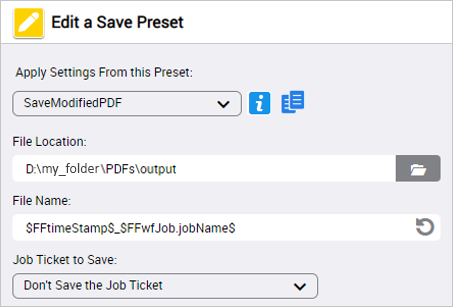
The save node is used to save the modified PDF file to a destination folder.
In this case, we are saving the file to the D:\my_folder\PDFs\output folder. We will also prepend a date & time stamp to the filename:
We have saved the workflow as "Frank ICC profile test".
-
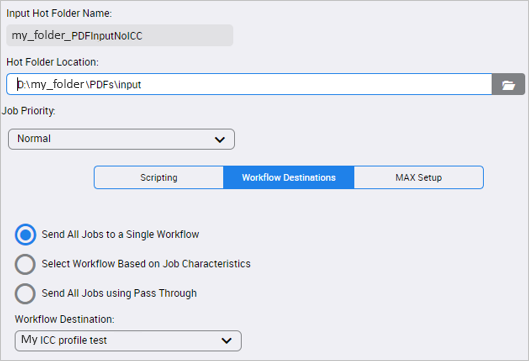
Go to Administration > Hot Folders and create a new hot folder as illustrated below.
The input folder has been set to "D:\my_folder\PDFs\input". The workflow destination dropdown must match exactly the name of the workflow created above:
-
To test the workflow, drop a PDF file into the D:\my_folder\PDFs\input folder or use the Job Management and Status screen to upload the file.
After a few seconds, the updated file should be copied to the D:\my_folder\PDFs\output folder.
Generating a XLIM PDF file with an embedded ICC profile using FreeFlow Core
In the previous section, we set up a FreeFlow Core workflow and a hot folder to add an ICC profile to a PDF file.
We can use this workflow to allow the untagged PDF files generated by XLIM to be processed.
-
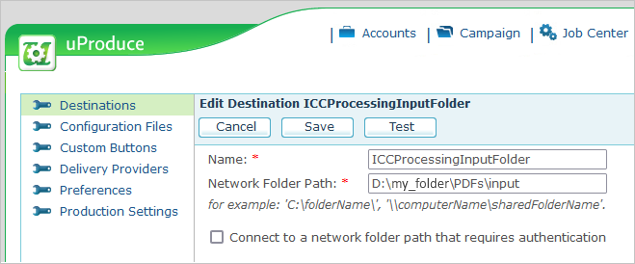
In uProduce, create a new destination and set the folder path to the hot folder input directory created above:
-
When submitting the job in uProduce, select the created destination as the job output destination. The PDF file will now be automatically processed by FreeFlow Core.

Created by: Frank Hubert: October 14, 2021, updated by Mohammad Mansour: April 12, 2022
