Visualizer service
Personalia’s Visualizer service is a tool for displaying images in 3D. Personalia provides a stand-alone service which can be easily applied to every website or platform to display dynamic items in 3D.
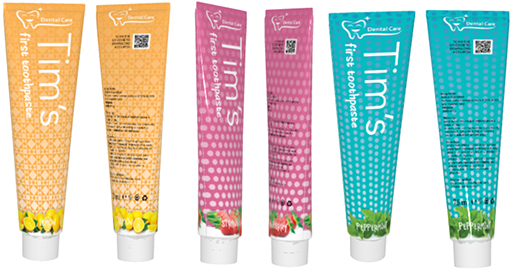
While documents such as business cards and posters will usually be in 2D, documents such as package labels are better perceived when shown on a 3D model. Using this service, you can present the finished product with a 360-degree 3D view so one can see exactly how it would look from all angles. This is particularly powerful for viewing labels on packaging.
The Visualizer service can also present static images.
Where do I start?
Let’s start from the end – all you have to do is provide the dyeline, and we will take care of the rest.
We will provide you an HTML snippet to include in the destination HTML page, and then you are ready to go.
To be able to present your products in 3D, the following are needed:
-
A dyeline
-
An InDesign template
-
A 3D model (provided by XMPie)
-
An HTML snippet (provided by XMPie)
Before we can create the 3D model, you will need to prepare a dyeline. This dyeline will be the base for the 3D model and for the InDesign template created by your designer.
The template will eventually be used to create the PDFs and their PNG equivalents for the 3D preview.
Once you have a dyeline, you can contact XMPie's Professional Services to jointly create the 3D model.
The 3D Visualizer service requires a configuration file of the 3D representation in JSON format. This is also done by XMPie’s Professional Services. This JSON tells the Visualizer service how to present the 3D model by defining various characteristics, such as the material of the 3D model object (glass, plastic, paper, etc).
Visualization of the material is controlled by a set of attributes, such as roughness for the reflectivity of the object, metalness for the metallic feel, and normalMap for its embossment.
The 3D characteristics JSON file defines the different options for these materials, and is embedded in the HTML snippet provided by XMPie’s Professional Services.
How do I integrate Visualizer in my website?
Professional Services will provide you an HTML snippet which loads the 3D model and the configuration to be included in your website's HTML. The web developer will include the snippet in the HTML product page.
This HTML snippet also includes an HTML tag which contains attributes and can be used to configure the following parameters:
-
Width – a string containing the width of the model (must be defined in a valid CSS unit: px, percents, vw, etc.)
-
Height – a string container for the height of the model (must be defined in a valid CSS unit (px, percents, vw etc.)
-
Tilt – an object string describing the unit offset for each axis. I.e. {x: 1, y 2, z: 3)
-
Rotate speed – a number that describes the speed of the rotation (1 – 20).
-
Ambient color – a color in a RGB hex number i.e. #F124AB. This color describes the ambient light color.
-
Ambient light brightness – a light multiplier for the light in the model.
-
Camera position – an object string describing the position of the camera in the scene. i.e. {x: 1, y 2, z: 3)
-
Scene background – a color in a RGB hex number i.e. #F3AA23.
-
Image sources – a list of URLs for images. The list should be encapsulated in brackets and separated by a comma. i.e. [/wrappers/businessCard/bc3.png;/wrappers/businessCard/bc4.png;]
The relevant attributes will be determined by the customer and XMPie Professional Services. The web developer can edit the selected attributes based on the required preferences.
Please note that the image source must be set in the source attribute (“src”) as an array of URLs to link the image, and the materials map which come together. The image can be dynamically changed.
Example of a snippet:
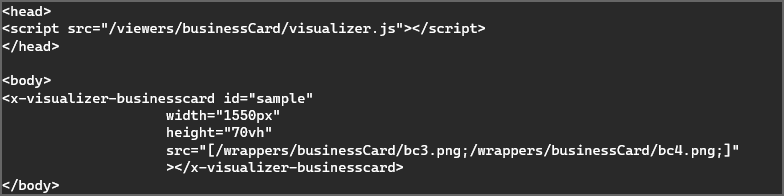
The snippet provided will include in the <head> the API key, and the API call to the 3D model and configuration. The tag which includes the selected attributes is located in the <body> and can be edited as often as needed.