Email Reputation and Deliverability
XMPie Email Service provides the following features to safeguard the reputation of your emails and enhance deliverability.
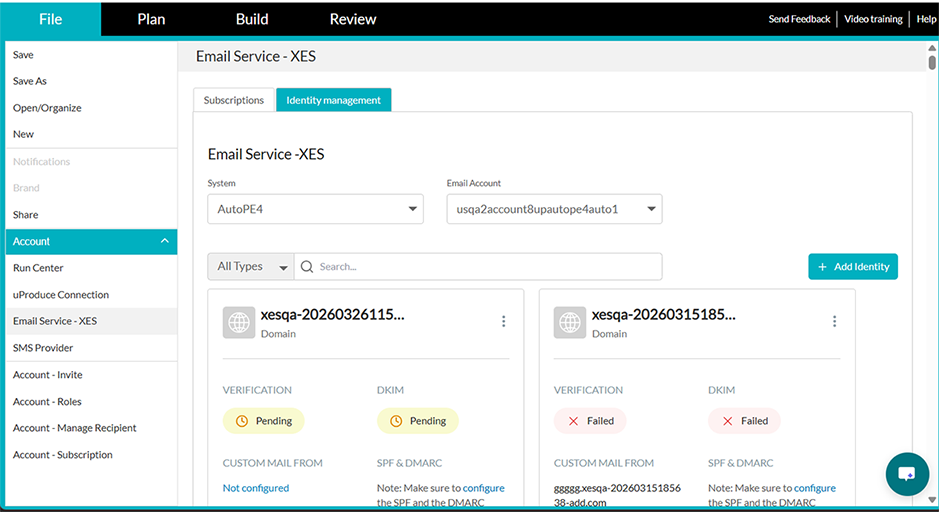
Identity Management allows you to manage your email sender identities directly from Circle. You can add and verify domain and email identities, view DNS authentication records (DKIM, SPF, DMARC), configure a Custom Mail From domain, and track the verification status of each identity — all from a single interface.
To access Identity Management, in Circle, go to Account > Email Service - XES and click the Identity management tab.
Identity types
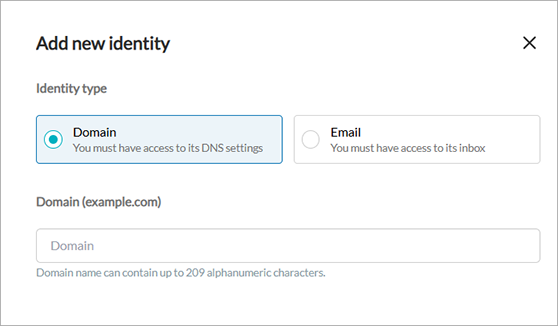
There are two types of identities you can add:
-
Domain — Verifying a domain allows you to send emails from any address within that domain. For example, verifying ABC.com lets you send from info@ABC.com, marketing@ABC.com, and any other address at that domain. Domain verification requires access to the domain's DNS settings.
-
Email — Verifying an individual email address allows you to send from that specific address only. Email verification requires access to the inbox of that address.
Domain verification
If you want to permit sending from any email address in the company, you can verify the company domain. This effectively verifies all email addresses ending in that specific domain.
This is an efficient way to verify many email addresses, as opposed to verifying each email address individually.
To add a domain identity:
-
In the Identity management tab, click Add identity.
-
In the Add new identity panel, select Domain as the identity type.
-
Enter the domain name (for example, mydomain.com) and click Add Identity & Continue.
-
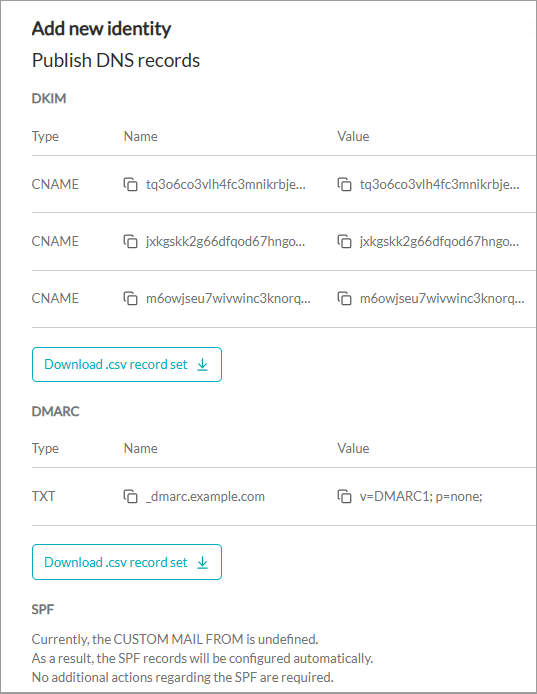
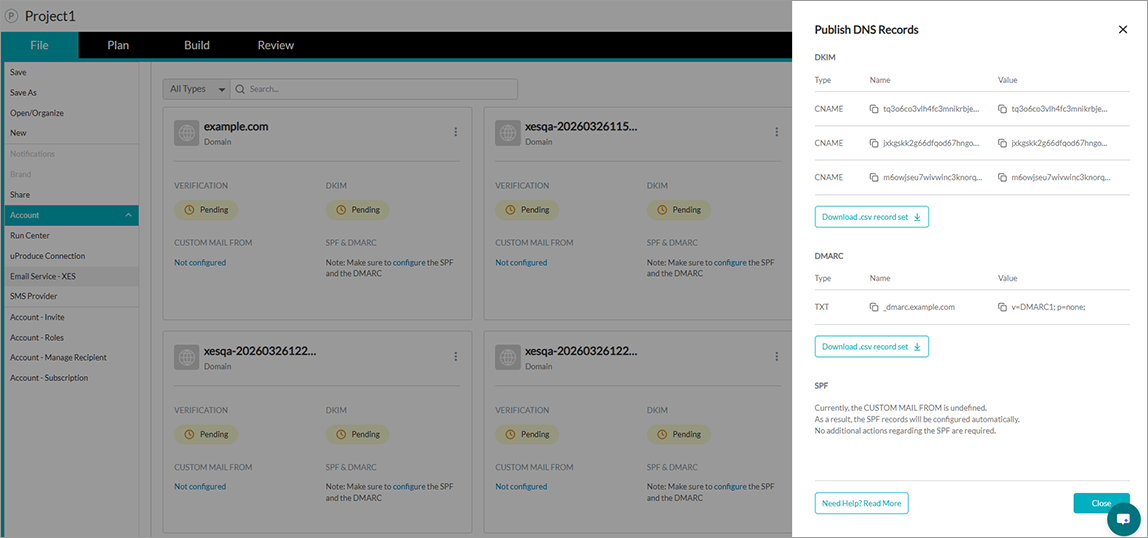
The Publish DNS records panel appears, showing the DNS records that need to be added to your domain's DNS configuration. These include:
-
DKIM — Three CNAME records for DomainKeys Identified Mail authentication. DKIM allows email providers to verify that a message was sent from your domain and was not modified in transit.
-
DMARC — A TXT record for Domain-based Message Authentication, Reporting and Conformance. DMARC uses DKIM and/or SPF to protect your domain against email spoofing.
-
SPF — Information about Sender Policy Framework. SPF tells email providers which servers are allowed to send email from your domain. Note: If the Custom Mail From is not configured, SPF records will be configured automatically and no additional action is required.
For more information about these authentication methods, see XES Email Authentication.
-
-
Copy each DNS record by clicking the copy icon next to the Name and Value fields, or click Download .csv record set to download all records for a section as a CSV file.
-
Add these records to your domain's DNS configuration. To do this, log in to the management console of your DNS provider and create the records listed. If you are not sure how to do this, contact your domain administrator or your DNS provider's support.
-
Click Close. The domain identity will appear in the identity list with a Pending verification status while DNS records are being detected.
What happens after publishing the DNS records?
After you add the DNS records at your DNS provider, Amazon SES will attempt to detect them. Depending on your DNS provider, there might be a delay of up to 72 hours before the records are detected.
As the records are detected, the statuses on the domain identity card will update:
-
Verification status changes from Pending to Verified once the domain ownership is confirmed.
-
DKIM status changes to Verified once the DKIM CNAME records are detected.
Once the Verification and DKIM statuses both show as Verified, you can start sending emails from addresses within this domain.
Which DNS records do I need?
At a minimum, you should add the DKIM records. DKIM authentication is required for domain verification and is essential for email deliverability.
It is strongly recommended to also add the DMARC record. DMARC is required by Gmail and Yahoo for bulk senders (over 5,000 emails per day) and provides additional protection against email spoofing. For more information, see Google/Yahoo delivery requirements.
SPF records are configured automatically by Amazon SES when the Custom Mail From is not set up, so no action is required unless you configure a Custom Mail From domain.
Managing domain identities
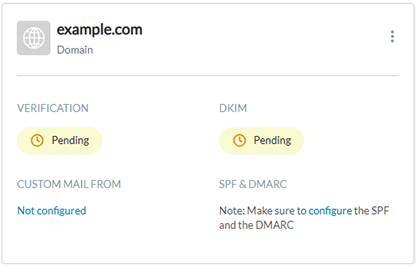
For each domain identity card, you can see the following sections:
-
Verification — The overall domain verification status.
-
DKIM — The DKIM authentication status.
-
Custom Mail From — The Custom Mail From domain configuration status.
-
SPF & DMARC — Displays a note reminding you to configure the SPF and DMARC DNS records for your domain. If you have not yet added these records at your DNS provider, click the configure link to open the DNS records panel where you can view and copy them.
Click the three-dot menu on a domain identity card to access these options:
-
View DNS records — Displays the DKIM, DMARC, and SPF DNS records. You can copy values or download them as CSV.
-
Add Custom Mail From / Edit Custom Mail From — Opens the Custom Mail From configuration panel (see below). The label changes depending on whether a Custom Mail From is already configured.
-
Delete — Removes the domain identity. Deleting a domain identity requires Admin or Owner permissions.
Custom Mail From
By default, emails sent through XES use a subdomain of amazonses.com as the MAIL FROM domain. You can configure a custom MAIL FROM domain to use a subdomain of your own domain instead, which provides the flexibility to use SPF, DKIM, or both to achieve DMARC compliance.
Why use a custom MAIL FROM domain?
Messages that you send through Amazon SES automatically use a subdomain of amazonses.com as the default MAIL FROM domain. Sender Policy Framework (SPF) authentication successfully validates these messages because the default MAIL FROM domain matches the application that sent the email—in this case, SES.
If you don't want to use the SES default MAIL FROM domain, and would rather use a subdomain of a domain that you own, this is referred to in SES as using a custom MAIL FROM domain. To do this, it requires you to publish your own SPF record for your custom MAIL FROM domain. In addition, SES also requires you to set up an MX record so that your domain can receive the bounce and complaint notifications that email providers send you.
By using a custom MAIL FROM domain, you have the flexibility to use SPF, DKIM, or both to achieve Domain-based Message Authentication, Reporting and Conformance (DMARC) validation. DMARC enables a sender's domain to indicate that emails sent from the domain are protected by one or more authentication systems. There are two ways to achieve DMARC validation: Complying with DMARC through SPF and Complying with DMARC through DKIM.
Choosing a custom MAIL FROM domain
In the following, the term MAIL FROM domain always refers to a subdomain of a domain that you own - this subdomain that you use for your custom MAIL FROM domain must not be used for anything else and meets the following requirements:
-
The MAIL FROM domain has to be a subdomain of the parent domain of a verified identity (email address or domain).
-
The MAIL FROM domain shouldn't be a subdomain that you also use to send email from.
-
The MAIL FROM domain shouldn't be a subdomain that you use to receive email.
To configure a Custom Mail From domain:
-
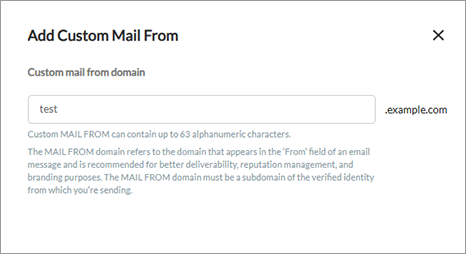
On the domain identity card, click the three-dot menu and select Add Custom Mail From, or click the Not configured link in the Custom Mail From section.
-
In the Add Custom Mail From panel, enter the subdomain name (for example, bounce to create bounce.yourdomain.com). The subdomain can contain up to 63 alphanumeric characters.
-
Click Save & Continue.
-
The Mail From DNS records will be displayed. Add these records to your DNS configuration.
For requirements and background on choosing a Custom Mail From subdomain, see Custom MAIL FROM in the Email Reputation and Deliverability page.
You can also delete a Custom Mail From configuration by selecting Edit Custom Mail From and choosing to remove it.
Email verification
XES requires that you verify your email address or domain, to confirm that you own it and to prevent others from using it. You are therefore required to verify all email addresses from which you send emails through XES, to protect your sending identity. For example, if you are creating a campaign for company ABC, and sending emails from info@ABC.com, marketing@ABC.com and support@ABC.com, you must verify all of these From addresses.
Make sure to inform your contact person at the company (e.g. ABC) that during the verification process, they will receive an email from Amazon SES for each of these addresses, which includes a verification link that they must click within 24 hours.
To add an email identity:
-
In the Identity management tab, click Add identity.
-
In the Add new identity panel, select Email as the identity type.
-
Enter the email address and click Add Identity & Continue.
A verification email will be sent to the specified address. The recipient must click the verification link within 24 hours. Until the link is clicked, the identity status will show as Pending.
Important notes about email identity verification:
-
If the domain of the email identity has already been verified, you will not be able to add this email identity, since there is not need to do so as the domain has been verified and includes all email identities within it.
-
The email address is case sensitive. For example, if you verify support@ABC.com, you cannot send from Support@abc.com unless you verify that address separately.
-
Emails must be verified within 24 hours after the verification request.
-
You should follow up and make sure your contact person has verified the emails. If an email is in the pending status, this means that it hasn’t been verified yet.
-
If verification fails or expires, you can click Retry verification on the identity card to resend the verification email.
Verification statuses
Each identity displays a verification status:
-
Pending — Verification is in progress. For domains, DNS records are being detected. For emails, the verification link has not yet been clicked.
-
Verified — The identity has been successfully verified and can be used for sending emails.
-
Failed — Verification was not successful. For emails, you can click Retry verification to resend the verification email. For domains, review the DNS records to ensure they were added correctly.
Domain identities also display separate statuses for DKIM, Custom Mail From, and SPF & DMARC.
Filtering and searching identities
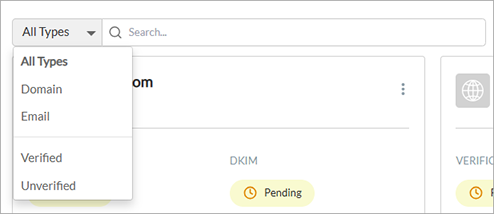
Use the filter and search controls at the top of the identity list to find specific identities:
-
Type filter — Filter by All Types, Domain, or Email.
-
Status filter — Filter by Verified or Unverified.
-
Search — Search across identity names to quickly find a specific identity.
Google/Yahoo delivery requirements
This section is relevant if you are an XMPie Email Service customer who sends thousands of emails to Gmail/Yahoo recipients.
Gmail and Yahoo have a set of requirements to protect against spam, reinforce the long-standing industry best practice, and improve the email experience for recipients. They require that bulk sender domains authenticate their emails, allow for easy one-click unsubscribe and to stay under a reported spam threshold.
A domain is considered a bulk sender if there are about 5,000 emails sent to Gmail/Yahoo recipients within a 24-hour period regardless of the email provider. Also, emails sent from different subdomains belonging to the primary domain also count toward the 5,000 limit.
Here is what you need to do:
-
Fully authenticate
Brands that send many thousands of emails every day, are required to authenticate their sender IP addresses and domains using SPF, DKIM, and DMARC.
What you need to do:
Most bulk senders are already using SPF, DKIM, and DMARC. You should check and make sure that you are too. If not, contact Support@xmpie.com and get the advanced sender package as soon as possible.
-
One-click unsubscribe feature
Gmail and Yahoo have a one-click unsubscribe feature which allows recipients to easily unsubscribe without the need to search the email body for the unsubscribe link.
Brands are required to facilitate the one-click unsubscribe feature.
What you need to do:
XMPie has implemented the one-click unsubscribe feature.
-
For triggered email: You will need to upgrade to the relevant uProduce version.
-
For batch email: You need to make sure the email body includes the unsubscribe link that is populated using the built-in Email Unsubscribe URL ADOR. Any email with such a link in the body will automatically support the one-click unsubscribe feature.
-
-
Keep spam rates low
Gmail and Yahoo require that senders aim to keep spam rates below 0.1% and avoid a spam rate of 0.3% or higher, especially for a sustained period.
What you need to do:
According to Google, you can check your spam rates in Postmaster Tools. Be sure to keep rates below 0.10% and avoid reaching a spam rate of 0.30% or higher.
Sending limits to control delivery rates
XMPie Email Service accounts have a set of sending limits to regulate the number of email messages that you can send and the rate at which you can send them. Sending limits help you to gradually ramp up your sending activity and decrease the likelihood that Inbox Providers will block your emails because of sudden, unexpected spikes in your email sending volume or rate.
There are two sending limits: a sending quota (the maximum number of messages you can send in a 24-hour period) and a maximum send rate (the maximum number of emails that XMP Email Service can accept from your account per second).
By default, you can send up to 500,000 emails within 24 hours. If you need to increase this number, contact Support.
When do I need a dedicated IP?
When you create a new XES account, by default your emails are sent from IP addresses that are shared with other users via a pool of IP addresses. You can also use dedicated IP addresses that are reserved for your exclusive use by leasing them for an additional cost. This gives you complete control over your sender reputation and enables you to isolate your reputation for different segments within email programs.
What is the default send rate for the shared IP?
The max default send rate is 500K per 24 hours, 70 email per second. If you wish to increase it, please contact Support.
How to increase the default send rate for the dedicated IP?
When purchasing a dedicated IP, you are limited to 40 emails per second per dedicated IP. If you wish to increase the send rate, you will need to purchase an additional dedicated IP. Please contact Support.
Enforcing high-quality email-sending practices
If the emails you send result in excessive bounces, complaints, or other issues, this may indicate that you are engaged in low-quality email-sending practices and your sending abilities may be placed on probation or suspended. This process is called enforcement.
Bounces
Your bounce rate includes hard bounces to domains you have not verified. Hard bounces are permanent delivery failures such as "address does not exist." Temporary and intermittent failures such as "mailbox full," or bounces due to blocked IP addresses, do not count toward your bounce rate.
In order to ensure a high reputation for this service, email bounce rates must be kept to a minimum, preferably less than 5%. If you bounce rate exceeds 10%, you risk your account being suspended. If you exceed the bounce rate, you will be notified by XES to investigate the issue and fix the problem, i.e. remove bounced addresses from your mailing lists and stop sending mail to them. If you do not take care of this, your account may be suspended by SES.
Email addresses must therefore be validated before being sent. There are many free websites over the internet to validate email addresses, such as www.datavalidation.com and www.neverbounce.com
For information on reducing bounces, see Understanding email deliverability in Amazon SES.
Complaints
A complaint occurs when a recipient reports that they do not want to receive an email. They might have clicked the "This is spam" button in their email client, complained to their email provider, notified XMPie Email Services directly, or through some other method.
High complaint rates are often indicators that a sender is sending to recipients who did not specifically sign up to receive emails, or that the sender is sending content that is different from the type that recipients signed up for.
The number of complaints from end email recipients must remain below 0.1%. Your account may be suspended if your complaint rate exceeds 0.5%. In case you exceed the complaint rate, you will be notified by XES to fix the problem, i.e. review your list acquisition process and the content of your emails to try to understand why your recipients might not appreciate your email. If you do not take care of this, your account may be suspended by XMPie Email Service (XES).
For information, see Complaints FAQ.
Probation and Suspension
When a significant issue with the sending on your account is detected, you will be notified by XES and be given time to fix it. At this point XMPie Email Service places you on probation. You can still send emails, but if you don't fix the problem in the given timeframe or sending allowance, your sending privileges may be suspended.
At this point, look at the email you received from XES for a summary of the issue, and investigate your sending to determine what aspect of your sending triggered the issue. If possible, stop sending emails until you fix the problem.
If you are put on probation for a sending problem (for example, bounces), the probation expires, and the issue has not been resolved, your account will be suspended. If a suspension occurs, your account will be shut down so you can no longer send emails.
A suspension can also occur if your problem is so severe that you were immediately suspended without a probation period.
In this case, examine the email you’ve received from XES for a summary of the issue, investigate your sending to determine what aspect of your sending specifically triggered the issue.
Mailbox simulator for email testing
When using XMPie Email Service, you can use the Amazon SES mailbox simulator, which is a set of test email addresses. Each email address represents a specific scenario.
You can send emails to the mailbox simulator when, for example, you want to test how your email sending program handles bounces and complaints or generate a bounce without putting a valid email address on the suppression list.
To use the mailbox simulator, email the addresses and observe how your setup responds to the simulated scenarios.
Examples of simulated address that you would use for specific scenarios:
-
To test successful delivery, use success@simulator.amazonses.com
-
To test bounced emails, use bounce@simulator.amazonses.com
-
To test complaint emails, use complaint@simulator.amazonses.com
Note that you will be billed for these emails. However, emails to the mailbox simulator will not affect your email deliverability metric for bounces and complaints, nor count against your sending quota.
For more information see Sending test emails in Amazon SES with the simulator.