Rendering records
After a project is deployed, you can render it from the dashboard to create videos. Videos are generated in MP4 and HLS formats.
Upload assets
You may first need to upload the relevant assets. Simply click Upload > Upload Assets and select the necessary assets.
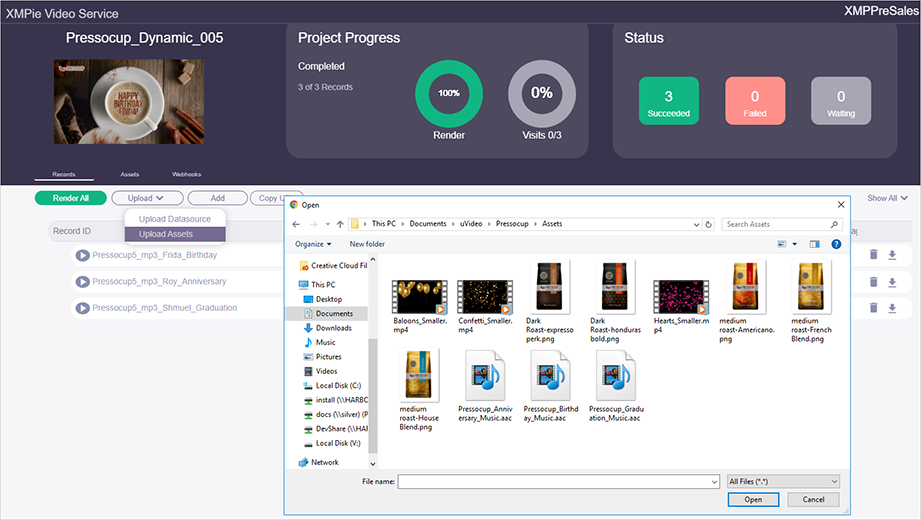
After the upload, you may review the assets in the Assets tab.
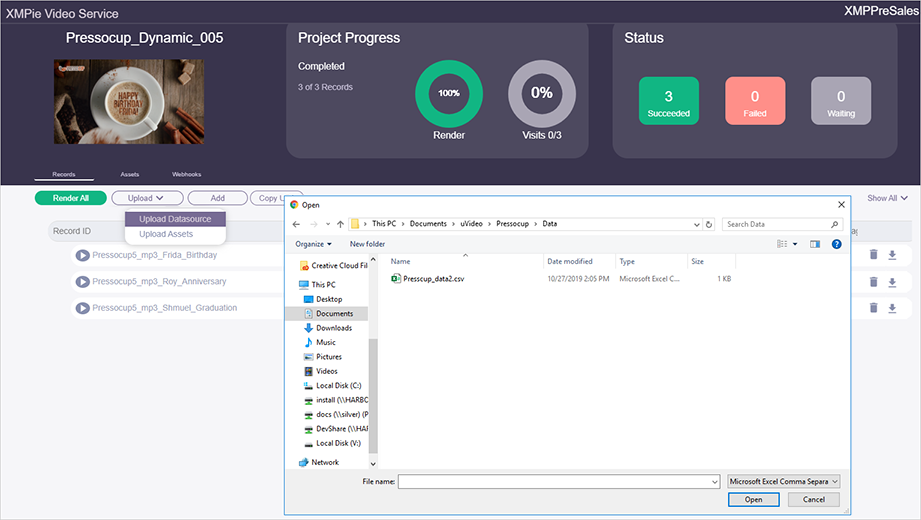
Upload data source
You may also add records that you wish to render. Simply click Upload > Upload Datasource, select the relevant data source and click Open.
The following are the requirements for a valid data source:
-
The data source must be comma separated (CSV) and in UTF-8 format.
-
All graphic assets in a single column should be of the same format. For example:
ID
Pic1
Pic2
Video1
Video2
E87362B
Mary.png
New York.jpg
Mary.mp4
Mary.mov
27F458F
Dan.png
Boston.jpg
Dan.mp4
Dan.mov
302D12D
David.png
Miami.jpg
David.mp4
David.mov
2D07012
Susan.png
New York.jpg
Susan.mp4
Susan.mov
-
In order to comply with GDPR regulations, it is recommended to add to your CSV a GUID (Globally Unique Identifier) column with a unique identifier per record, which will be later used as the record Id in the final URL of the video.
-
You cannot use any of the following characters in the tag values that will be used in the record Id:
% * / # [ ] \ & ? +For example, if the record Id is {RID}_{Plan}, the values in these columns should not include these characters.
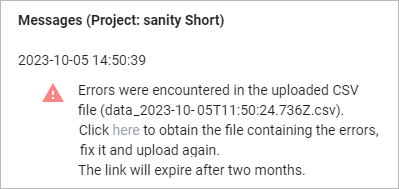
During the CSV data source upload, XVS collects the records which have errors and combines them into a new error CSV file. If errors occurred during the upload, you will receive a message. Click the bell icon in the Status area to view the message, from which you can download, fix and upload the fixed CSV to XVS.

Copy video URL
To use the videos in your applications you would need a URL to the video. The URL can be to a player that plays the specific video, or to the video itself, and can be used in 3rd party video players.
Click the Copy URL button to get the personalized video URL. You can insert this URL in an email, HTML page or SMS. Make sure to change the {Record_ID} to the specific record ID, as you defined during the deployment phase.
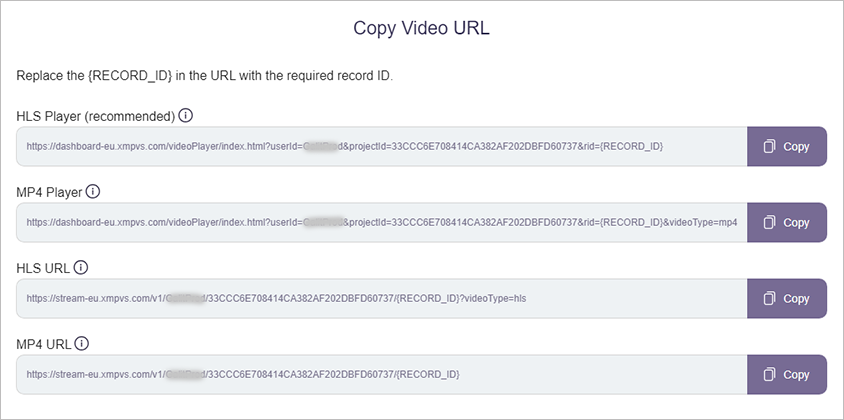
You can choose any of the following options:
-
HLS Player: This URL opens a player that plays the video. It can be used as a link in an email or HTML page. This is a general-purpose URL that should be used unless high bandwidth is guaranteed or unless using your own HLS player. Use this player if you wish to track viewing progress events.
This player adjusts the viewing quality to suit the viewers’ network bandwidth. It minimizes latency and buffering on mobile and low bandwidth networks.
You can pass multiple parameters in the URL query string to configure the video display. You concatenate parameters using an ampersand (&).
The configurable parameters are:
-
controls: Specifies that video controls should be displayed.
-
height: Sets the height of the video player.
-
width: Sets the width of the video player.
-
fullscreen: Opens the video in full screen.
-
poster: Specifies an image to be shown while the video is downloading, or until the user hits the play button. A full HTTPS encoded URL path should be provided.
-
loop: Specifies that the video will start over again every time it is finished. Possible values: true or false.
-
muted: Specifies that the audio output of the video should be muted. Possible values: true or false.
-
autoplay: Specifies that the video will start playing as soon as it is ready. Note that some browsers may block autoplay if muted is set to false. Possible values: true or false.
Example:
https://dashboard-eu.xmpvs.com/videoPlayer-v1/index.html?userId=ABC&projectId=...&rid=John&autoplay=true&muted=true&controls=false
-
-
MP4 Player: This URL opens a player that plays the MP4 videos. It can be used as a link in an email or HTML page. Use this player if you wish to track view progress events.
-
HLS URL: This option adjusts the viewing quality to suit the viewers’ network bandwidth. It minimizes latency and buffering on mobile and low bandwidth network.
This URL points to an HLS file that can be used in third party HLS players.
-
MP4 URL: This URL points at the source video, which is the highest quality video. It is not suitable for use on low bandwidth networks.
Render records
After uploading all assets and data sources, and defining webhooks, if needed, you can render the records by clicking the Render button.
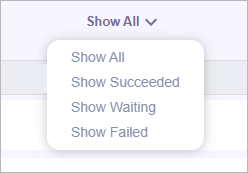
You may filter the list of records to view:
-
All records
-
Records that have rendered successfully
-
Records waiting to be rendered
-
Records that failed to render
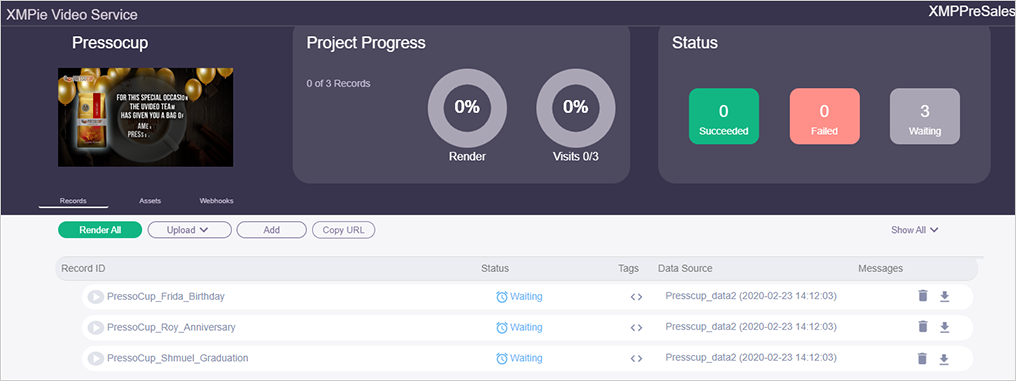
On-demand video rendering
If you wish to render a video for an additional record, you may use this option.
-
Click the Add button and fill in the form.
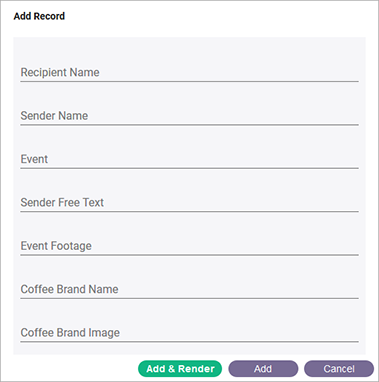
-
Click Add to add a record to be rendered later or Add & Render to start rendering now.
You cannot use any of the following characters in the tag
values that will be used in the record Id:
% * / # [ ]
\ & ? +
For example, if the record Id is {Recipient Name}_{Sender Name}, the values in these fields should include these characters.