
 View what's in this topic
Using Production Directives for Printing
Production Directives (previously known as Dynamic Media Selection) enable you to define print production requirements associated with a spread. These directives tell the print controller the specific media and production settings to use when printing each spread.
For example, you may be printing a booklet that uses heavyweight blue paper for the cover page, regular white paper for the body pages, and red paper for section dividers between the chapters of the book. In this case, you could use production directives to assign different media, stored in different paper trays, to improve production control and the overall workflow. When the job is processed, the selected media will be automatically chosen from the appropriate paper tray.
Production directives go beyond basic media selection. Using the CIP4 standard, you can define a wide range of print production attributes organized into intent categories such as MediaIntent, BindingIntent, FoldingIntent, LayoutIntent, and more. This enables automated print workflows where the RIP and print controller can interpret standardized instructions for media, finishing, and production handling.
XMPie production directives are available with different print output formats: PDF/VT-1, PDF/VT-3, VIPP, VPS, PostScript, and VDX. Choose a format that enables your print server (RIP) to perform the most efficient production.
Note: Production directives are not supported for PPML output. If you define production directives and produce PPML output, uProduce reports a warning and the directives are ignored.
CIP4 Attribute Categories
Production directives are organized into CIP4 intent categories. Each category contains a set of standardized attributes that describe specific aspects of print production:
|
Category |
Attributes |
|---|---|
|
Intent |
ProductType |
|
MediaIntent |
BackCoating, Coating, FrontCoating, Grade, ISOPaperSubstrate, LABColorValue, MediaColor, MediaColorDetails, MediaQuality, MediaType, MediaTypeDetails, Opacity, Texture, Thickness, Weight |
|
LayoutIntent |
Sides, SpreadType |
|
ProductionIntent |
PrintPreference, PrintProcess |
|
BindingIntent |
BindingSide, BindingType |
|
ColorIntent |
Coatings |
|
FoldingIntent |
FoldCatalog, Orientation |
|
HolePattern |
HoleReferenceEdge, Pattern |
|
Stitching |
StapleShape, StitchNumber Stitching attributes route to a binding-style subdict based on the BindingType directive on the same spread: SideStitch routes them under SideStitching; any other value (or no BindingType) routes them under SaddleStitching (the default). |
|
Production |
CopyCount |
|
CIP4Custom |
Free-form CIP4 attribute. Type the attribute name (or a slash-separated path, for example Tracking/BatchID) in the Attribute field. The value lands inside the CIP4 subtree of the page metadata, alongside the standard CIP4 categories above. |
|
Custom |
Free-form non-CIP4 attribute. Type the attribute name (or a slash-separated path, for example XMPie/UserField) in the Attribute field. The value lands outside the CIP4 subtree, at the page metadata root. |
For each attribute, you can determine the type of value you wish to use - dynamic or static:
-
To use a dynamic value, create a content object whose return string defines the production directive value per-recipient. It is important that the return string is in the required print output format.
-
To use a static value, shared by all recipients, type the required string directly in the value field.
The following figure shows an example content object rule that sets a dynamic media color for the PDF/VT print output format. The media color is chosen based on the School database column: law students receive blue media (the return string is blue), while other students (else value) receive white media (the return string is white).
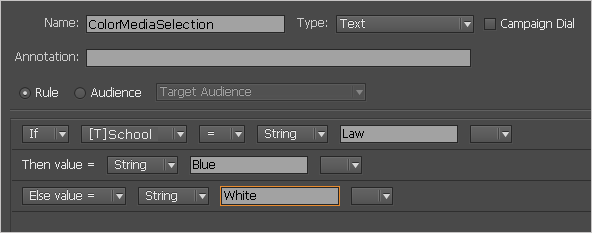
Configuring Production Directive Attributes
Before assigning production directives to spreads, you can configure custom attribute names that appear in the autocomplete for Custom and CIP4Custom directives. This is done through the Configure Production Directives dialog, accessible from the uCreate Preferences dialog.
To configure production directive attributes:
-
Open the uCreate Preferences dialog (Dynamic Content > Preferences).
-
At the bottom of the Preferences dialog, next to Custom Production Directives, click Configure.
The Configure Production Directives dialog box is displayed:
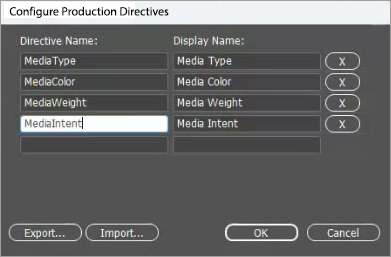
The dialog displays a list of attribute definitions, each with:
-
Directive Name - The name that will be written into the output file (for example, MediaType, MediaColor).
-
Display Name - The name that will appear in the per-page/spread Production Directives dialog (for example, Media Type, Media Color).
These entries appear in the Attribute field autocomplete when Custom or CIP4Custom is selected as the category in the per-spread dialog. They have no effect on the standard CIP4 categories (MediaIntent, BindingIntent, and the others), which use a fixed attribute list from the CIP4 specification.
-
-
To add a new attribute, type the attribute name and display name in the empty row at the bottom of the list.
-
To remove an attribute, click the X button next to it.
-
Use the Export button to save attribute definitions to an XML file for sharing with other users or across documents.
-
Use the Import button to load attribute definitions from a previously exported XML file.
-
Click OK to save your changes.
Setting Up Production Directives for a Spread
To set up production directives for a spread:
-
Determine the type of directive value you wish to use, dynamic or static.
Note that to use a dynamic value you must first create a content object whose return string defines the value per-recipient.
-
Right-click the gray area next to the spread to which you want to assign production directives, and then select Dynamic Content > Page/Spread Production Directives.
Tip: You can select multiple pages/spreads in the Pages panel before right-clicking. The production directives you define will be applied to all selected pages/spreads.
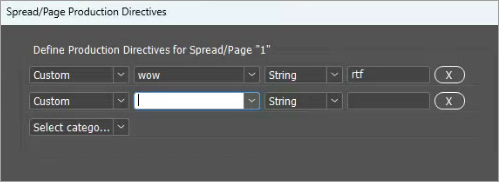
The Spread/Page Production Directives dialog box is displayed:
-
To add a production directive, click the Select category dropdown and choose a category (such as MediaIntent, BindingIntent, CIP4Custom, or Custom). A new row is added with the chosen category. For the standard CIP4 categories, the Attribute field is pre-filled with the category's first attribute; for Custom and CIP4Custom, the Attribute field is empty for you to type.
-
For each directive row, configure the following:
Field
Description
Attribute
The specific attribute within the selected category. The dropdown shows the attributes available for that category, with the currently selected one marked. For example, selecting MediaIntent provides attributes such as MediaColor, MediaType, Weight, and others.
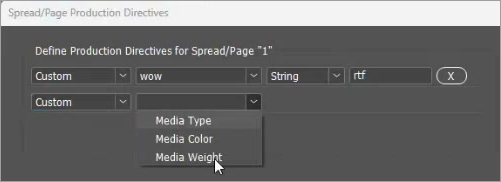
When Custom or CIP4Custom is selected as the category, the attribute field becomes an editable text field where you can type any attribute name, including a slash-separated path (for example, Tracking/BatchID). The autocomplete list is pre-populated with the entries defined in the Configure Production Directives dialog.
Category
The category for this directive (for example, MediaIntent, Custom).
Remove (X)
Click the X button to remove a directive row.
Value
The actual value of the directive. When String is selected as the value type, enter a static text value. When Content Object is selected, choose a content object from the dropdown list.
Value Type
Choose how the directive value is determined:
-
String - Enter a static value shared by all recipients. Make sure this value is compatible with your print output format.
-
Content Object - Select a content object from the dropdown list. For each record, the directive value will be set by the content object's return value, enabling per-recipient values.
-
-
You can add multiple directives to a single spread, mixing standard CIP4 categories with Custom and CIP4Custom attributes as needed.
-
Click OK to save your changes and close the dialog.
Note: When Step-and-Repeat is enabled, pages or spreads imposed onto the same sheet should share the same production directives. If they differ, uProduce reports a warning during production, since a single sheet can carry only one set of media and finishing instructions.
How Directives Carry Across Spreads
A directive defined on a spread carries forward to all subsequent spreads until you redefine it. For example, if spread 1 sets MediaType to Plain and spread 2 sets MediaColor to Blue without restating MediaType, then spread 2 effectively has MediaType=Plain and MediaColor=Blue. Spread 3 inherits both unless it overrides either of them.
Identity is determined by the combination of category and attribute path:
-
Setting the same category + attribute on a later spread replaces the inherited value.
-
Setting a different category + attribute on a later spread adds to the set of directives in effect.
To use the per-spread directive values downstream in a uProduce post-composition operation file name (for example, to name output files by media type), see Output Naming Tokens in the uProduce online help.