
 View what's in this topic
Defining a uImage Content Object
The uImage content object can be created in different ways, depending on your work mode — connection to a plan or connection to a data source.
-
Connect to a plan: this mode requires working both in uPlan and in uCreate. First, use uPlan to create a plan that includes a uImage content object and define its QLingo expression as a uImage call. You can then use uCreate to connect your document to this plan file and obtain this uImage content object. The uImage content object can now be placed in the design like any regular graphic content object.
For details on creating a uImage content object in uPlan, see uImage online help. -
Connect to a data source: this mode allows you to perform the whole workflow in uCreate, eliminating the need to work in uPlan. When your document is connected to a data source, you define the uImage content object in the Rule Editor: first, add a graphic content object; then build its rule to reference the uImage template.
Note: It is assumed that you are connected to a data source.
The uImage graphic content object is used just like any other graphic content object, to tag relevant graphic(s) in your document. During production, these tagged graphics are dynamically replaced with the uImage personalized files.
A uImage document package (*.dpkg) contains all the template information defined by the uImage designer in Photoshop — such as the template type, the action or script used to create the effect, and the copyfitting settings. uCreate Print reads these settings from the package automatically when you select it.
The package defines one of the following template types:
-
Regular: a generic template. Any uImage template can be defined as a regular template.
-
Image Font: shows text using images, where each character is represented by a specific image.
-
Separated Letters: shows personalized text using regular fonts, with each letter on a separate text layer so it can have its own design.
To add a graphic content object that references a uImage template:
-
Right-click anywhere in the Dynamic Content panel and select New Content Object.
-
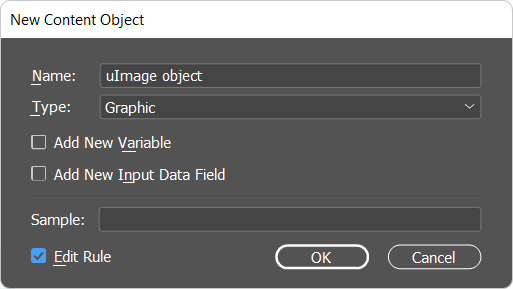
In the New Content Object dialog, enter a name for the new content object (for example, the name of the uImage template it references), set Type to Graphic, select the Edit Rule checkbox, and click OK.
Optionally, select an audience from the Link to Audience dropdown to give the content object a different rule for each audience segment (see Define a rule for an audience-linked content object or variable).
-
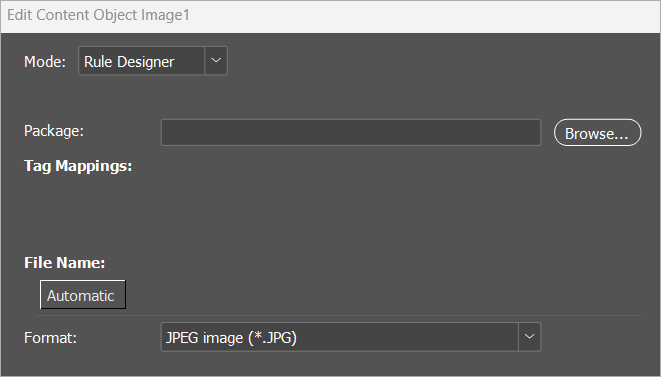
The Rule Editor opens in Rule Builder mode. Right-click in the rule area and select Personalized Image. The editor switches to Rule Designer mode and displays the uImage settings.
-
Next to Package, click Browse and select the uImage template package (*.dpkg) file.
-
Define tag rules in the Tag Mappings tree, as described in Defining uImage Tag Rules.
-
Set File Name and Format. For more options (output folder, optimization, quality), click Advanced. See Advanced uImage Settings below.
Note: The Advanced button is available only for regular packages. For Image Font and Separated Letters packages, the advanced output settings are not available.
-
Click OK.
Advanced uImage Settings
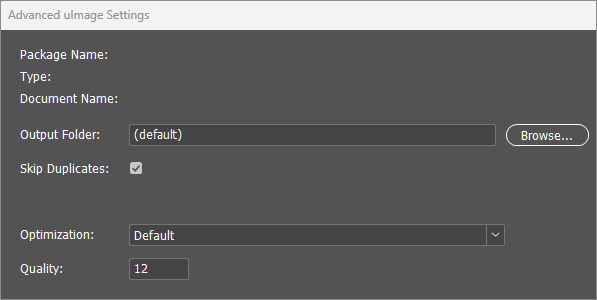
The Advanced uImage Settings dialog defines where the personalized images are stored and how they are optimized. The package details at the top (Package Name, Type, Document Name) are read from the selected document package and cannot be edited.
-
Output Folder: the folder in which the personalized images are stored. Click Browse to locate a full path, or enter a relative path to be appended to the default uImage output folder (see Setting uImage Defaults). When the document is connected to uProduce or Circle, the Output Folder field and its Browse button are disabled.
-
Skip duplicates: reuses a single image for all recipients who share the same data, instead of regenerating an identical image per recipient. Selected by default. Clear it to force uImage to regenerate every image even when a matching file already exists in the output folder.
-
Optimization: controls how much of the template is regenerated per recipient (see the optimization values below).
The remaining options depend on the output Format selected in the Rule Designer:
-
For JPEG output, set Quality to control the image quality.
-
For EPS output, select Save vector data to preserve any vector data in the image, and set the Encoding (Binary, ASCII, or JPEG). If you select JPEG encoding, also set the Quality (Low, Medium, High, or Maximum).
Note: Skip duplicates reuses the whole personalized image for recipients who share the same data. The optimization options below reuse variable sections of the image, and can be combined with Skip duplicates. For document packages, section-level optimization is supported for the JPG, EPS, and PNG output formats.
Optimization values
The Optimization option defines how the personalized image is generated:
-
Default: the default optimization for this template type — None for Regular templates, Automatic for Image Font and Separated Letters templates.
-
None: no optimization is applied.
-
Custom: the personalized image is a specific area of the template that contains all the variable data. To use this setting, mark the variable area in the Photoshop template by drawing a rectangular path.
-
Automatic: uImage automatically detects all variable areas in the template for each recipient and uses them to create the personalized image. This option saves the most disk space, but cannot be used with templates that require scripts which change the layer structure or which use the uImage tag names and values to personalize the template.
Output formats for document packages
The following table lists the output formats available for Photoshop document packages and their options.
|
Photoshop output format |
Option |
Description |
|---|---|---|
|
JPEG (*.JPG) |
Optimization Quality |
Set the optimization (see the optimization values above) and the image quality. |
|
Photoshop EPS (*.EPS) |
Save vector data Optimization Encoding |
Select Save vector data to preserve any vector data in the image (selected by default). Set the optimization (see the optimization values above). Set the Encoding in which the image data are saved: Binary, ASCII, or JPEG. If you select JPEG, choose a quality setting (Low, Medium, High, or Maximum). The default is Binary. |
|
PNG (*.PNG) |
Optimization |
Set the optimization (see the optimization values above). |
|
Photoshop PSD (*.PSD) |
None |
|