Creating a Transparent EPS File with Photoshop
Note: EPS file format is not supported in dynamic NG documents.
-
In Adobe Photoshop, open the image that you want to use as a transparent EPS.
-
On the image, select the area that you want to make transparent.
-
In the Layers pane, right-click the layer thumbnail and select Select Pixels.
-
Right-click the image and select Make Work Path.
-
In the Make Work Path dialog box, click OK.
-
From the Paths pane menu, select Save Path.
-
In the Save Path dialog box, give the path a name and then click OK.
-
In the Paths pane menu, select Clipping Path.
-
In the Clipping Path dialog box, click OK.
-
From the File menu, select Save As.
-
In the Save As dialog box, name the file and in the Save as type list, select Photoshop EPS.
-
Click Save.
-
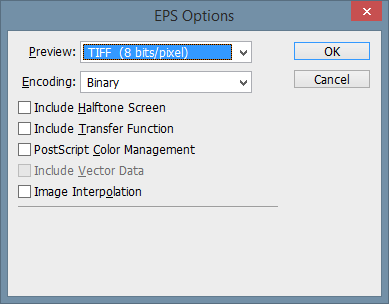
In the EPS Options dialog box, select the following settings:
-
Preview:TIFF (8 bits/pixel)
-
Encoding:Binary
-
-
Click OK.
The EPS file is ready to be added to your InDesign template.