Optimizing Performance in uPlan
Optimizing performance in uPlan can be done using any of the following methods:
uImage Function
Use the uImage.uImage function, used to work with a uImage Package (DPKG file) instead of a uImage template. Working with a uImage Package saves you the need to handle each uImage effect component manually when you export the uImage template and ensures a seamless workflow.
Caching
The uImage.uImage function is the output file name. Enter OPT to prevent uImage from creating a file with the same output file name (and the same design) if the output file already exists. Using the OPT parameter allows you to improve the performance of the production.
To regenerate the image, cancel the OPT parameter or delete the relevant output file.
Output format Properties
The uImage.uImage function can create the following types of output formats:
-
Photoshop PSD (*.PSD)
-
JPEG (*.JPG)
-
Photoshop PNG (*.PNG)
-
Photoshop EPS (*.EPS)
Each output format has different properties that can be configured in order to achieve the required production results. For better speed performances, select the minimal output file size that still meets your quality requirements.
uImage Optimize Feature
If the area of personalization is only a small part of the whole template, you can significantly improve performance using the uImage Optimize feature. This feature allows you to process only the variable section instead of the whole template, thereby reducing the weight of the Print Output file.
The Optimize feature is available for all output formats: JPG, PNG and EPS.
Optimize Feature with uImage Document Packages
When generating personalized images using a uImage document package, the Optimize feature requires a simple setup in uPlan and in Photoshop.
In uPlan - Add the Optimize Setting to the uImage Content Object Expression
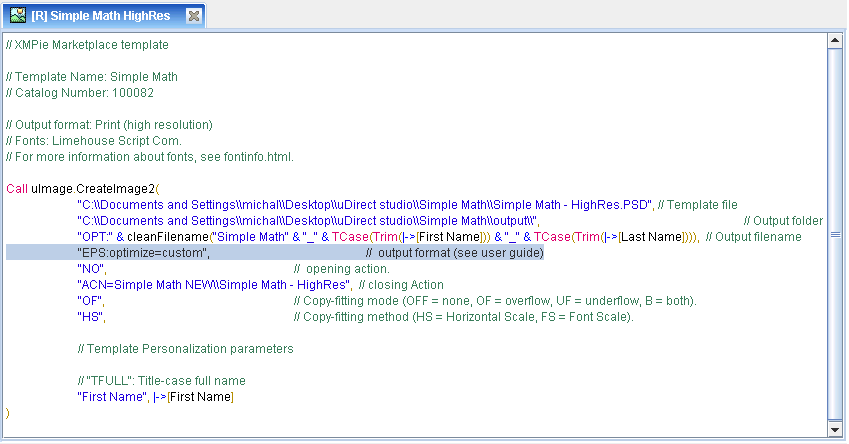
The Optimize feature is enabled by setting the output format parameter of the uImage.uImage call with the relevant Optimize option:

To enable optimization in your Plan, proceed as follows:
-
Open the Plan file containing the uImage content object.
-
Open the uImage content object Expression window.
-
Set the output format (the fourth parameter) to either JPG, PNG or EPS, followed by a colon and the relevant Optimize option, for example:
"EPS:Optimize=<option>"
<option> may be one of the following:
-
None: no optimization is performed. This is the default setting for Regular templates.
-
Automatic: uImage automatically detects all variable areas in the template for each recipient, and these areas are used to create the personalized image. This option saves the most disk space and is the default option.
This option cannot be used with templates that require one of the following scripts:
-
Scripts that change the layer structure.
-
Scripts that use the uImage tag names and values to personalize the template.
-
-
Custom: the personalized image is a specific area of the template, containing all the variable data. To use this setting, mark the variable area in the Photoshop template by drawing a rectangular path.
This optimization is always possible.
Notes:
If you do not set any option, the default optimization of each template is used: “None” for Regular templates and “Automatic” for Image font and separated letters.
If you set the “Custom” option, you are required to manually mark the variable area in Photoshop.
-
In Photoshop - Mark the Variable Area and Save the Optimization in the Document Package
This procedure is required only if you set the Optimize option in the uImage call to Custom.
You may mark the variable area in your template by defining it as a path. The path is then packed separately, as part of a specific document package. Proceed as follows:
-
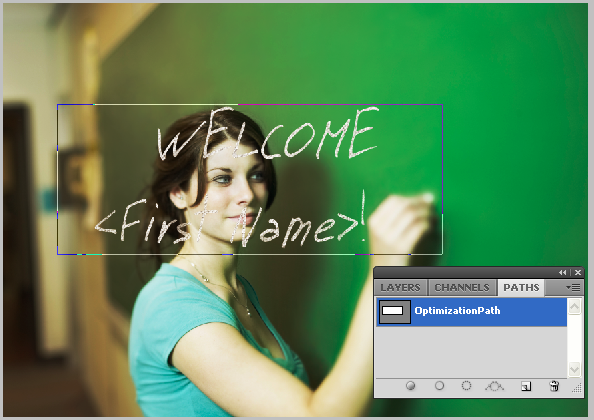
Mark a variable area by defining a path as follows:
-
Open the uImage template.
-
Verify that all of the required layers are displayed.
-
From the Paths panel menu, choose New path...
-
The New Path window is displayed.
-
Enter a Name for this path.
Select the Rectangle tool
 and
draw a rectangle around the dynamic elements.The rectangle must be symmetric
(90°, four vertexes).
and
draw a rectangle around the dynamic elements.The rectangle must be symmetric
(90°, four vertexes).The following figure shows an example Photoshop path.
-
-
Save the template as a document package (from the Photoshop menu, choose File > Automate > Export XMPie DPKG...).
The Export XMPie uImage Document Package dialog is displayed, automatically detecting all paths defined in the template.
-
Select Include Optimization Information and set the Optimization Path list to the path you wish include in this document package.
-
Set all other export options as explained in Saving a uImage Template as an XMPie Document Package (DPKG) and export the document package.
When uImage uses this document package to generate personalized images, the process will be optimized using this custom setting.
Optimize Feature with uImage Templates (EPS Output Only)
This workflow applies only to the template workflow (for the uImage DPKG workflow). In this case, the optimization applies only to print productions of the EPS output format.
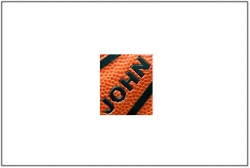
This feature divides the image into two EPS images:
-
A static background: the original image without the dynamic layers.
-
A dynamic foreground: the original image with all the dynamic layers, cropped in such a way that only the dynamic area has pixels. The static part is included without any pixels, so the template’s dimensions are maintained, but the file is significantly lighter.
The following are EPS Images, one with a Static Background and the other with an Optimized Dynamic Foreground.

The optimized, dynamic foreground image is placed exactly on top of the static background image, as shown in the following figure.
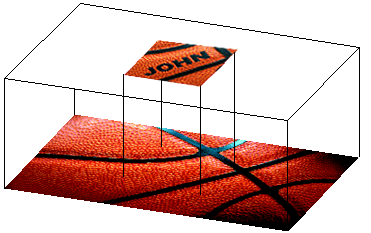
These two images are composed seamlessly, providing the desired personalization effect, as shown in the following figure.

To use the EPS Optimization feature, perform the following procedures:
-
In uPlan: Add the Optimize Setting to the uImage Content Object Expression
-
In Photoshop: Create a Dynamic Foreground and a Static Background
-
In InDesign: Insert the Static Background and the Dynamic Foreground to your Document
In uPlan - Add the Optimize Setting to the uImage Content Object Expression
The EPS optimization is applied when the optimize keyword is added to the EPS output parameter of the uImage QLingo call.
To add the EPS optimization to your Plan, proceed as follows:
-
Open the Plan file containing the uImage content object.
-
Open the uImage content object Expression window.
-
Set the output format (the fourth parameter) to EPS, with the Optimize feature set to the desired optimization option:
"EPS:Optimize=<option>"
<option> may have one of the following values:
-
None (the default setting) - no optimization is performed.
-
Speed - uImage processes a smaller section of the template that contains the uImage tags. This setting calculates the variable section only once, based on the size of the tagged layers, instead of recalculating this section for each recipient. This is the fastest production option, but the processed area may be larger than the minimum required for some recipients.
This option cannot be used with scripts or actions. It also requires setting the Copy Fitting Mode parameter to OF (Over Fitting). -
Size - uImage processes the smallest section of the template possible for each recipient, and that area only is saved as the personalized image. This option saves the most disk space.
This option cannot be used with scripts or actions. -
Custom - the personalized image is a specific area of the template containing all the variable data. This setting requires marking the variable area in the Photoshop template, by drawing a rectangular path in the path layer named "uImageOptimize" (un-quoted and case-insensitive).
This optimization is always possible.
-
The “Speed” and “Size” options do not require additional settings outside of uPlan. However, the "Custom" option requires editing the uImage template and the InDesign Document.
In Photoshop - Create a Dynamic Foreground and a Static Background
This procedure is required only if the uImage content object expression is set to EPS:Optimize=custom.
-
Create the dynamic foreground image by defining a path as follows:
-
Open the uImage template.
-
Verify that all of the required layers are displayed.
-
From the Paths panel menu, choose New path...
-
Set the Name of the path as follows:
-
When working directly with this template, the path name must be uImageOptimize.
-
When working with this template as part of a document package, no specific name is required: you may enter any free text as the path name.
-
-
Select the Rectangle tool
 and
draw a rectangle around the dynamic elements. The rectangle must be symmetric
(90°, four vertexes).
and
draw a rectangle around the dynamic elements. The rectangle must be symmetric
(90°, four vertexes). -
Save the template file.
-
-
Create a static background image:
-
Open the original uImage template.
-
Remove all layers with uImage tags (both text and graphics).
-
Remove any layers that are effected by Photoshop scripts and actions.
-
Save the background image in a Photoshop EPS format.
-
The foreground and background EPS images must have the same quality settings. Otherwise, when the two images are composed, the differences between them will be evident.
Tip: Alternatively, you can create the EPS of the static background EPS by removing the optimization parameter from the Plan, adding an empty record to the data source and producing the original template for this record only. The generated EPS will include the Photoshop effect without any recipient data.
In InDesign - Insert the Static Background and the Dynamic Foreground to your Document
Insert the optimized uImage template to your Document as follows:
-
Open the InDesign Document.
-
Insert the background image into a new layer.
-
Copy the layer that contains the background image (the copy will appear exactly on the top of the document).
-
Tag the copied layer with the uImage content object.
-
Save the Document.
When you preview or print your Document, the optimized personalized image will be placed exactly on top of the static background, thereby effectively achieving the personalization effect.