Optimizing the uImage Template
The size of the Photoshop template file has a crucial affect on the duration of the production.
The following actions can be taken to reduce the template's size (including the size of the uImage assets), resulting in decreased duration of production and preservation of the quality of the output file.
Reduce Image Resolution
Photoshop requires more memory and disk space to process high-resolution images, thus increasing the duration of time needed to process and display them. It is recommended to minimize the size of image files by reducing the images' resolution (image resolution is measured in pixels per inch (ppi)). Therefore, wherever it is possible, reduce the resolution from 300 ppi to 150 ppi.
For better speed performances, verify (in InDesign) that the Effective ppi of the image is equal to its Actual ppi.
The following is a comparison between the Effective ppi and the Actual ppi.
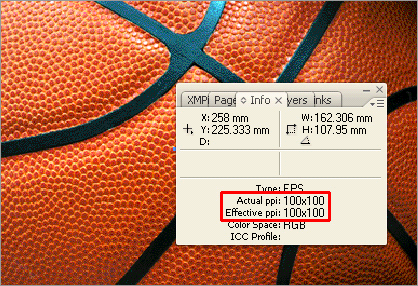
Note that the Effective ppi information is provided only for raster image formats (such as JPG and TIF).
To reduce the resolution of an image in Photoshop:
-
Open the image in Photoshop and go to Image > Image Size.
-
In the Document Size section, decrease the Resolution value and click OK.
If you wish to resize a Photoshop template file and you are already working with an action, refer to Design Tips to read on how to edit your action so that it still functions after resizing the template.
Convert to CMYK vs. RGB
The CMYK mode takes longer to process effects which are applied to the template. Furthermore, it does not support all effects and it creates larger output files. Therefore, it is sometimes preferable to work in RGB mode and convert the file to CMYK mode later in the process, by using the RIP.
Reduce 32-bit Functionality
Photoshop significantly increases the number of features that can be performed on 32-bit images. Sometimes very simple images, consisting of only several solid colors, are stored unnecessarily as a 32-bit image. If your resources are low, reducing such images to 16-bit or even 8-bit can improve performance.
Note that such reduction may permanently delete the extra color data from the image and reduce the picture quality.
To reduce an image to 16 bits or 8 bits:
-
Open the image in Photoshop and go to Image > Mode.
-
Select 16 Bits/Channel or 8 Bits/Channel.
Reduce Number of Layers
Working with layers helps make editing an image in Photoshop significantly easier. However, the layers increase the file size of an image and are time consuming because Photoshop recomposes each layer after every change that is applied to the image. Therefore, it is recommended to flatten (merge) the layers after applying changes to an image, in order to reduce its size and to remove blank layers, which also increase the image's file size.
Layers that contain uImage tags should not be flattened.
To flatten layers in a file:
-
Open the image in Photoshop.
-
Go to Layer > Flatten Image.
To merge a layer with the layer below it:
-
In the Layers panel, select the layer above the layer with which you want to merge it.
-
Go to Layer > Merge Down.
Design Tips
-
Do not put layers that contain uImage tags inside a Layer Group.
-
A layer that contains a uImage tag must not be rasterized.
-
The contents of the Smart Object layers should be in the proper size (not too big and not to small).
-
Use Smart Object layers only when using image based fonts.
-
When saving a file, do not save it to have maximum compatibility with an older Photoshop version.
-
To benefit from automatic uImage optimization, do not change layer structure using actions.