Create Image From Package
The uImage.uImage () call is used to create personalized images from a Photoshop document package. This call has the following format:
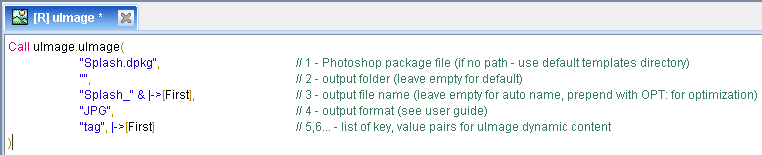
Set the uImage call parameters.
Note: Some parameters (script settings and Copy Fitting mode and method) are defined earlier, when the document package is created in Photoshop. The uImage.uImage call automatically uses these definitions.
-
Photoshop document package (DPKG) file: the name and path of the Photoshop document package file. Either specify the full path, or a relative path compared to the default uImage Templates folder.
For example, the full path to your Photoshop document package may be:
C:\ Program Files\XMPie\XMPie uImage\uImageTemplates\Stellar Templates\PromoImage.dpkg
You may have a default Templates folder, set to the following path:
C:\ Program Files\XMPie\XMPie uImage\uImageTemplates
In this case, you can set the DPKG location using a relative path:
"Stellar Templates\PromoImage.dpkg"
The default value is Splash.dpkg.
-
Output folder-the folder in which the personalized images are stored. If you leave this parameter empty, uImage creates a folder named Output next to the template and uses it as the output folder.
-
Output filename: the name of the personalized image. It is recommended to create this name using a combination of all image tag values. This ensures that different images will receive different names, while images containing the same tag values will receive the same name.
For example, you may have a template named “PromoImage”, which includes a single tag: “FirstName”. In this case, the output filename may be created by the following QLingo expression:
”PromoImage_” & |->[FirstName]
This convention creates image names such as PromoImage_Kim, PromoImage_John, etc. Note that if two (or more) recipients share the same data (for example: the first name “John”), their personalized images will have the same filename.
Tip: Maintaining such a naming convention allows you to optimize production, by creating each personalized image only once for all recipients who share the same tag values and can, therefore, receive the same personalized image.
To use this optimization, set the output filename parameter to “OPT:” (either with or without specifying a filename convention). uImage will produce personalized images only for unique filenames and skip the production of files whose names are duplicated.
In the above example, use ”OPT:PromoImage_” & |->[FirstName] as the output file name parameter. All recipients named “John” will share the same filename: “PromoImage_John”. uImage will generate this image once and skip all duplicates.
If you use the optimization option and make any changes to the template, make sure to delete the existing personalized files from the output folder.
The default value is an empty string. In this case, uImage automatically assigns a unique output filename based on template properties and uImage tag values. In this case, you can still use the Skip Duplicates optimization (OPT:).
-
Output Format: the format of the personalized images. To choose a format, specify its value as follows:
Format
Value
JPEG
JPG
EPS
EPS
PSD
PSD
PNG
PNG
Some formats support one or more Save options. To set Save options, add a colon after the output format and then a comma-separated list of key-value pairs for the Save option names and values. For example, “EPS:Vector=true,Optimize=Custom” saves the personalized images in the EPS output format, with vector data and with a custom optimization.
If you add a Save option without specifying its value, a default value is used.
The following table lists the supported output formats and their Save options.
Output Format
Save Options
JPEG (*.JPG)
-
Quality: sets the quality of the JPG file.
-
Possible values: 1 -12 (the higher the value, the higher the quality).
-
Default is 12
-
Example: “JPG:Quality=8”
-
-
Optimize: this Save option allows you to optimize production by processing a smaller section of the template that contains the uImage tags, instead of processing the whole template.
-
Set Optimize to one of the following options:
-
None: no optimization is performed. This is the default setting for Regular templates.
-
Automatic: uImage automatically detects all variable areas in the template for each recipient, and these areas are used to create the personalized image. This option results in the fastest uImage production and is the default option for Image fonts and separated letters document packages.
Note: Automatic optimization does not take place in the following cases.
If actions or scripts are used where the layer structure of the template changes.
If a script is used that uses uImage tag values to carry out personalization.
In these cases, production proceeds without automatic optimization (the job is failed only if you specifically set the Optimize:Automatic option).
-
Custom: use this option when Automatic optimization cannot be used. For this option to be used, you must manually mark the variable area in the Photoshop template by drawing a rectangular path. uImage will then optimize production according to this defined variable area. This option will still do some optimization, but is not as efficient as Automatic, since it is limited to a single variable area.
This optimization is always possible.
-
-
Default is "None" for Regular templates and "Automatic" for Image font and separated letters.
-
Example: "JPG:Optimize=Custom"
-
Photoshop EPS (*.EPS)
-
Vector: if the image contains vector data, use this option to determine if vector data should be saved.
-
Possible values:
-
true saves the vector data.
-
false ignores the vector data.
-
-
Default is true
-
Example: "EPS:Vector=true"
-
-
Encoding: the format in which the image data are saved.
-
Possible values:
-
BINARY
-
ASCII
-
JPEGLOW
-
JPEGMEDIUM
-
JPEGHIGH
-
JPEGMAXIMUM
-
-
Default is BINARY
-
Example: "EPS:Encoding=BINARY"
-
-
Optimize: this Save option allows you to optimize production by processing a smaller section of the template that contains the uImage tags, instead of processing the whole template.
-
Set Optimize to one of the following options:
- None: no optimization is performed. This is the default setting for Regular templates.
-
Automatic: uImage automatically detects all variable areas in the template for each recipient, and these areas are used to create the personalized image. This option results in the fastest uImage production and is the default option for Image fonts and separated letters document packages.
Note: Automatic optimization does not take place in the following cases:
If actions or scripts are used where the layer structure of the template changes.
If a script is used that uses uImage tag values to carry out personalization.
In these cases, production proceeds without automatic optimization (the job is failed only if you specifically set the Optimize:Automatic option).
-
Custom: use this option when Automatic optimization cannot be used. For this option to be used, you must manually mark the variable area in the Photoshop template by drawing a rectangular path. uImage will then optimize production according to this defined variable area. This option will still do some optimization, but is not as efficient as Automatic, since it is limited to a single variable area.
This optimization is always possible.
-
Default is “None” for Regular templates and “Automatic” for Image font and separated letters.
-
Example: "EPS:Optimize=Custom"
-
PNG (*.PNG)
-
Optimize: this Save option allows you to optimize production by processing a smaller section of the template that contains the uImage tags, instead of processing the whole template.
-
Set Optimize to one of the following options:
-
None: no optimization is performed. This is the default setting for Regular templates.
-
Automatic: uImage automatically detects all variable areas in the template for each recipient, and these areas are used to create the personalized image. This option results in the fastest uImage production and is the default option for Image fonts and separated letters document packages.
Note: Automatic optimization does not take place in the following cases:
If actions or scripts are used where the layer structure of the template changes.
If a script is used that uses uImage tag values to carry out personalization
In these cases, production proceeds without automatic optimization (the job is failed only if you specifically set the Optimize:Automatic option).
-
Custom: use this option when Automatic optimization cannot be used. For this option to be used, you must manually mark the variable area in the Photoshop template by drawing a rectangular path. uImage will then optimize production according to this defined variable area. This option will still do some optimization, but is not as efficient as Automatic, since it is limited to a single variable area.
This optimization is always possible.
-
-
Default is “None” for Regular templates and “Automatic” for Image font and separated letters.
-
Example: "PNG:Optimize=Custom"
-
Photoshop PSD (*.PSD)
None
-
-
Key, value pairs: one or more key-value pairs (comma separated) , specifying the name and value of each uImage tag for a specific recipient. The key-value pairs are defined in the following format:
“tag1,Value1,tag2,Value2… tagN,ValueN”
-
For Text tags, the tag value is the text to be placed in the template.
-
For Image tags, the tag value is the name and extension of an image asset file that was packaged into the uImage DPKG when creating the package in Photoshop. For example: image.jpg.
Note: Tag names are case sensitive, so you must make sure the tag name in the key-value string is spelled exactly like the tag name inside the template file.
-