Uploading a uImage Package to uProduce
This section explains how to add your uImage template to uProduce.
You can create a uImage Package in Photoshop and upload it to uProduce (by going to the campaign’s Documents page, clicking New, setting the Document Source list to Upload and browsing to the DPKG. This provides uProduce with all the relevant image components, and uProduce automatically installs these components on all connected servers. In addition, a new Document (PSD) is added to the campaign’s Documents page, indicating the association with this image.
A DPKG upload operation automatically uploads all components required to achieve the uImage effect and stores them in the appropriate locations (on the uProduce Server and on all uImage Processing Units). The packed components always include the uImage Template and the fonts required by the personalized effect, as well as any of the following:
-
uImage Assets: recipient-specific graphic files, intended to replace the image tags in your template.
Note: uImage assets are specific to each uImage template. Do not confuse them with the campaign assets, which may be shared by different Documents.
-
Action: a Photoshop action to be played back during production. This action may include brushes or styles.
-
Script: a Java Script file to be run during production.
To upload the DPKG file to uProduce, proceed as follows:
-
In uProduce Dashboard, go to the campaign that uses the uImage template to be uploaded (if this campaign is not defined yet, you may create it now).
-
In the campaign components tree, select Documents.
-
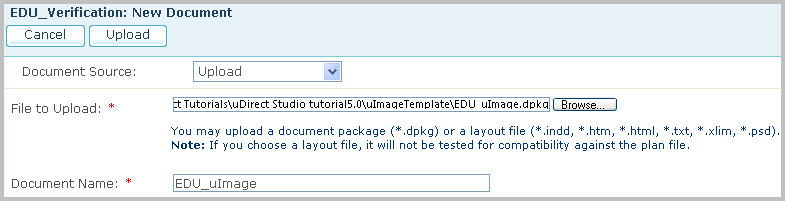
In the Documents page, click New.
The New Document window is displayed.
-
Upload the uImage document package just like any other Document:
Set Document Source to Upload, click Browse to set the path to your uImage document package and click Upload.
Once the document package is uploaded, it appears on the Documents page as a Photoshop file.
Since you uploaded a document package, the upload process is now complete: all components required to achieve the uImage effect are automatically uploaded and stored in their proper locations.
Copying a uImage Illustrator Template (*.AI) to uProduce
The following explains how to copy uImage Illustrator templates to uProduce. The uImage template file is simply saved in the same format in which its was created - an Illustrator AI file - to the path defined in the uImage content object expression.
To copy the uImage Illustrator Template file to uProduce, proceed as follows:
-
Manually copy the *.il template file to the path defined in your n the uImage content object expression.
-
Since you copied a standalone uImage Illustrator file, you must manually add all components required to achieve the uImage effect:
-
Java Script files: if you are using Java Script files, copy them to the uProduce Server, or place them in an accessible network location.
If necessary, modify the path in the QLingo uImage call defined in your Plan file to show the new script location.
-
Actions, brushes, patterns and fonts: if you are using your own actions or any specific brushes, patterns fonts, etc. manually load them into the uProduce Illustrator application. Supported font types are OTF (OpenType) and TTF (TrueType). To save and load actions and brushes, use the respective Illustrator panels. For detailed instructions, see the Adobe Illustrator documentation.
-
Notes:
-
If you are using uImage Processing Units, you must repeat this process on each of these units (copy the template, JavaScript file, action, brushes, patterns and fonts).
-
The uImage.uImage() function accepts parameters for the source template ("in") and output path, which function for desktop production. However, the output path parameter is ignored during server production, and the default (E:\XMPie\XMPieOutput\PlanParts) is used.