Defining User Views
User Views enable you to retrieve several fields at once from the database using a single SQL query, rather than retrieving each field, one at a time. Generally, the resulting view is a table with multiple columns and rows for each recipient. It can be used to define Table ADORs or other types of ADORs. For example, a user view may display the last 10 purchases made by a customer.
If you use the wizard to create your plan, uPlan automatically creates user views.
You can create a new untitled user view, create a new group of user views, and sort user views by right-clicking the User Views icon.
-
Right-clicking a specific user view group enables you to create a new user view in the current group or delete the currently selected group, provided it is empty.
-
Right-clicking a specific user view enables you to do the following:
-
Add a new field to the currently selected user view. This field must be included in the SQL query you use to retrieve information for the current user view.
-
Edit the user view’s expression in an expression window.
-
Insert the currently selected user view into the active Expression window.
-
Create a Table ADOR from the currently selected user view.
-
Move the user view into the selected group.
-
Sort the fields in the currently selected user view by name or type.
-
-
If you right-click a specific field in a user view you can insert the currently selected field into the active Expression window, and define the type of field in the user view ( bool, date, number or string).
Example of a User View Definition
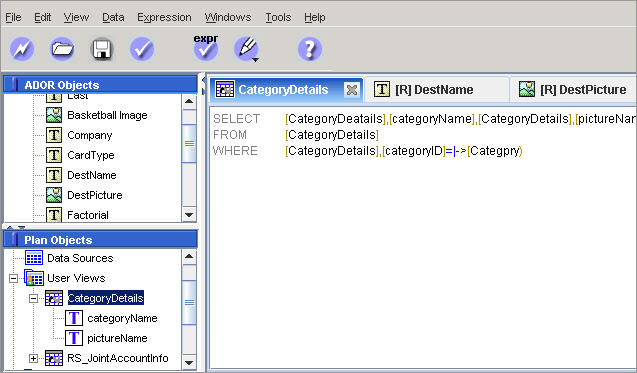
The following illustrates the use of a user view to retrieve database information on recipients’ travel destination categories.
We first defined a user view called "CategoryDetails". This user view retrieves database records that provide information on recipients’ travel destination categories. The records in this user view include Category Name and Category Picture Name, for each recipient. This information comes from two tables: Customers, which contains the list of recipients and CategoryDetails, which contains the information about the travel destination categories. The following figure illustrates the user view as defined in uPlan.
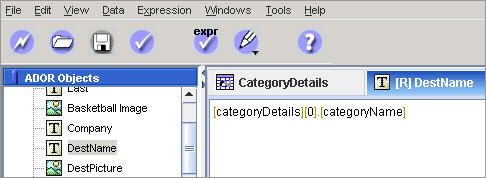
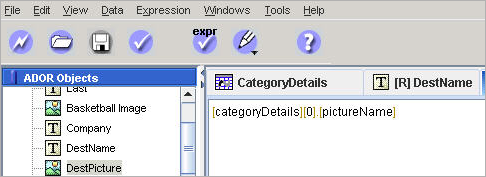
We also defined the DestName Text ADOR and the DestPicture Graphic ADOR. As illustrated below, these ADORs call the user view we defined and retrieve the values of the first record in the view.
DestName Text ADOR:
DestPicture Graphic ADOR:
Define a User View from an XML String
This following is an explanation of how to define a User View using an XML string, with no need for a data source.
To define the User View, create a variable that contains the required XML string. The code sample below is a User View definition, in which ''my_variable'' is the variable containing the XML string (note that ''EMBEDED'' is intentionally spelled with a single D):
Code Sample 1: User View Definition
"@{EMBEDED_XML} : SELECT @{my_variable}"
The following is an example XML prototype, which is the value of your variable:
Code Sample 2: XML Prototype
<T nm="table name"><FD><F nm="colum name"/>...</FD><R><C>value</C>...</R>...</T>
Notes:
-
Using an XML as the source of a User View allows you to utilize XML web services as your data sources (this normally requires writing a QLingo Extension that implements the web service call).
-
When a User View is created from an XML string, the plan validation generates an error (for example, “Error: line 1 character 1: The "EMBEDED_XML" data source is not defined”). This error may be ignored.
Define a User View using the UVDefQuery Function
Use the UVDefQuery function if you wish to perform simplified filtering of queries.
The advantages of using this function are:
-
There is no need to provide the list of fields as they are taken directly from the definition of the User View (hence the name UVDefQuery).
-
It supports a unicode CSV data source which is not hosted on uProduce.
Syntax
-
@{schema name}: EXECUTE UVDefQuery( @[table_name], filter expression);
-
@{schema name} is the data source referenced by the uPlan schema.
See Defining the Schema.
-
@[table_name]is the QLingo generic table name syntax.
See Use QLingo Generic Query Syntax When Working with Multiple Data Source Types.
-
filter expression is composed of three parts:
-
Comparand: @[field name] which is a QLingo generic field name syntax.
See Use QLingo Generic Query Syntax When Working with Multiple Data Source Types.. -
Comparison operator, which can be one of the following: =,<,>,<=,>=,<>
-
Compared value:
Filter expression example:
@[field name]=|->[Field]
-
User View XML Rules
The rules below describe the required User View XML structure. These rules provide a lot of freedom, so you can use the same XML for other purposes.
-
The table rows should be the children of the root node.
-
The number of children in the root should be the number of rows + 1.
-
The first root child should serve as a header row, while the rest should be data rows. Use "FD" as the name of the first child.
-
The first child should contain a number of children that matches the number of columns in the User View. Each child should have an attribute named "nm", whose value is the name of the column. Any other content in these children [attributes, text, children] is allowed but it will be ignored. You may use any name for these children (for example, use “F” as the name), as long as they have the "nm" attribute.
-
The other children of the root serve as the data rows. The order of the rows in the User View is determined by the order of the children. There is no restriction on the names of the data row children.
-
Each other child (data rows) should have a number of children that is equal to (or higher than) the number of children in the header child (FD). Each child in a data row serves as the column value of that row.
The value is the text content of the child. You may define any attribute on the column value node, but these attributes will be ignored. -
The order of the children in the data row nodes determines the column identity. The nth child of a data row matches the nth column in the header child (FD).
-
The data rows can have extra children, by these children will be ignored.
-
An empty value for a certain column in a data row is signified by an empty child (and not by a missing child).
The following code is an example XML (in variable I all special characters have been replaced with a with a backslash: ''\''):
<T nm="CategoryXML">
<FD>
<F nm="categoryID"/>
<F nm="Name"/>
<F nm="Picture"/>
<F nm="Desc"/>
<F nm="DOB"/>
</FD>
<R>
<CID>1</CID>
<N>test 1</N>
<P>1</P>
<D>Description of test 1</D>
<DD>01/01/1973</DD>
</R>
<R>
<CID>2</CID>
<N>test 2</N>
<P>2</P>
<D>Description of test 2</D>
<DD>12/31/2008</DD>
</R>
<R>
<CID>3</CID>
<N>test 3</N>
<P>3</P>
<D>Description of test 3</D>
<DD>05/22/1973</DD>
</R>
<R>
<CID>4</CID>
<N>test 4</N>
<P>4</P>
<D>Description of test 1</D>
<DD>04/26/1945</DD>
</R>
</T>