To adapt an existing data source for Web:
1. In uProduce > Campaigns> Data Sources, click a data source.
2. In the Data Source Details page, click the Adapt for Web button.
This will take you to the Recipients step of the Adapt Data Source for Web Wizard.
Adapting data sources for Web enables using file-based data in uProduce Web Campaigns.
When adding file-based data sources to uProduce, the system imports such file-based data into a dedicated data storage space and converts them to Local data sources. Then, when adapting local data sources for Web, uProduce adds an XMPieRecipientKey column to the Recipient table of the selected data source, thus enabling using the data in Web Campaigns. This columns will be populated with a unique value for each Recipient.
Local data sources can be exported from uProduce to the following file-based formats: CSV, TXT, XLS and MDB.
You may want to use the Adapt Data Source for Web Wizard instead of the Adapt Campaign for Web Wizard in the following cases:
· If you want to add a data source to a Campaign which is already adapted for Web.
· If you perform the web adaptation manually, for example, for the purpose of defining customized “Write ADORs”, you may still want to adapt the data sources.
· If you want to transfer the data to a third-party system, or send it to the customer.
Warning: When moving from file-based data sources to Local data sources, SQL queries that use a special syntax may no longer work, causing certain production operations to fail. To prevent this error, make sure you remove the incompatible SQL queries, or adapt them to a data source-independent format.
To use the Adapt Data Source for Web Wizard
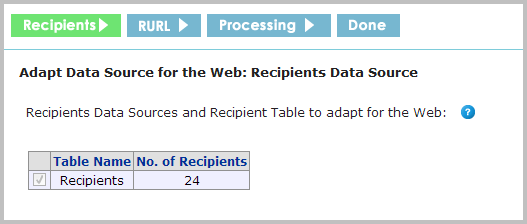
1. The Recipients step is the first step of the Adapt Data Source for Web Wizard.

2. The system displays the list of the tables that you have previously defined as Recipient Tables in the data source details page. If no Recipient Table was defined for this data source, go back to the data source details page and click Add tables to define at least one Recipient Table.
Note: It is possible to adapt for web Recipient Tables that do not match the Recipient Schema in the plan. However, you will still need to map them to the plan before use.
3. Select one or more Recipient Tables that you wish to use in your Campaign, by marking the check box to the left of the Table Name column. Make sure you are selecting the correct table by inspecting the number of Recipients in the table.
Note: Adapting Data Source for Web Wizard adds the XMPieRecipientKey both to the Recipient Table and to the plan’s Schema. Therefore, Recipient Tables that are not selected to be adapted for Web will become unmapped.
Option |
Description |
Table Name |
The name of the Recipient Table. |
No. of Recipients |
Number of Recipients in the Recipient Table |
4. Click Next. The RURL page is displayed.

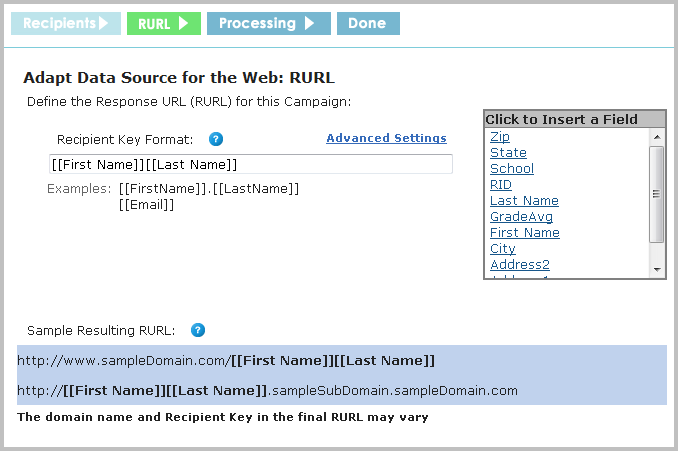
The RURL page enables you to define website's RURL format. Its settings define the content of the XMPieRecipientKey column and the Campaign's INSERT expression. As opposed to the RURL step of the Adapt Campaign for Web Wizard, this page does not allow defining the friendly URL, since the Adapt Data Source for Web Wizard does not create a Port.
5. Define the Response URL (RURL) for the Campaign.
Option |
Description |
|---|---|
Enter field names enclosed by double square brackets (for example, "[[First Name]]". Fields names are the column headers in your Recipient Table. They are listed to the right of the Recipient Key Format, under the label Click to Insert a Field. You may click a field name to insert it, or type it manually into the Recipient Key Format text box. Note: The list of fields under the label Click to insert a Field contains fields from the Recipient Table, and not ADOR Objects. The Recipient Key format definition enables the HDS Wizard to create values in the XMPieRecipientKey column for each Recipient. For more information on Recipient Key Format, see Recipient Key Format. |
|
Advanced Settings |
Click the Advanced Settings link to fine-tune the contents of the XMPieRecipientKey column and to modify the Plan INSERT expression. The Advanced Settings pop-up is displayed. In the Handling duplicate Recipient Key values section, fill in the following fields: · In the Add numeric suffix: digits drop-down list, select the number of digits in the numeric suffix. · In the Suffix separator field, select the separator between the added digits and the Recipient Key. For example, if your Recipient Key format is [[First Name]].[[Last Name]], and if you use the default settings for the numeric suffix (3 digits with no separator), your Recipient Key will look as follows: "John.Smith007". In the Modifying the Plan INSERT Expression select one of the following options: · Modify the INSERT expression to match the Recipient Key Format (default selection unless the plan already has an INSERT expression with some code) · Keep the existing INSERT expression. Clicking the View link will open the existing INSERT expression in a new window. |
Sample resulting RURL |
The Sample Resulting RURL section shows what a RURL in your Campaign may look like, based on the definition of the Recipient Key Format field above it, and Ports previously defined in the Campaign - if any exist. Information is updated as it is typed above. If insufficient information is available in the Campaign, the domain http://unknownDomain is used as a temporary placeholder. The final RURL will be based on a domain that you will define at a later stage, and not on this temporary domain name. |
6. Click Finish. The Processing page is displayed.
The Processing page shows a progress indicator, as the Wizard adapts the data sources for Web.
7. Once the processing is completed, the Done page is displayed.
The Done (summary) page shows you all modifications that occurred in the data sources during their adaptation for Web.
If the Wizard completes successfully, a success Message bar is shown with the message: “<DataSourceName> was successfully adapted for the Web”.
The Summary of Changes displays the sections that have been adapted to hosting by the Wizard. The summary displays the following information:
Option |
Description |
|---|---|
Data Changes |
Displayed only for the tables that previously did not contain the XMPieRecipientKey column. · Announces that the XMPieRecipientKey column was added to the relevant Recipient List tables. · Announces that values were set in the XMPieRecipientKey column wherever a value did not exist, in all Recipient Tables. · Specifies the Recipient Key format defined for the values. |
Plan Changes |
Displayed if any changes were made to the plan. · Declares that the column XMPieRecipientKey was added to the plan Schema. · Lists ADOR Objects for which the Write ADOR Expressions were created. · Specifies the updated Recipient Key Format used by the Plan INSERT Expression. |
You can click the Save link to save the Campaign changes summary or click Print to print this page.
8. Click Close to quit the Wizard.