A Recipient Table is the main list of Campaign recipients. Each record in the list corresponds to a person for whom a personalized content will be provided. The Recipient Tables designated for a particular Campaign will be available for selection in all production processes (print, email, web).
To add Recipient Tables:
1. In
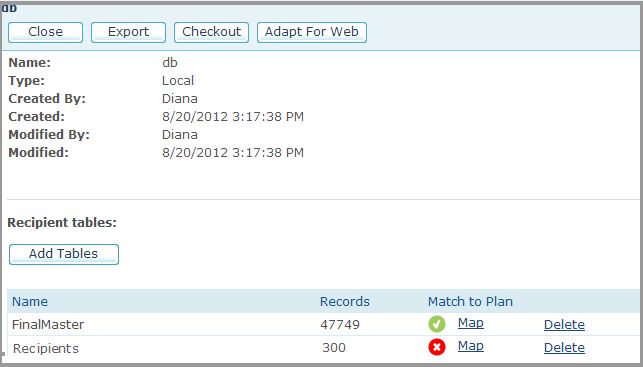
the Recipient Tables section of the data source details page,
click the Add tables button.
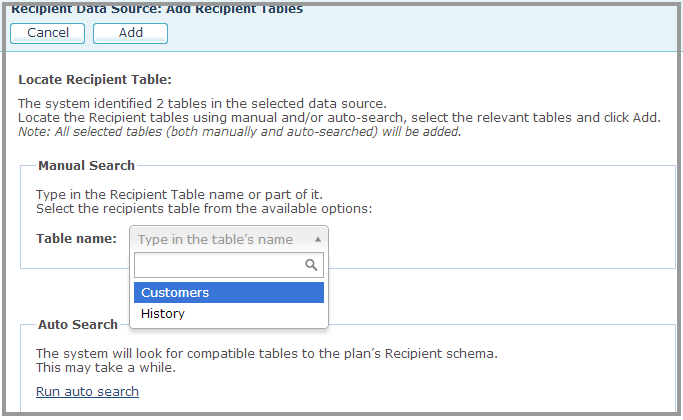
The Add Recipient List Tables page is displayed.

You have now the option to search for Recipient Tables either manually or automatically or both.
2. To manually add a Recipient Table, in the Manual Search section, select the table in the Table name field or start typing the table name to find it. The drop-down list contains all the data sources tables. To add more than one Recipient table, click the Add another table link and select the name of a different table.
3. To automatically search for tables that can be used as Recipient Tables, click the Run auto search link in the Auto-search section. Once the search is completed, the list of all the compatible tables is displayed. By default, all the tables are selected. You can remove the selection if you do not wish to use a particular table.
4. Click Add, to return to the data source details page. Note that all the selected tables are added, whether they were searched manually or automatically.
5. If you would like to add a Recipient Table whose column names are not the same as defined in the plan’s Schema, an Error icon will appear and you will have to map the Recipient Table columns to the plan’s Schema fields. Mapping is necessary to be able to use this Recipient Table later in production. To perform mapping, click the Map link next to the Recipient Table name.

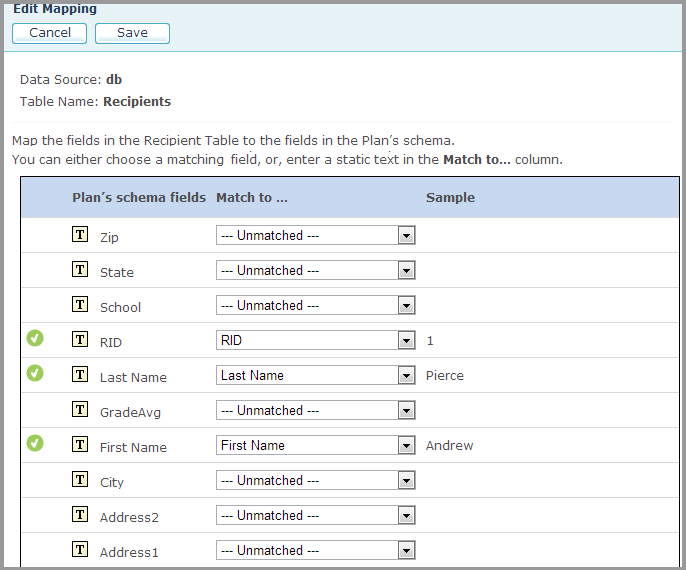
The Edit Mapping window is displayed.

6. To successfully map the selected Recipient Table to the plan’s Recipient Schema, each plan’s Schema Field must be mapped in one of the following ways:
– To a column in the selected Recipient Table (make sure your Recipient Table field data type matches the plan's schema data type).
OR
– To a static value
The selection of a static value is recommended for the cases in which the data is the same for the selected table. In this cases the table will not have this field as a column.
Specify how to perform the matching using the following options:
Option |
Description |
|---|---|
|
This icon indicates that the plan’s Schema fields have been successfully mapped to the Recipient table fields. |
Plan’s Schema fields |
Lists all fields in the plan’s Recipient Schema. All these fields must be matched or converted to static text. |
Match to |
Determines how to handle the plan’s Schema fields. Each field has a drop-down list, allowing you to choose an action to be performed or a matching field of the selected Recipient Table. |
<<Unmatched>> |
A plan’s Schema field that is unmatched by a field in the selected Recipient Table. |
<<Replace with Static Text…>> |
Choose this option if there is no field in the Recipient Table for this plan’s Schema column. This means that this value is constant for the selected table. This option displays a Text frame, allowing you to enter static text. This text will replace all instances in which this field’s ADOR Object appears in your document. Note: Leaving the text frame empty and clicking Next invokes an error message. |
Mapping plan’s Schema Fields - <<Replace with Static Text…>> option
|
|
<Field Name> |
For each field in the plan’s Schema, choose the matching field of the selected Recipient Table. Note the following: · Fields that have the same name in the plan’s Schema and the Recipient Table are automatically matched. · Matching fields are grayed out in the drop-down lists of other fields. · When a matching field is found, it can only be replaced by one of the unmatched fields (or by an action). |
Sample |
For each field in the Data Schema that is mapped to the Recipient table, this column displays the sample value. Values, whose data type in the Recipient Table does not match the data type defined in the Data Schema are marked with an asterisk (*). |
7. Once you finished mapping the data source and the Recipient Table, click Save. The page can only be saved if all the plan’s Schema fields are mapped.
8. In the data source details page, click Close to return to the main data source page.