Assets
Your campaign’s documents may use assets: graphic files and text files, used by ADOR objects as dynamic content in your document. To use these assets in your campaign, you are required to define their asset Source: a logical container that holds these individual asset files. For example, a graphic ADOR object selects the image for a specific recipient from this asset Source.
Each campaign may include several asset sources. Having more than one asset source serves different purposes, for example:
-
Grouping: you can group assets under different categories, where each category is a separate asset source.
-
Location: you can place assets in different locations. For example, you can create a local asset source for images specific to a particular campaign, and another asset source, which is a shared directory common to all of the company’s campaigns.
-
Usage: different asset Sources may serve different usage scenarios, such as processing versus proofing. In this case, one asset source may include all high-resolution graphics required for processing the dynamic document, while another asset source may include low-resolution graphics for proofing the dynamic document.
You can control which asset sources are used for a specific purpose by turning on the ones you require and turning off the rest. For more information, see Activate and deactivate asset sources.
Add campaign asset sources
Your campaign can point to one of two types of asset sources:
-
Local asset sources: reside locally on the uProduce server.
-
File system asset sources: reside on a different computer.
To add an asset source to a campaign:
-
Go to the Campaigns page and select the campaign to which you wish to add an asset source.
-
In the campaign tree, click Asset Sources to display the Asset Sources page.
-
Click the New button.
The New Asset Source dialog is displayed.
-
Choose the asset source type you wish to create:
-
Select Local to create an asset source that will be used for uploading campaign assets to the uProduce server.
-
Select File System to create an asset source that will be linked to a file system location, where the Assets reside.
uProduce displays settings that are relevant to the chosen asset source type:
-
For local asset sources, you are prompted to enter a Name.
-
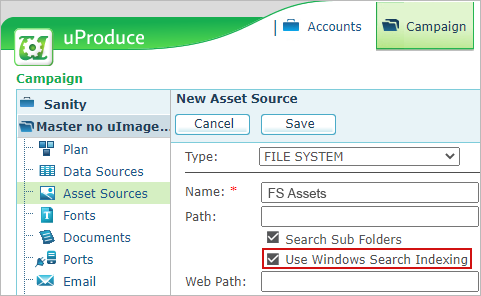
For file system asset sources, the dialog displays the following options:
Option
Description
Name
The name of the new asset source logical container.
Path
The file system path that uProduce will use to search for Assets.
The path is required for print productions and is optional for HTML productions.
You should enter a value for HTML productions if your data source does not use file extensions (for example, *.gif, *.jpg, *.txt, etc.) when it lists the Assets. This parameter will ensure that uProduce searches the specified path location for the required files.
Search Sub Folders
Select this option to search for subfolders within the selected path.
Use Windows Search Indexing
If you observe poor performance when searching for asset files, it is advisable to use Windows Search Indexing.
This is especially useful in cases when the file system contains many folders and subfolders. During production, searching these folders may take a long time and could thus affect asset-resolving performance.
For Windows Indexing to work you must first configure in on the server. For more information, see Improving Search Performance using Windows Indexing.
Important! This feature is relevant only for large file system asset sources, where the search is slow. As a rule of thumb, if the search is under 2 seconds per asset, do not use this option as it may result in performance degradation.
Web Path
The web path uProduce will use to locate the assets during generation of the HTML pages.
This parameter is required for HTML production.
-
-
Click the Save button.
The new asset source is listed on the Asset Sources page.
You can now add assets to populate this asset source.
-
Repeat the above procedure for any additional asset source you wish to add to your campaign.
Edit asset source details
When editing an asset source, you can change the asset source name. For file system asset sources, you can also change the path.
To edit asset source details:
-
In the campaign tree, click Asset Sources to display the Asset Sources page.
-
In the Asset Sources page, go to the asset sources list and click the Edit link next to the asset source you wish to edit.
The Edit Asset Source page is displayed, showing the asset source name and its path/web path and path authentication details (where relevant).
-
Change the name and path/web path as needed.
-
For asset sources residing on servers requiring authentication, edit the path authentication fields (if necessary).
-
Click the Save button.
The updated asset source is displayed in the Asset Sources page.
Change the priority of asset sources
uProduce enables you to assign different priorities for various asset sources. Looking at the list of asset sources, you can see the priority assigned to each asset source in the Priority column.
When uProduce searches for assets during production or generation of a proof set, it first looks for the required assets in the higher priority asset sources. You can change the priority of asset sources by moving them up and down in the list.
To change the priority of asset sources:
-
In the campaign tree, click Asset Sources to display the Asset Sources page.
-
Check the desired asset source and click the Move Up or Move Down button, to raise or lower the priority, respectively.
Activate and deactivate asset sources
uProduce allows you to activate or deactivate asset sources, so they are either used or ignored during production, respectively. If an asset source is deactivated, uProduce will ignore it and will not search it for its Assets during production. For example, you may have two asset sources, one for high-resolution graphics and one for low-resolution graphics. You can then choose to activate only one of these asset sources, according to what is needed for the individual production run.
By default, all asset sources are initially activated.
To activate or deactivate asset sources:
-
Go to the Campaigns page and select the campaign whose asset sources you wish to activate or deactivate.
-
In the campaign tree, click Asset Sources to display the Asset Sources page.
-
Check the desired asset source and click the Deactivate or Activate button, to ignore or use the asset source, respectively.
Upload campaign assets to local asset sources
Once you have defined a local asset source, you can add assets to your campaign.
When working with a local asset source, you are required to upload the assets associated with the current plan. You can upload each asset file separately, or upload a zip file that includes all the assets related to a specific campaign.
To upload assets to a local asset source:
-
Go to the campaigns page and select the campaign to which you wish to upload assets.
-
In the campaign tree, click Asset Sources to display the Asset Sources page.
-
Click the asset source name to display the details page of the selected asset source.
-
Click the Upload button.
The Upload Assets dialog is displayed.
-
Enter the path of the asset file or click the Browse... button to locate the file. You can choose any single asset file (*.jpg, *.gif, *.eps, *.bmp, etc.) or a zip file (*.zip) that contains the required Assets.
-
Click Save to upload the asset(s).
A progress indicator is displayed. At the end of the upload process, the asset information is displayed in the Assets page.
Manage assets
You can view assets that you added to your campaign, provided that they belong to a local asset source.
If you wish to make changes to an asset, or use a different asset file, use the Check In and Check Out feature. For more details, see Checking Files In and Out.
You can download an asset file, delete an individual asset, an asset Source, or all assets.
You can indicate the manner in which you want uProduce to handle missing Assets during production. Many of the dialogs for production preferences or settings prompt you to specify whether you would like to ignore the error, skip the record, or fail the job in case of missing Assets.
How uProduce searches for assets
Note: Before you choose the asset file type for your print production, it is recommended that you refer to Best Practices for Variable Data Print (VDP) Design.
The assets specified in the plan file may not necessarily include a file extension or data path. In these cases, uProduce uses a unique search algorithm for populating the ADOR objects with the actual values during proofing and production.
uProduce first checks whether the document involves print or HTML production.
Print documents
uProduce checks if the asset is a text file or a graphic file:
For a printed text file, uProduce searches for a matching file name with the following extensions (in the order listed here):
-
*.txt (plain text)
-
*.rtf (Rich Text Format)
-
*.doc (MS Word)
For printed graphic files, uProduce searches for a matching file name with the following extensions (in the order listed here):
-
*.eps
-
*.pdf (Portable Document Format)
-
*.psd (Adobe Photoshop)
-
*.ai (Adobe Illustrator)
-
*.tiff/*.tif image
-
*.bmp image
-
*.jpg/*.jpeg image
-
*.png image
-
*.gif image
-
*.HEIC
-
*.HEIF
-
*.SVG
-
*.WEBP
Web HTML documents
uProduce first checks if the asset is a text file or an image file.
For a web text file, uProduce searches for a matching file name with the following extensions (in the order listed here):
-
*.html/*.htm (HTML)
-
*.txt (plain text)
For a web image file, uProduce searches for a matching file name with the following extensions (in the order listed here):
-
*.jpg/*.jpeg image
-
*.gif image
-
*.png image