
 View what's in this topic
uImage Documents
A uImage for server enables a uProduce server to generate personalized images, with all the advantages of the robust uProduce production environment. Each uImage for server license key enables a server to perform uImage Production.
The server generating the personalized images may be one of the following:
-
A uProduce server with production capabilities
-
A uProduce Extension server that performs a variety of production tasks
(in addition to uImage production) -
A uImage Processing Unit (UPU) that is dedicated to uImage production
The uImage Template is uploaded to the uProduce server, but the production itself may be executed by an Extension server or a UPU.
uProduce can generate the personalized images in different ways, depending on your specific needs. For example, uImage production can be an integral part of your general print production. In this case, printing the document that contains the uImage template triggers the creation of the personalized images. The ability to create images on demand allows you to incorporate uImage into a cross-media campaign.
Alternatively, you can prepare the personalized images in advance, by generating a proof set. The personalized images are then instantly available for use as regular graphic Assets. This way, uImage production can benefit from the advantages of the uProduce environment without effecting the performance of your print production.
Note: As similar workflow allows you to
include uImage in your campaign when uProduce does not have a uImage for
server license (for example, when using uProduce e-Media): simply create
the personalized images in advance
(for example, generate a proof set using uPlan) and then upload them to
the uProduce server as regular graphic Assets.
The following sections describe the main procedures used to incorporate uImage into your uProduce workflow
Upload a uImage template to uProduce
This section explains how to add your uImage Template to uProduce. This procedure depends on whether you are uploading a uImage document Pacakge or copying a standalone Template:
-
Uploading a uImage document Package (DPKG)—you can create a uImage Package in Photoshop and upload it to uProduce (by going to the Campaign’s documents page, clicking New, setting the document Source list to Upload and browsing to the DPKG. This method provides uProduce with all the relevant image components, and uProduce automatically installs these components on all connected servers. In addition, a new document (PSD) is added to the Campaign’s documents page, indicating the association with this image.
-
Copying a standalone uImage Template (PSD): when working with Templates directly (PSD files), you have to copy the image to uProduce, and set the plan reference (the uImage call) to point to the image on uProduce. No action is required within the uProduce Dashboard.
Note that using the Template directly (as opposed to using a document package) forces you to copy the template, as well as install the relevant fonts, actions and assets, on every single uImage Processing Unit and every single uProduce Extension Sever. Therefore, this is not the recommended workflow.
A DPKG file is the recommended method for incorporating uImage Photoshop Templates into your uProduce Campaign. A DPKG upload operation automatically uploads all components required to achieve the uImage effect and stores them in the appropriate locations (on the uProduce server and on all uImage Processing Units). The packed components always include the uImage Template and the fonts required by the personalized effect, as well as any of the following:
-
uImage assets: recipient-specific graphic files, intended to replace the image Tags in your Template.
Note that uImage assets are specific to each uImage Template. Do not confuse them with the Campaign assets, which may be shared by different documents
-
Action: a Photoshop action to be played back during production.
This action may include brushes or styles. -
Script: a Java Script file to be run during production.
To upload the DPKG file to uProduce, proceed as follows:
-
In uProduce dashboard, go to the campaign that uses the uImage template to be uploaded (if this campaign is not defined yet, you may create it now).
-
In the campaign's components tree, select Documents.
-
In the Documents page, click New.
The New Document window is displayed.
-
Upload the uImage document package just like any other document:
Set Document Source to Upload, click Browse… to set the path to your uImage document package and click Upload.
Once the document package is uploaded, it appears on the documents page as a Photoshop file.

Since you uploaded a document Package, the upload process is now complete: all components required to achieve the uImage effect are automatically uploaded and stored in their proper locations.
Copy a uImage template (*.PSD) to uProduce
This section explains how to copy uImage Photoshop Templates to uProdcue. In this case, the uImage Template file is simply saved in the same format in which its was created - a Photoshop PSD file - to the path defined in the uImage ADOR object expression.
To copy the uImage Template file to uProduce, proceed as follows:
-
Manually copy the *.psd Template file to the path defined in the uImage ADOR object expression.
-
Since you copied a standalone uImage Photoshop file, you must manually add all components required to achieve the uImage effect:
-
Java Script files: if you are using Java Script files, copy them to the uProduce server, or place them in an accessible network location.
If necessary, modify the path in the QLingo uImage call defined in your plan file to show the new script location. -
Actions, brushes, patterns and fonts: if you are using your own actions or any specific brushes, patterns fonts, etc. manually load them into the uProduce Photoshop application. To save and load actions and brushes, use the Photoshop panel. For detailed instructions, see the Photoshop documentation.
Note that if you are using uImage Processing Units, you must repeat this process on each of these Units (copy the Template, JavaScript file, Action, brushes, patterns and fonts).
-
Work with uploaded uImage effect components
After uploading a uImage DPKG or standalone Template to uProduce, you may wish to edit the Template or its components (for example, replace a font or update and action). Such updates are performed differently for uImage document Packages and for uImage Templates.
Document package workflow: Edit uImage Effect components
Whenever you wish to update any of the uImage effect components (uImage Template, fonts, Assets, actions etc.), you can easily create a new document Package and upload it to uProduce.
To replace a DPKG, proceed as follows:
-
In the campaign’s Documents page, click the uImage template you wish to replace.
-
In the Document Details page, click Checkout.
This operation prevents other users from updating the same uImage Template.
-
Update the relevant uImage effect components and create a new DPKG.
-
Back in the Document Details page, click Checkin.
The Update Document dialog is displayed.
-
Click Browse... and point to the updated DPKG file.
-
Click Save.
The new DPKG is uploaded and the components are updated on all uProdcue Extensions and UPUs.
Edit templates uploaded DPKGs
The uImage Template itself can be replaced in two different ways: either as part of a DPKG as explaned above, or directly. To replace the uImage Template directly, follow the same procedure as the DPKG update procedure explained above, except that you upload a standalone uImage Template (PSD) instead of a DPKG.
Note: You must not manually replace any uImage effect component (other than the uImage Template) installed on your uProduce server, uProduce Extension or UPU. For example, if you wish to update an action, you must not delete it from Photoshop and attempt to replace it with a new action, but recreate the uImage DPKG and upload it to uProduce.
Standalone uImage template workflow: Edit uImage effect components
When using the standalone uImage Template workflow, all the uImage effect components are installed manually. For example, the uImage Template is the copied to the path specified by the plan file (in the uImage call). Note that no action is performed via the uProduce Dashboard.
Similarly, updating each of these components is done manually, by overriding the existing components.
Note: If you choose to update a certain component manually (and not as part of a DPKG), make sure you load the changes to all uProduce Extension Servers and Image Processing Units (UPUs).
Locale conflicts between the workstation and uProduce
Locale is a set of parameters that define a country’s cultural conventions, such as its language, date and time formats, currency symbols etc. If the desktop tool used to create the uImage Template has different locale settings than uProduce, there may be inconsistencies in the layer names that are referenced by the Template’s actions.
For example, you may use an action that runs two commands: Duplicate and Select . Duplicate creates a copy of the selected layer. The name of this copy depends on the locale of the machine. For example, machines with an English locale add the suffix “copy" to the layer name, while machines with a French locale add a different suffix: “copie”.
After the layer is duplicated, the “Select” command uses the layer name as input. If the action was created on a machine with an English locale, the Select command searches for a layer name with the suffix “copy”. Running this action on a machine with any other locale will fail, because the duplicated layer will have a different suffix (for example, “copie” on machines with a French locale).
To avoid such Photoshop conflicts, make sure the locale settings and the Photoshop language on the designer’s workstation are identical to those on the uProduce server.
Set up the uImage asset source
When using the standalone uImage Template workflow (as opposed to the DPKG workflow), uImage requires setting several default folders, including the output folder in which personalized images are stored.
These personalized images are used as regular graphic Assets by the document containing the uImage ADOR object. If you save the personalized images to this default folder, add it to your campaign as a file system asset source, to allow uProduce to find them when the document is produced.
In certain cases, you may prefer to store the personalized images in another output folder, such as a drive with more disk space. This is done in the plan file, by setting the second parameter of the uImage call to the chosen output folder. This folder must be defined in your campaign as a file system asset source.
Note that to make the images available to the web, the web path to the uImage Output folder should be a URL that is mapped to the same folder.
Generate personalized Images on uProduce
uProduce allows you to generate personalized images in different ways:
-
When you proof or process a document that uses uImage, the personalized images are generated as part of the document composition process.
-
Alternatively, if you do not wish to generate these personalized images for a particular document composition (for example, if you wish to generate them in advance, so they will be ready to be used as website images), you can generate a proof set.
Choose one of the following procedures:
To generate personalized images as part of a document production:
-
Select the document that uses the uploaded uImage template.
-
Produce this document by selecting the Proof or Process options.
The production of the job triggers the evaluation of the plan file containing the uImage call. This in turn triggers uImage to create the personalized images and save them in the specified output folder. These images are then automatically incorporated into the print / web document and added to the print output file. It is recommended to start with a short run, to check that everything is working properly, before running the full production job.
In order to allow fast, efficient production, the personalized image generation is shared by all uProduce extensions that have a uImage for server license.
To generate personalized images as a proof set:
-
In the campaign tree, click Plan.
-
In the Plan page, select the plan.
-
In the Plan Details page, click the Generate button.
The Generate Proof Set for <Plan Name> page is displayed.
-
To generate a proof set, define its input data and record range and click Submit.
This proof set will include a personalized image for each recipient in your data source.
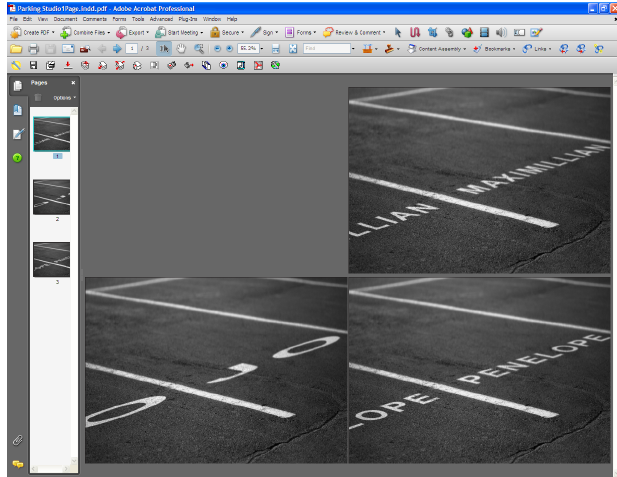
The following shows example personalized images generated by uProduce. In this case, the print output file is a PDF that includes three images. Each image shows the recipient’s first name (Jo, Maximillian or Penelope) painted on all parking spaces.
Download a uImage document package from uProduce
The uImage document may be downloaded from uProduce just like any other document, either as a document Package or as the original file.
To download the uImage document Package:
-
In uProduce dashboard, display the campaign containing the uImage document you wish to download.
-
In the campaign's components tree, select Documents.
-
In the Documents page, click the uImage template (a Photoshop file).
-
In the Document page, click Download.
The Download <Document Name> page is displayed.
-
Choose Document Package.
-
Click Save.
The Photoshop template is packed along with all components required to achieve the uImage effect (such as fonts, uImage assets, actions, brushes, styles and scripts).
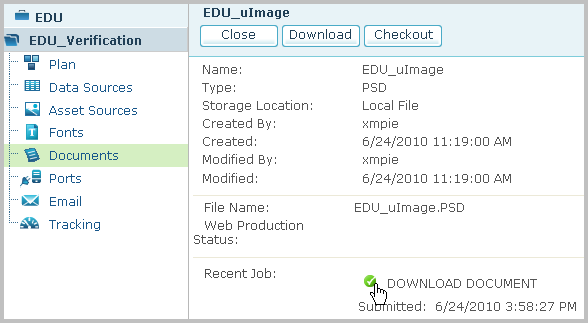
When the package is ready, the Download Results page is displayed with a link to the downloaded file:
-
Click the Download Document icon
 .
The Output Download page is displayed.
-
Click the link to your document Package to display a File Download window.