Configuring Hot Folders
Note: This operation can be performed by the system admin user only.
The Hot Folder feature allows you to automate document submission. This is done by simply dropping a data file into a hot folder. Data files are picked up by the hot folder and sent to production, thereby generating various output. Users can configure multiple hot folders and drop into them numerous files of various data formats.
Using hot folders for document production offers several benefits:
-
Automation: Hot folders automatically trigger predefined processes when files are added, thus reducing manual effort and improving efficiency.
-
Streamlined workflow: By assigning specific tasks to different hot folders, you can easily manage and streamline your production workflow.
-
Consistency and accuracy: Hot folders ensure that documents are processed according to the same set of rules every time, minimizing human error and maintaining consistent output quality.
-
Scalability: Hot folders allow for easy scaling of operations, as new folders can be added to handle additional tasks or document types without significant reconfiguration.
-
Time savings: With automated processing, tasks are executed faster than they would be manually, saving time and allowing for higher production throughput.
-
Flexibility and customization: Hot folders can be customized to handle various file types and processes, adapting to your specific document production needs.
-
Real-time processing: As soon as a file is added to a hot folder, it’s immediately processed, enabling real-time document production.
These advantages make hot folders a valuable tool for organizations that need efficient, automated document production and management.
Note: The Hot Folder feature is an optional add-on and is activated by an additional license. It will eventually replace the Hot Submit plugin created by XMPie Professional Services. If you have purchased this plugin from the Professional Services team, contact support to get your free license for the new built-in version.
Also, you should be aware that this is not a direct replacement of the Professional Services plugin, meaning that your existing hot folders will need to be reconfigured to use the new built-in hot folder mechanism.
When you log in as the admin user, you can click the Settings tab at the top to get the list of settings on the left, and then click to view the Hot Folders settings. This is where you create new hot folders or edit the settings of existing hot folders.
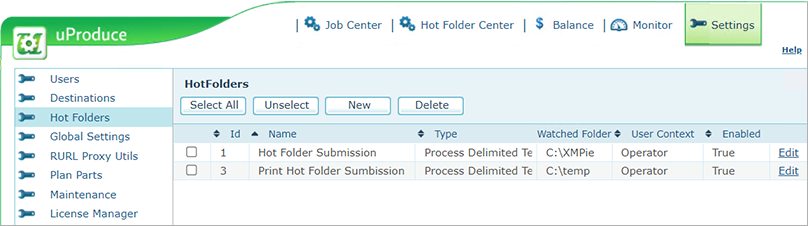
Only the admin user can create new hot folders. The hot folder setting is not available to other dashboard users.
You can still create hot folders without a license. If a license is not installed, you will see a message informing you that a license is required to process the files added to the hot folders.
The Hot Folder Center, which can be accessed from the button at the top of the page, is the place to view and check the status of all the files sent to the hot folders.
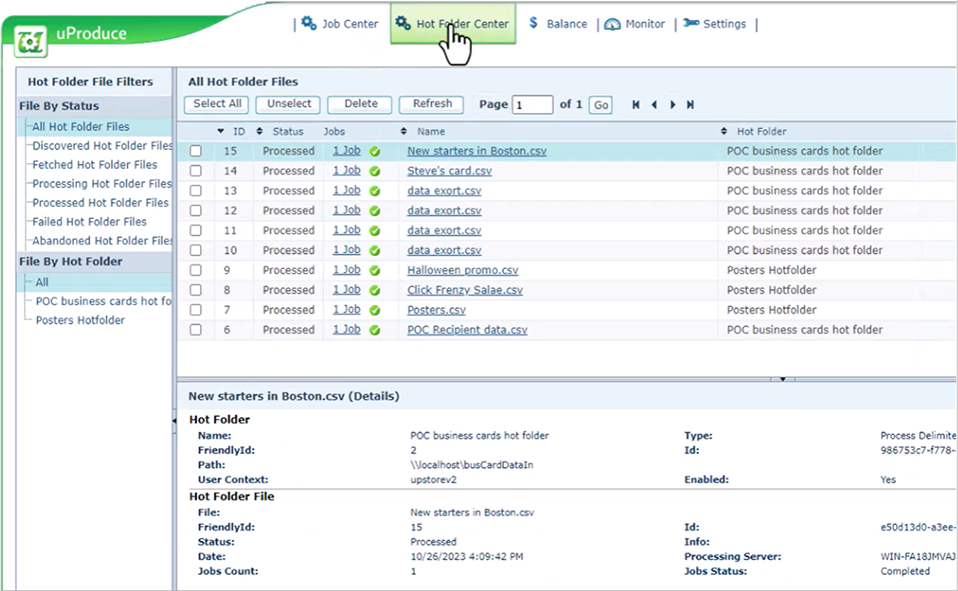
Each hot folder processes jobs in the context of a specific uProduce user. When administrators set up a hot folder, they define the user context by selecting one of the uProduce users available on the server. That user will see only the hot folder files that were sent to hot folders that this user is permitted to see.
On the left panel, you can filter the list of files by the hot folder you own, or by the status of the file.
The details area at the bottom allows you to get more information about the file submission and its status.
The "Jobs" column shows the status of the job that was created. If the job used split into batches, the number of jobs is shown, and the status icon shows the most relevant status of split jobs. If some are completed but one is still processing, it will show processing. If one job fails, the status overall will be failed even if some jobs succeeded. Clicking the link will take us to the Job Center with the relevant job selected.
The hot folder feature is designed to be extended via custom development. The functionality that comes with the hot folder license is designed to look for a data source file type in the hot folder, and to trigger production. Example of an extended functionality that can be created: watching campaign packages added to the hot folder, which are then automatically uploaded to a uProduce account.
Create hot folders
This section explains how to create and use a uProduce hot folder.
Two data types can be used:
-
Recipient data file: Processes the input data file as the recipients data source.
All other data sources (schema) configured in the job ticket, and needed for production, are left unchanged. -
Data file: Processes the input data file as the sole data source used in the job production.
The recipients data source and all other data sources (schema) configured in the job ticket, and needed for production, are set to use the input data source.The data file is used to create a new data source on uProduce. During the hot folder job submission, the data source will be locked. Once the job is completed (succeeded or failed), the data source will be deleted at the end of the production.
As the data file may contain multiple tables, the table used as the recipients data source is detected automatically by matching the plan recipients schema.
To create a hot folder:
-
Log in to the uProduce dashboard as the admin user.
-
Select Hot folders from the settings list.
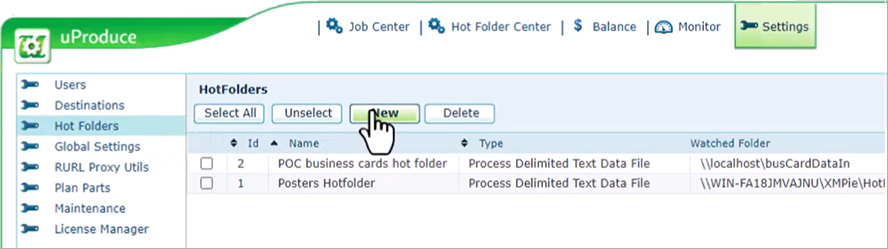
-
Click to add a new hot folder.
-
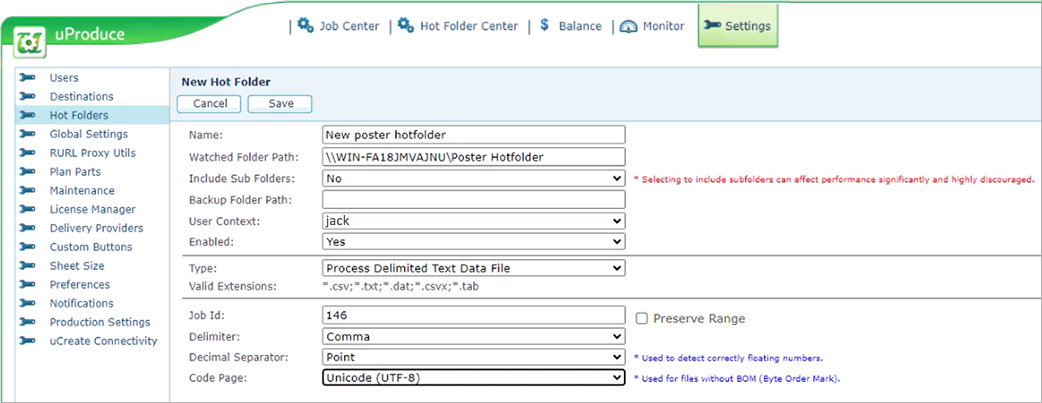
In the New Hot Folder dialog, enter the following:
-
Name of the hot folder.
-
Path: Set up a shared folder that will be used as the hot folder. The Windows user that is running the XMPie services on the uProduce server must have full control to read, write, update and delete files in the folder.
-
Include Sub Folders: Select whether to watch sub folders as well. This is not recommended because the additional load will impact performance.
-
Backup Folder Path: After processing the file, the hot folder feature will delete the file. You can define a backup folder where the file uploaded to the hot folder will be moved to after it is processed instead of being deleted.
-
User Context: Select the uProduce user that you want to process the job. This user will need to have access to the account that contains the document you want to process.
-
Enabled: Enable the hot folder so it can process files.
-
Type: The type of files that will be detected in the hot folder.
-
Process Recipients Data File: The following data files types - csv, txt, dat, csvx or tab extensions - are being watched to replace the recipients table.
The data file is held in the file system, and not uploaded into the uProduce dashboard, so it is used as the recipient table, and any additional data tables needed for production will come from the data sources already defined in the campaign. -
Process Data File: This type supports a multi-table data source such as Excel, Access, multi-file CSV zip, used for both recipient and additional tables.
A new data source will be created in the dashboard, all tables in the Excel, Access or ZIP file will be added, and only that data source will be used for production. If the data source contains more than one table that matches the primary recipient table, the first one found will be used as the primary recipient table, and all others will be considered as additional schema tables.In addition, after processing the document against the uploaded data, the data source will be deleted automatically.
-
-
Job Id: Enter the ID of the job that includes all the required job settings/parameters that will be used for the automation.
Select the Preserve Range checkbox to process only several records of the input data file, as set in the job ticket. This can be useful as a proof or test before processing the whole data file. If this checkbox is not selected, the hot folder will disregard the range setting and generate an output for all available records.
-
Set the delimiter, decimal separator (period, comma) and the code page (used for files without Byte Order Mark). Note that the delimiter can be set to Fixed Width, in which case you will have to set the values of the column widths.
-
-
Save your settings.
You can now test by copying a data file into the hot folder. When the file is processed, it is deleted or moved to the backup folder.
Back in the uProduce dashboard, you can see the status of the file in the Hot Folder Center. If you want more information about the job, you can click the job link and be taken to the job center where the relevant job is highlighted.