Configuring Post Composition Operations
The Post Composition Operations feature allows you to apply operations on print files after they are composed. For example, you can apply post composition operations to compress the output, or to copy it to a network shared folder. Post composition operations can be chained, allowing multiple operations to be carried out.
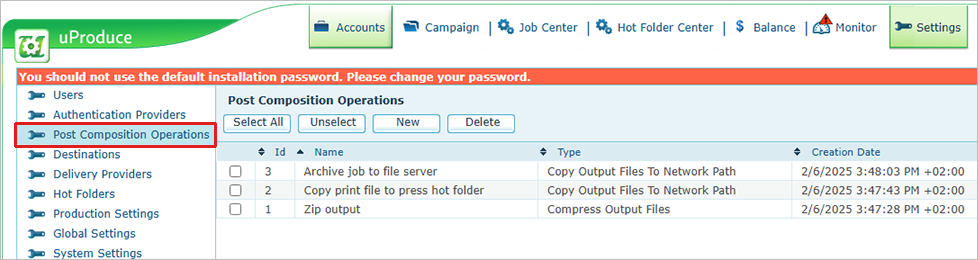
When admin users log into the uProduce dashboard, they can click the Settings tab on the toolbar to get the list of settings on the left, and then click the Post Composition Operation settings. This is where you create new post composition operations, edit the settings of existing operations, or clone existing operations to create new operations based on the original.
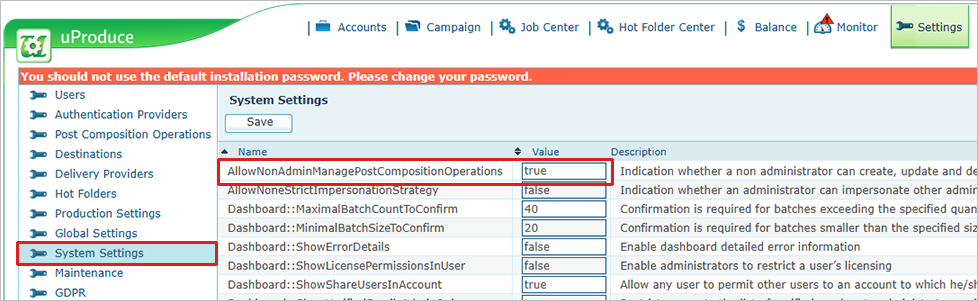
Note that by default, non-admin users will be able to see, but not create, edit or clone post composition operations. However, it is possible for the admin user to change the AllowNonAdminManageAccountLevelEntities system setting to true to allow all dashboard users to create, clone and edit account-level entities such as post composition operations.
Create Post Composition Operations
-
On the Post Composition Operations setting page, click the New button.
-
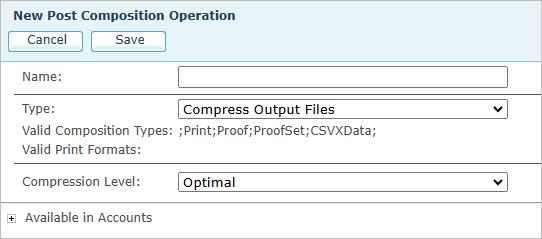
Name: Enter a descriptive name for the operation, so that when users are processing jobs and selecting post composition operations, the function of the operation will be clear.
For example, an Impose Output File operation could be named "8x5_sheet_with_6-up_labels" to clearly define what it is used for.
-
Type: Select the type of operation you want to perform:
-
Compress Output Files: Select how to compress the print output file.
-
Copy Output Files to Network Path: Define a network path as the destination for your production output.
-
Copy Output Files to FTP(S) Location: Select an FTP path as the target destination for your production output. For example, ftp://server:21/folder.
-
Copy Output Files to AWS S3: Select AWS S3 as the target destination for your production output.
-
Delete Output Files: Remove the output files from the uProduce server after they are copied to another location.
-
Copy Output Files to SFTP Location: Select an SFTP path as the target destination for your production output. For example, sftp://server:22/remote/path/to/directory.
-
Create Job Definition (JDF) File: Create a JDF file using an eXtensible Stylesheet Language Transformation to format the XML JDF file.
-
Impose Output File: Define a new imposition template.
-
-
Settings: Depending on the operation selected, the available settings will change so you can configure the operation.
Compress Output Files
-
Compression Level: Select Optimal, Fastest or No compression.
Copy Output Files to Network Path
-
Network Path: The network path to copy the files to. For example: "C:\path\" or \\server\share\path
-
Sub Folder: You can select to automatically create a subfolder in the network path and name it via the uProduce Job ID, or the current date time. If you select to create a subfolder, you will be able to customize the folder name using the format field and standard string formatting features. For example, for the Job ID, you can enter any static text string together with 0 or # placeholders for the Job ID. (0 will force a zero to display even if it is not required. # will display only if there is a number relevant.) If the Job ID is 1234 and Format is Job-000000000 the sub folder created will be Job-000001234.
-
Network Path Requires Authentication: If needed, you can select this box to display fields to enter the required username and password for the shared folder.
-
Available in Accounts: By default, post composition operations are available in all uProduce accounts (including any new accounts created in the future). By expanding this setting, you can change to Specific accounts which will display a list of accounts on your server. You can then select the accounts where your new post composition operation will be available.
Copy Output Files to FTP(S) Location
-
Ftp Url: The FTP path to copy the files to. For example, ftp://server:21/folder.
-
Sub Folder: You can select to automatically create a subfolder in the FTP location and name it via the uProduce Job ID, or the current date time. If you select to create a subfolder, you will be able to customize the folder name using the format field and standard string formatting features. For example, for the Job ID, you can enter any static text string together with 0 or # placeholders for the Job ID. (0 will force a zero to display even if it is not required. # will display only if there is a number relevant.) If the Job ID is 1234 and Format is Job-000000000 the sub folder created will be Job-000001234.
-
Use Passive: Select to use Passive FTP mode. Otherwise, Active will be used by default.
-
Enable Ssl: Select to enable FTP with SSL (also called FTPS). Note that this is not SFTP.
-
Ftp Requires Authentication: This option is selected by default so you can enter the FTP username and password of a user who has write permission. You can clear the checkbox if authentication is not required.
-
Available in Accounts: By default, post composition operations are available in all uProduce accounts (including any new accounts created in the future). By expanding this setting, you can change to Specific accounts which will display a list of accounts on your server. You can then select the accounts where your new post composition operation will be available.
Copy Output Files to AWS S3
-
Access Key: The access key for your S3 Bucket.
-
Secret Key: The secret key for your S3 Bucket.
-
Region: Select your AWS region from the list.
-
Bucket Name: Enter your S3 Bucket name
-
Bucket Base Folder: Enter the folder path where you want the output files copied.
-
Sub Folder: You can select to automatically create a subfolder in the network path and name it via the uProduce Job ID, or the current date time. If you select to create a subfolder, you will be able to customize the folder name using the format field and standard string formatting features. For example, for the Job ID, you can enter any static text string together with 0 or # placeholders for the Job ID. (0 will force a zero to display even if it is not required. # will display only if there is a number relevant.) If the Job ID is 1234 and Format is Job-000000000 the sub folder created will be Job-000001234.
-
Available in Accounts: By default, post composition operations are available in all uProduce accounts (including any new accounts created in the future). By expanding this setting, you can change to Specific accounts which will display a list of accounts on your server. You can then select the accounts where your new post composition operation will be available.
Delete Output Files
There are no settings required to delete output files. This option is designed to save disk space by removing the output files from the uProduce server after they are copied to another location. If you delete files from the uProduce server, they will not be available to download from the dashboard’s Job Center.
Copy Files to SFTP Location
-
SFTP Uri: The SFTP path to copy the files to. For example, sftp://server:22/remote/path/to/directory.
-
Sub Folder: You can select to automatically create a subfolder in the SFTP location and name it via the uProduce Job ID, or the current date time. If you select to create a subfolder, you will be able to customize the folder name using the format field and standard string formatting features. For example, for the Job ID, you can enter any static text string together with 0 or # placeholders for the Job ID. (0 will force a zero to display even if it is not required. # will display only if there is a number relevant.) If the Job ID is 1234 and Format is Job-000000000 the sub folder created will be Job-000001234.
-
Username: The name of a user with write permissions to the SFTP location.
-
Password/Private Key File: The post composition operation can authenticate to the SFTP server with either a password or private key file. First, use the dropdown list to select the authentication option you want to use, then enter the password or select and upload the private key file.
Create Job Definition File (JDF)
-
JDF XSLT: The post composition operation for JDF uses an eXtensible Stylesheet Language Transformation to format the XML JDF file. The XSLT can be typed or pasted into the area provided.
To help you quickly get a sample XSLT to edit, XMPie provides a link to “load example xslt” which will insert a default XSLT template that will format the JDF with the same structure that the legacy JDF feature creates.
To create the JDF from the XSLT, the uProduce server creates an XML file with details of the job being processed. The XSLT template includes placeholders that can transform the values in the XML. For example, {./@Name} in the XSLT template will be replaced with the document name from the Name attribute of the JobDetails XML node.
Impose Output File
The Impose Output File operation screen consists of two areas:
-
On the left are settings to define the imposition template.
-
On the right is a preview area to help visualize the imposition layout of the selected settings.
Sheet
-
Type: Select the finished sheet size from the Type dropdown list. To add custom sheet sizes, go to Settings > Sheet Sizes. Or, select "Custom" type to define a once-off or single-use sheet Width and Height. The sheet size is shown in the preview area by the white area on the gray pasteboard.
-
Width: When a Sheet Type is defined, the Width and Height are read-only. To set a custom once-off or single-use sheet size, select "Custom" from the Type dropdown list, and set the required Width and Height values. Note that the measurement units can be changed by using Settings > User Preferences.
-
Height: As above.
-
Margins: The Left, Top, Right, and Bottom margins can be defined to set the non-printable area around the outside of the sheet. The margin is shown in the preview area by a thin gray line.
Imposition
-
Layout: Select the required imposition layout.
-
N-up – Pages are placed sequentially across each sheet until it's full, then continue on the next sheet. Think of it as filling one sheet at a time, e.g. left to right, top to bottom.
-
Cut stack – Pages fill each position one sheet at a time, going through the entire stack before moving to the next position. After printing, cut and stack the piles — pages come out in sequential order.
Note: In the preview area, k represents the number of sheets of the stack.
-
-
Dutch cut: Enabling Dutch cut sets up a second imposition grid that can be used to maximize the available sheet space and avoid material wastage. When Dutch cut is enabled, additional settings appear to configure the second imposition area.
-
Page flow style: Defines the path direction when reaching the end of a row or column:
-
Linear - Returns to the starting edge and continues in the same direction. Rows (or columns) always flow the same way. Example:
1 , 2 , 3 , 4
5 , 6 , 7 , 8
9,10,11,12 -
Zigzag - Reverses direction at the end of each row or column, creating a snake-like path. Example:
1 , 2 , 3 , 4
8 , 7 , 6 , 5
9,10,11,12
-
-
Page flow: Defines where placement begins and in which direction. Set by choosing a starting corner and an initial direction (horizontal or vertical). For example, Top Left → Right starts at the top-left corner and places pages horizontally first.
-
Rotate pages 90°: Rotates all pages 90° on the sheet.
-
Duplex: Changes the sequence of the recipient pages on the even sheets so that they match the odd side when printed duplex or double-sided.
-
None (Single-sided printing)
-
Flip left-to-right
-
Flip top-to-bottom
-
-
Pages
-
Max Page Width: Defines the maximum page width that should be used with this imposition template. This setting is used to show production validation warnings in the job center if a document with a larger page width is submitted to the imposition.
-
Max Page Height: As above.
-
Rows: Enter the number of rows of pages that you want to print on the sheet.
-
Columns: Enter the number of columns of pages that you want to print on the sheet.
-
Flip pages: This setting allows you to rotate pages 180° according to a cyclic or repeating pattern. Use 1 to rotate a page, or 0 to not rotate a page. For example:
-
"01" will rotate every second page.
-
"1100" will rotate pages 1,2,5,6,9,10…
-
-
Row gaps: Enter the value(s) you want in between rows using a cyclic or repeating pattern. (Use a space separator between values in the pattern.) For example:
-
"5" will put 5 of your measurement units in between each row.
-
"5 0" will put 5 of your measurement units in between the first and second rows, 0 space between the second and third rows, and repeat the pattern for the following rows.
-
-
Column Gaps: Enter the value(s) you want in between columns using a cyclic or repeating pattern. (Use a space separator between values in the pattern.) For samples, see row gaps above.
-
Horizontal Alignment: This setting positions the imposition grid horizontally on the sheet.
-
Horizontal Offset: Enter a positive or negative value to shift the imposition grid to the left or right.
-
Vertical Alignment: This setting positions the imposition grid vertically on the sheet.
-
Vertical Offset: Enter a positive or negative value to shift the imposition grid up or down.
Dutch Cut Region Pages
-
Location: Sets the location of the second imposition grid to the right or bottom of the sheet.
-
Note that either Column or Row gaps are controlled by the pages section depending on the Location setting.
-
The operation of all other Dutch cut settings are the same as the main settings described above.
Printer Marks
-
Crop Marks: Adds fine horizontal and vertical rules that define where the sheet should be trimmed.
-
Offset: Specifies how far from the edge of the sheet the printer’s marks will be drawn.
Preview Information
Imposition templates can be used with any print document on the uProduce server. So, when you are creating the template, it is useful to see how the template will work with different input document sizes. To assist with this, you can define the preview page size. The preview page size is only used to show the result of the current settings when used with a document of the preview page size.
You can also display the page bleed and crop marks on the preview page.
Editing an existing Post Composition Operation
The Post Composition Operation list includes an Edit link next to each operation.
Clicking the Edit link opens the settings for that operation.
Saving the operation overwrites the previous settings with the edited version.
Any production job tickets using the operation will now use the new settings.
Cloning an existing Post Composition Operations
The Post Composition Operation list includes a Clone link next to each operation.
Clicking the Clone link opens the dialog to create a new Post Composition Operation, but instead of loading the default settings, the clone operation copies the settings from the source operation that you cloned.
This is particularly helpful for the Impose Output File operation where there are many settings.
When you clone an operation, the name of the source operation is also copied. You must change the name of the new operation to reflect the purpose of the new operation. You will not be able to save the operation with the same name.
It is important to clearly name your Post Composition Operations so that when dashboard users are processing jobs, they can easily identify which operation they need to select to perform the desired task.
For example, an Impose Output File operation could be named "8x5_sheet_with_6-up_labels" to clearly define what it is used for.