Configuring Reports
The Reports feature allows you to export job data from your uProduce server to CSV files. You can create saved reports with specific filter criteria, or run ad-hoc reports for one-time exports. Reports are useful for analyzing production data, tracking job performance, and generating summaries for business purposes.
Reports support advanced filtering capabilities, field selection, and sorting. In addition, an optional AI Assist feature lets you describe the data you want in natural language, and the system automatically translates your request into the appropriate query parameters.
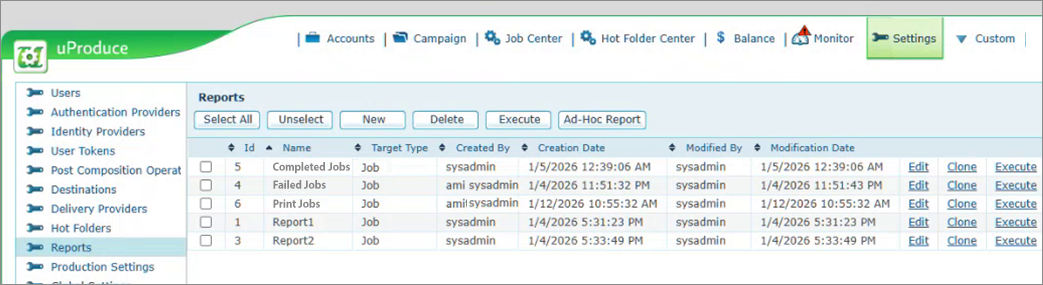
When admin users log into the uProduce dashboard, they can click the Settings tab on the top toolbar to get the list of settings on the left, and then click Reports. This is where you create new reports, edit or clone existing reports, execute reports, run ad-hoc reports, and delete reports.
When a report is executed, a background job is created. The job appears in the Job Center, and when it completes, the output CSV file is available for download.
Note: All users can create, edit, clone, and execute reports. The visibility of the Report Users Permission section is controlled by the AllowNonAdminShareWithOtherUsers system setting.
Creating a New Report
-
On the Reports page, click the New button.
The New Report page is displayed with the following sections.
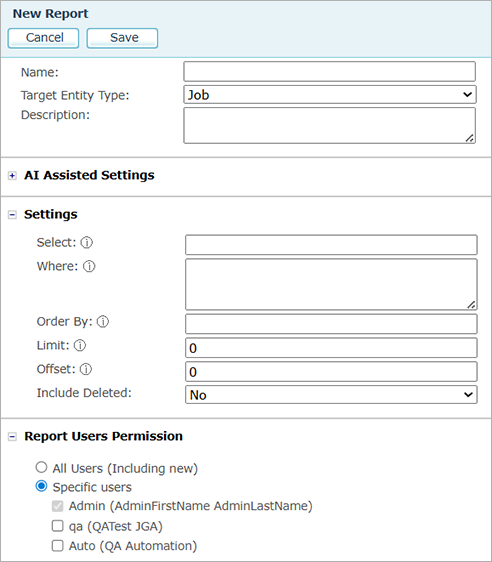
Basic Information
|
Option |
Description |
|---|---|
|
Name |
Enter a descriptive name for the report. The name must be unique. This field is required. |
|
Target Entity Type |
Select the type of entity to report on. Currently, only Job is supported. |
|
Description |
Enter an optional description to help identify the purpose of the report. |
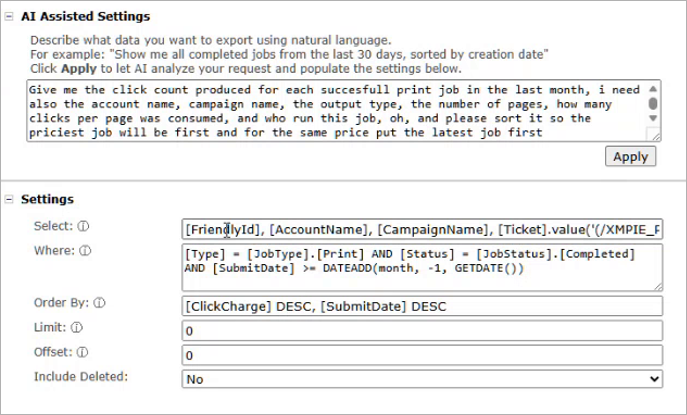
AI Assisted Settings
The AI Assisted Settings section allows you to describe the data you want to export using natural language. The system uses AI to analyze your request and automatically populate the export settings fields.
This section is collapsed by default. Click the section header to expand it.
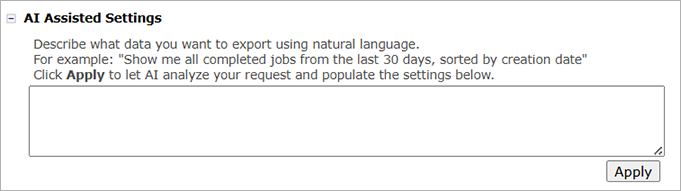
To use AI Assist:
-
Type a description of the data you want to export in the text area. For example: "Show me all completed jobs from the last 30 days, sorted by creation date."
-
Click Apply. The AI analyzes your request and populates the Settings fields below (Select, Where, Order By, etc.).
-
Review the populated settings and adjust them if needed.
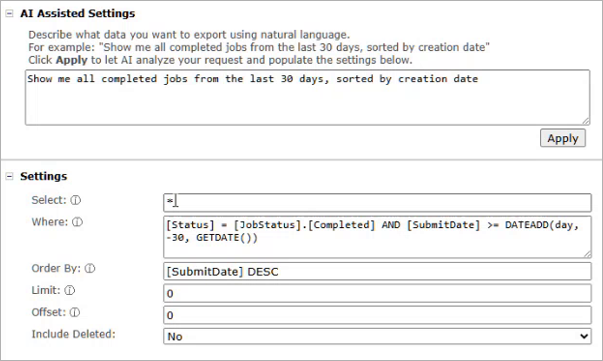
The AI Assist can handle complex queries. For example, you can ask for calculated fields, specific date ranges, particular job statuses, and custom sort orders. The following image shows the result of a complex natural language query that includes calculated fields and multi-criteria sorting:
If the AI cannot process your request, for example, if you ask for fields that do not exist, or your query is logically impossible, an error message is displayed explaining why the request could not be fulfilled.
Note: The AI Assist feature requires a Claude API key to be configured in the system settings. See Configuring the AI Assist API Key later in this topic for details.
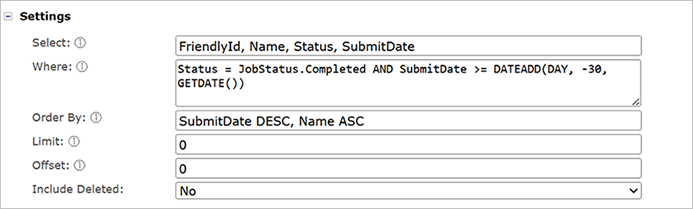
Settings
The Settings section defines the export query parameters. This section is expanded by default. You can populate these fields manually, or use the AI Assist feature to populate them automatically.
|
Option |
Description |
|---|---|
|
Select |
Specify which fields to include in the export. Use a comma-separated list of field names, or enter * (asterisk) to include all available fields. Example: FriendlyId, Name, Status, SubmitDate Default: * (all fields). |
|
Where |
Specify a filter condition to select which records to include. Uses T-SQL WHERE clause syntax. Example: Status = JobStatus.Completed AND SubmitDate >= DATEADD(DAY, -30, GETDATE()) Leave empty to include all records. |
|
Order By |
Specify the sort order of the exported records. Uses T-SQL ORDER BY syntax. Example: SubmitDate DESC, Name ASC Default: FriendlyId DESC (most recent first). |
|
Limit |
Maximum number of records to export. Enter 0 for no limit (export all matching records). Default: 0. |
|
Offset |
Number of records to skip before exporting. This can be used together with Limit for pagination. Default: 0. |
|
Include Deleted |
Select Yes to include soft-deleted records in the export. Select No (default) to exclude them. |
Report Users Permission
Under Report Users Permission, choose which users will have access to this report:
-
All Users (Including new): All current and future users will have access to the report.
-
Specific users: Only the selected users will have access. Select individual users from the checkbox list.
Administrators and system administrators always have access to all reports. Their checkboxes appear checked and grayed out in the user list. The currently logged-in user always retains access and cannot be removed.
Note: By default, the Report Users Permission section is visible to all users. To hide it from non-admin users, set the AllowNonAdminShareWithOtherUsers system setting to false.
Cloning an Existing Report
The Reports list includes a Clone link next to each report.
Clicking the Clone link opens the report editor with all the settings copied from the source report. This is useful when you want to create a similar report with slight modifications.
The cloned report is saved as a new report with a new ID. You must change the name of the report before saving, as duplicate names are not allowed.
Permissions are not copied from the source report. The cloned report starts with default permissions (the creator and administrators have access).
Executing Reports
There are several ways to execute reports:
-
Execute a single report: Click the Execute link next to a report in the list.
-
Execute multiple reports: Select the checkboxes next to the reports you want to execute, then click the Execute button in the toolbar. Each selected report creates a separate background job.
When a report is executed, a background job is created and you are automatically redirected to the Job Center where you can monitor the job’s progress.
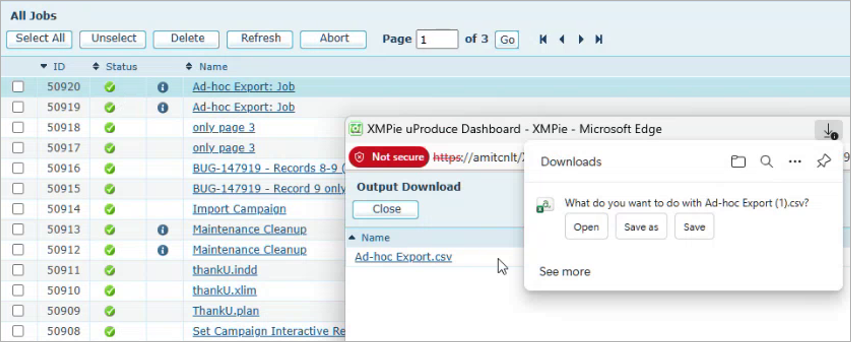
When the job completes, the output CSV file is available for download from the Job Center. The CSV file contains the data matching the report’s filter criteria and selected fields.
Running Ad-Hoc Reports
An ad-hoc report lets you run a one-time export without saving the report definition. This is useful for quick data exports where you do not need to keep the report for future use.
To run an ad-hoc report:
-
On the Reports page, click the Ad-Hoc Report button.
The Ad-Hoc Report page is displayed. The Name, Description, and Permissions sections are hidden because the report is not saved.
-
Configure the export settings manually, or use the AI Assist feature to populate them automatically.
-
Click Execute. A background job is created and you are redirected to the Job Center.
Note: Ad-hoc reports are not saved to the system. If you want to keep the report for future use, create a new report instead.
Configuring the AI Assist API Key
The AI Assist feature uses the Anthropic Claude API to convert natural language descriptions into report query parameters. To use this feature, you must configure a Claude API key in the system settings.
Note: XMPie does not charge for the AI Assist feature. However, you must create your own Anthropic Claude account and use your own API key. API usage charges from Anthropic apply according to their pricing.
To configure the Claude API key:
-
Create an account at https://console.anthropic.com and generate an API key.
-
In the uProduce dashboard, go to Settings > System Settings.
-
Locate the ClaudeApiSettings setting. Its value is a JSON string containing the API configuration.
-
Edit the JSON value and set the ApiKey field to your Claude API key. For example:
{"ApiKey":"Encrypt{sk-ant-your-key-here}Encrypt","Model":"claude-haiku-4-5-20251001",...}The ApiKey is the only field you need to change. All other fields in the JSON have sensible defaults and should generally not be modified unless instructed by XMPie support.
-
Click Save.
Once the API key is configured, the AI Assist feature is available to all users who have access to the Reports page.
AI Assist Examples
The AI Assist feature can interpret a wide variety of natural language requests. Here are some examples of queries you can use:
Simple queries
-
"Show me all completed jobs from the last 30 days, sorted by creation date"
-
"List all failed jobs from the past week"
-
"Give me all print jobs for account ID 5"
Complex queries
-
"Give me the click count produced for each successful print job in the last month. I need the account name, campaign name, output type, number of pages, how many clicks per page were consumed, and who ran the job. Sort by cost, most expensive first."
-
"Show me all email jobs that failed in the last two weeks where the subject contains 'newsletter'. Include the job name, error message, submit date, and recipient count."
-
"Give me a summary of the top 20 most expensive print jobs this month that completed successfully."
Queries the AI cannot process
If the AI cannot fulfill a request, it returns an explanatory error message. For example:
-
"Show me jobs that are both completed and failed" - The AI responds that a job cannot have both statuses simultaneously.
-
"Show me the job color and temperature" - The AI responds that these columns are not available in the job data.