Managing Users
Note: This operation can be performed by the system admin user only.
Three types of users exist in uProduce:
-
System administrators: Manage high-level system tasks such as maintenance and licensing. The system administrator is the top-level admin, and has access to all functionality of the system.
-
Administrators: Manage users, production resources such as hot folders, destinations and delivery providers. Administrators can access and use all options available to non-admin users.
-
Non-admin users (regular uProduce users): Their main job is to run production. In addition, they manage campaign components such as assets and documents. These users are also responsible for adding templates to the system via the dashboard or connectivity. Users created automatically through SSO are always assigned this role by default.
After you log on to uProduce as admin/system admin, the Users page is displayed and presents the current list of users:
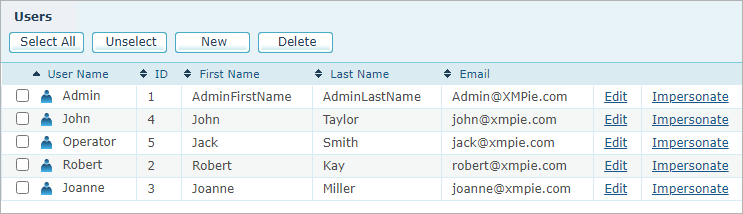
System administrators and administrators have the capability to "impersonate" an existing user, enabling them to take on the identity of that user within the system. Once the administrator impersonates a user, they effectively assume the role of that user and can operate within the system using their identity.
Note that is only possible to impersonate a lower level user.
Create new users
Note: This operation can be performed by the admin user only.
Administrators have the exclusive ability to create, edit, or delete users. If you are an administrator, you can grant admin privileges to any user, resulting in multiple administrators in the system.
Note: Users can also be created automatically when they log in through Single Sign-On (SSO), if the Auto Create Users option is enabled on the identity provider. SSO-created users are assigned to the identity provider’s parent account as regular users (not administrators). Their profile details (name, email, phone, address) are populated from the identity provider. For more information, see Configuring Single Sign On.
To avoid situations where there are no administrators, the currently logged-in admin cannot revoke its own admin privileges or entirely remove itself from the system.
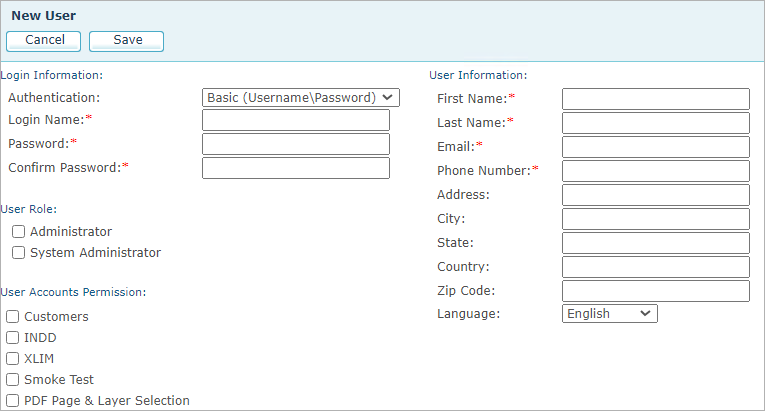
To create a new user:
-
On the navigation bar click Settings > Users.
The Users list is displayed.
-
Click the New button.
-
In the Login Information area
-
From the Authentication list, select the authentication type:
-
Basic: Users are managed by the uProduce system.
-
Built-In Windows Domain: Users are managed by the domain active directory. The domain used is the domain of the installation user.
uProduce also supports Single Sign-On (SSO) with SAML 2.0 and OpenID Connect identity providers such as Microsoft Entra ID, Okta, and Google. With SSO, users authenticate through the identity provider and are automatically logged in to uProduce. For details, see Single Sign-On (SSO).
-
Note that you can define additional authentication providers. For more information, see Authentication Providers.
Note: The Authentication setting applies to users who log in with a username and password. Users who log in through SSO are matched by their username regardless of the authentication type configured here. You do not need to change this setting to support SSO users.
-
Enter the user's login name. In case you choose a domain authentication type, this should be the login name of the domain user.
-
Enter the password, in case you chose the basic authentication type.
Leave the password fields empty in case of users who will authenticate using a token.
-
-
Under User Role, select the Administrator checkbox if you wish this user to have administrator privileges, or System Administrator to give the user system administrator privileges.
System administrators manage high-level system tasks such as maintenance, system-level configuration and licensing. The system administrator is the top-level admin, and has access to all functionality of the system.
Administrators manage users, production resources such as hot folders, destinations and delivery providers.
-
Under User Accounts Permission, choose on which accounts this user will be able to work (if you have already defined accounts in the system):
-
All Accounts (Including new): The user can access all existing accounts and will automatically gain access to any new accounts created in the future.
-
Specific accounts: Select individual accounts from the list below. Accounts that appear pre-checked and grayed out are accessible to all users (configured at the account level) and cannot be deselected.
Administrators and system administrators always have access to all accounts.
-
-
In the User Information area enter the necessary information.
-
Click Save to save the user information.