Imposition
Note: Options in the Imposition area are being deprecated and replaced by the Post Composition Operations feature, which supports more advanced imposition features.
Imposition determines the arrangement of the printed document’s pages on the printer’s sheet. It enables you to optimize the press sheet surface, by placing several different pages on one printed sheet and printing the documents duplex head-to-head.
XMPie offers three imposition options:
-
Disabled
By default, the imposition settings are disabled: the Imposition Template drop-down list displays Disabled and all the imposition parameter fields are grayed-out. When imposition is not applied, each recipient’s document is printed on different printer's sheets.
-
Step and Repeat
Step and Repeat is an imposition type that enables you to optimize the press sheet surface, by placing several different pages on one printed sheet and printing the documents duplex head-to-head. Step and Repeat is often used for double-sided planning, labels, postcards, and packaging printers. When you choose the Step and Repeat option, you have to set up its imposition parameters.
-
Cut and Stack
Cut and Stack is an imposition type that enables you to optimize the press sheet surface, by ordering the pages on the sheet as follows: front-back, left-right, top-bottom. When you choose the Cut and Stack option, you have to set up its imposition parameters.
|
Option |
Description |
|---|---|
|
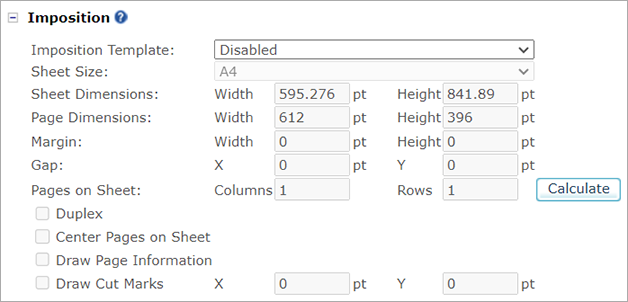
Imposition Template |
Select one of the following three options:
Note: all measurement values are in points. |
|
Sheet Size |
Select a standard sheet size (for example, Letter, A4.) from the dropdown list, to determine sheet dimensions. Alternatively, enter your custom Sheet Dimensions. |
|
Sheet Dimensions |
Enter the Width and Height of the physical sheet used for printing.
|
|
Page Dimensions |
The Width and Height of the logical design page. These values are used to calculate the number of pages that can fit on a sheet and should not be negative or zero. Note: These values are entered automatically when you upload a document package file. |
|
Margin (Width, Height) |
Enter the Width and Height of the margins to be maintained between the edges of the logical pages and the edges of the sheet. Note: To use cut (crop) marks, you must set the margin values. Make sure the margins are large enough to draw cut marks (it is recommended to set them to at least nine points). |
|
Gap (X, Y) |
Enter the X and Y values to set the gap that will be maintained between the logical pages on the sheet. These settings are required only if you wish to print or draw page information. |
|
Pages on Sheet (Columns, Rows) |
Manually enter the number of logical pages (Columns and Rows) that should fit on each sheet or paper. If the values you set do not fit the Sheet Size selection, a warning is displayed, specifying range of allowed values. Alternatively, click Calculate to automatically calculate how many documents fit into the chosen sheet or paper size. To adjust this number, change the Sheet Size selection. |
|
Duplex |
Select this check box to order even sheets, so the front side and backside will match for each recipient (flip horizontally). This setting is optional. |
|
Center Pages on Sheet |
Select this check box to center all the pages that will be printed on the sheet. If you do not select this option, uProduce will set out the pages starting from the bottom-left corner of the sheet. This setting is optional. |
|
Draw Page Information |
Select this checkbox to add the page information above each logical design page. This information includes the recipient number, and the page number of this recipient. This information is printed in the Gap/Margin area. This setting is optional. |
|
Draw Cut Marks |
Adds cutting (crop) marks on the margin area of the sheet, by defining their coordinates from the outside of the document to the inside of the document (note that this value does not set the length of the cut marks). Select this check box to add crop marks, and then set their inset value in the Bleed section. Note: Cut Marks require room to draw within the margin area (not next to the document). If you add Cut Marks, make sure the Margin field has Height and Width values that are large enough to include cut marks. |