
 View what's in this topic
Creating a New Message Template SQL
Note: Message template SQLs are not available for StoreFlow Cloud customers.
The SQL queries are used to retrieve data for the message.
SQL queries are used to generate XML code that is, in turn, used by the XSL to create a message in HTML format.
To create a new message template SQL:
-
In the left panel click Global Settings, and then select System Setup..
-
Click the Message Template SQL link.
The Message Template SQL page is displayed.
-
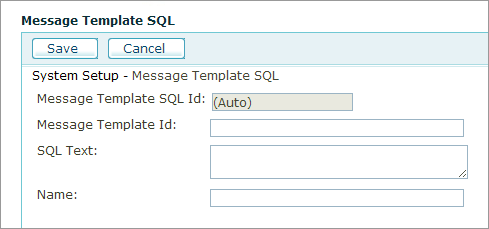
Click Add New.
-
Fill the following fields:
-
Message Template Id: ID number of the message template with which this SQL is associated.
-
SQL Text: SQL statement. The SQL may use parameters as specified in the section below.
-
Name: Node name of the record set in the XML file that will be generated. The node name must be unique per message template. See Sample of the XML data retrieved from the database.
-
SQL examples
exec ('SELECT FirstName, LastName
            FROM Users WHERE Users.UserID = ' + @UserId)
exec('SELECT Store.[Name] as StoreName,
            LandingDomain, LandingFolder FROM Store WHERE StoreId = ' + @StoreId)
exec('SELECT EncryptedOrderId FROM
            Orders WHERE OrderId = ' + @OrderId)
Note: Other SQL statements samples can be previewed in the backoffice . Go to uStore Global Settings > System Setup > Message Template SQL and click the View link.
The parameters that are passed to the SQL statement by event points are:
Note: The parameters that an event passes determine what a query written for that event is able to retrieve. If the data you need can only be reached through a parameter that the event does not pass, no amount of editing the query will return it. For a worked example, see Including a delivery's tracking number in an email below.
|
Event Type |
Event |
Parameters |
|---|---|---|
|
User Life Cycle Events |
Customer Login |
@StoreId @CultureId @UserId @ExternalUserID @UserEmail |
|
|
Customer Registration |
@StoreId @CultureId @UserId @ExternalUserID @UserEmail |
|
|
Customer Pending Registration |
@StoreId @CultureId @UserId @ExternalUserID @UserEmail |
|
|
Password Recovery |
@StoreId @CultureId @UserId @ExternalUserID @UserEmail |
|
|
User Creation in Admin Application |
@StoreId @CultureId @UserId @ExternalUserID @UserEmail |
|
|
User Details Update In Admin Application |
@StoreId @CultureId @UserId @ExternalUserID @UserEmail |
|
|
User Details Update in Storefront |
@StoreId @CultureId @UserId @ExternalUserID @UserEmail |
|
Order Life Cycle Events |
Delivery Creation |
@StoreId @CultureId @OrderId @UserId @DeliveryId |
|
|
Order Product Enters Shopping Cart |
@StoreId @CultureId @OrderId @UserId @OrderProductId |
|
|
Order State Transition |
@StoreId @CultureId @OrderProductId, @FromState @Tostate |
|
|
Order Submission in Customer Application |
@StoreId @CultureId @UserId @ApproverUserId (if applicable) @OrderId |
|
|
Reorder |
@StoreId @CultureId @ OrderProductId @OldOrderProductId |
|
Order Approval Process Events |
Approver Change - Notification to New Approver |
@StoreId @CultureId @OrderId @ApproverUserId (of new approver) |
|
|
Approver Change - Notification to Old Approver |
@StoreId @CultureId @OrderId @ApproverUserId (of old approver) |
|
|
Order Approved |
@StoreId @CultureId @OrderId @ApproverUserId |
|
|
Order Rejection |
@StoreId @CultureId @OrderId @RejecterUserId |
|
|
Order Sent To Approval |
@StoreId @CultureId @OrderId @UserId @ApproverUserId (if specific approver was selected) |
|
|
Unassign Group from Approval Process |
@StoreId @CultureId @UserId @ApproverUserId @ApproveeGroupId |
|
Inventory Events |
Inventory Level Is Low |
@StoreId @CultureId @OrderId @ProductId @OrderProductId |
|
|
Inventory Changed |
@StoreId @CultureId @OrderId @ProductId @OrderProductId |
|
Other Events |
Order Item Job Ticket on New Order Creation |
@StoreId @CultureId @OrderId @UserId @OrderProductId |
|
|
Redirect Clearing Failed |
@StoreId @CultureId @OrderId @UserId |
|
|
USADATA Clearing Failed |
@StoreId @CultureId @OrderId |
The SQL queries you create will be formatted by uStore into XML that, in turn, will be transformed into the email message subject and body using XSLs.
The SQL is formatted as follows:
<sqls>
   <RecordSetName>
      <Row>
         <FieldName>value</FieldName>
      </Row>
   </RecordSetName>
</sqls>
Where:
-
RecordSetNameis the name of the message template SQL (the number ofRecordSetNamenodes are identical to the number of message template SQLs). -
Rowencapsulates all fields of one record (the number ofRownodes is identical to the number of records that the SQL query returned) -
FieldNameis the name of the field that the SQL fetches (number ofFieldNamenodes is identical to the number of all fields that are declared in the SQL) -
valueis the value of this field.
Sample of the XML data retrieved from the database
<Sqls>
   <CustomerName>
      <Row>
         <FirstName>d</FirstName>
         <LastName>d</LastName>
      </Row>
   </CustomerName>
   <StoreName>
      <Row>
         <StoreName>MyStore</StoreName>
         <LandingDomain>www.xmpie.com</LandingDomain>
         <LandingFolder>MyStore</LandingFolder>
      </Row>
   </StoreName>
   <Order>
      <Row>
         <EncryptedOrderId>82104</EncryptedOrderId>
      </Row>
   </Order>
</Sqls>
Including a delivery's tracking number in an email
A shipment notification is sent by a trigger that uses the Delivery Creation event, as described in Notifying customers that an order has shipped. By default that email does not contain the tracking number, for two separate reasons.
First, the event has to be able to reach the delivery record. The tracking number is stored in the Delivery table, and not in the OrderProduct table. The Order State Transition event passes only @OrderProductId, so a query written for that event cannot reach the delivery record at all, and the tracking number is always empty. The Delivery Creation event also passes @DeliveryId, which is what makes the delivery data available.
Second, the default Delivery Creation template does not display it. The ShipData query supplied with the template already returns the tracking number, as TrackingNumber, but the template text does not output it.
To include the tracking number in the email, go to Global Settings > System Setup > Message Template, click Edit Localized Text for the Delivery Creation template, and add the following where the tracking number should appear:
<xsl:value-of select="//Sqls/ShipData/Row/TrackingNumber" />