Enfocus Switch Integration Guide
Prerequisites: Knowledge of Enfocus Switch and uStore admin interface, with admin access to both systems.
You can connect uStore with Enfocus Switch for automated prepress workflows, including imposition, post composition operations and integrations with third parties. This integration is available through the dedicated uStore app in the Enfocus App store. Watch video
How the Integration Works
The setup consists of the following steps:
- Switch flow: add uStore app and set it up, and activate the flow.
- uStore: set up prepress workflow provider, set up credentials, and link products to Switch flows.
After completing the setup steps, the workflow operates automatically:

Integration Steps Workflow - Full Details
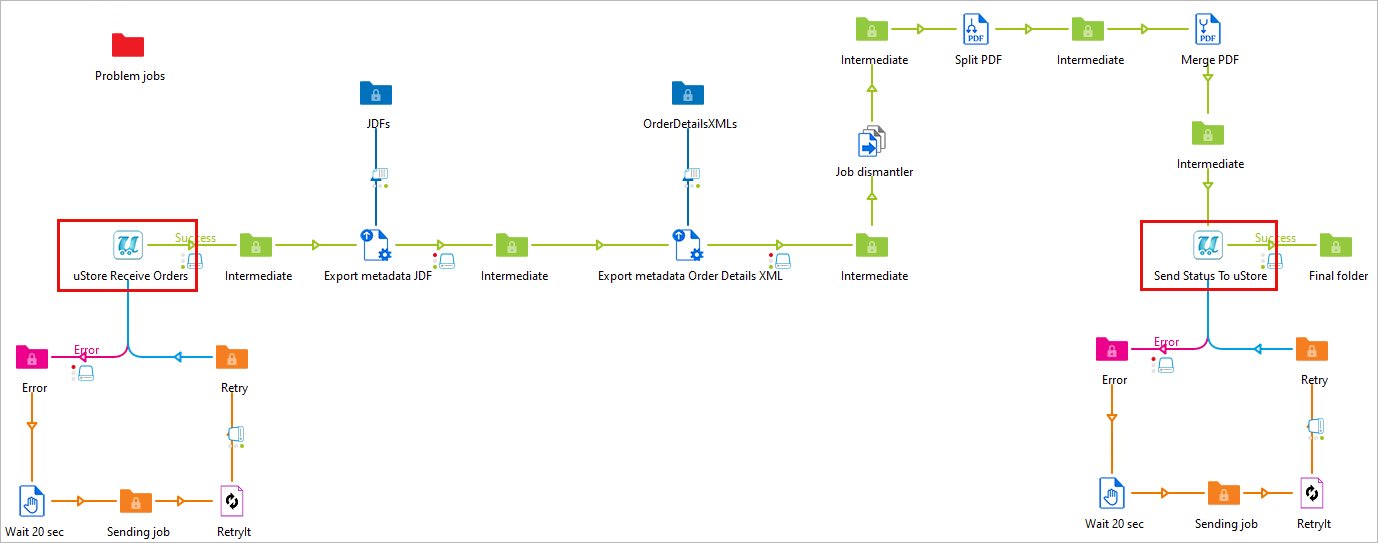
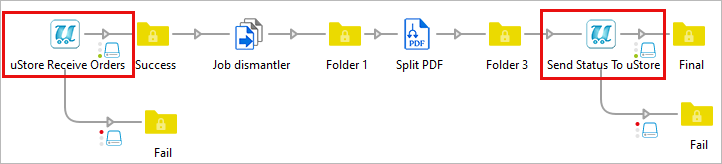
1 Switch: add the uStore app to an active flow
The uStore app can perform two actions:
- Receive Order: This action should be defined at the beginning of the flow to receive the output and order details from uStore.
- Send Status to uStore: This action should be defined at the end of the flow to notify uStore about the flow status.
Add the uStore app twice:
- On flow start: uStore app with "Action > Receive Order". This action is responsible for creating a webhook when the flow is activated, and it can be added only one time in a flow.
- On flow end: uStore app with "Action > Send Status To uStore". This action can be added multiple times to a flow.
Activate the flow. Non-active (stopped) flows won't appear in uStore.
Tip: start the name of the flow with "uStore", so it will appear at the top of the list in uStore backoffice.
Network set up: make sure that the uStore server can access the Switch server on the web service port over SSL.
For the full uStore app set up details, refer to: Configuring the uStore App in Enfocus Switch
Configure uStore app settings
Each action should be configured as follows:
Receive order
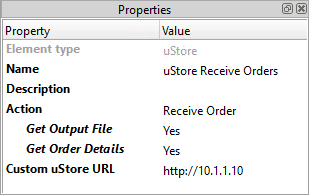
- Name and Description: Convenient names for you to use in your flow.
- Action: Receive Order
- Get Output File: Retrieve the output file (PDF, JPG, Etc.) from uStore and make it available for the flow. Default value: Yes
- Get Order Details: Retrieve the order XML details from uStore and make the XML. Default value: No
- Custom uStore URL: Optional. Needed only if there are issues with resolving the uStore address that is sent by uStore upon flow start.
Send Status to uStore
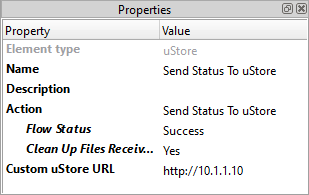
- Name and Description: Convenient names for you to use in your flow.
- Action: Send status to uStore
- Flow Status: Decide whether to send uStore a Success or Failure status message. Default value: Success.
- Clean Up Files Received: Delete the files from the previous folder. Files will not be deleted if there's an outgoing connection from this action. Default value: Yes.
- Custom uStore URL: Optional. Needed only if there are issues with resolving the uStore address that is sent by uStore upon flow start.
The following flows illustrate uStore app within Enfocus Switch:
2 uStore: set up Prepress Workflow Provider
Under "Presets > System Setup > Prepress Workflow Provider":
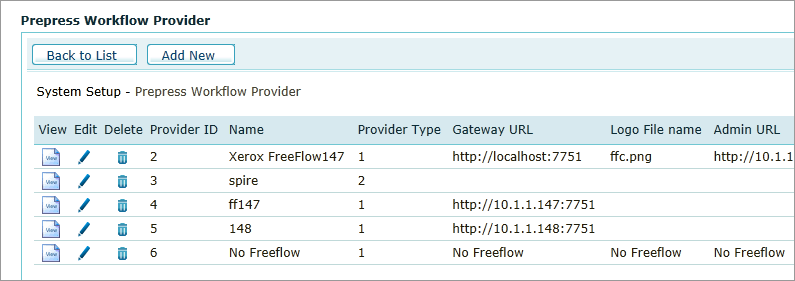
Add a new prepress workflow provider:
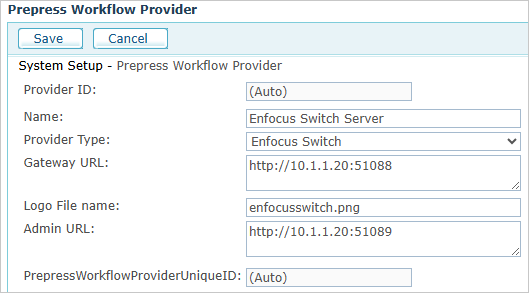
- Provider type: Enfocus Switch
- Gateway URL: address and port (the port can be found in Switch Web Services settings). Example URL: http://10.1.1.20:51088
- Logo File name: enfocusswitch.png
- Admin URL: optional. This will create a link to the workflow provider in the Presets menu. Example URL with the default port: http://10.1.1.20:51089
Network set up: make sure that the Switch server can access the uStore server, on the address set up under
3 uStore: add Switch credentials
Under "Presets > System Setup > Global Configurations", edit the values of the following items:
- EnfocusSwitchUser: The user for the Enfocus Switch workflow provider. This has to be an existing user in your Enfocus Switch installation.
- EnfocusSwitchPassword: The password of the user of the Enfocus Switch workflow provider. Once saved, the password will be encrypted.
4 uStore: link products to flows
In the product settings page, under "Presets > Add workflows". You can select multiple flows. The flows starting with "uStore" appear at the top of the list:
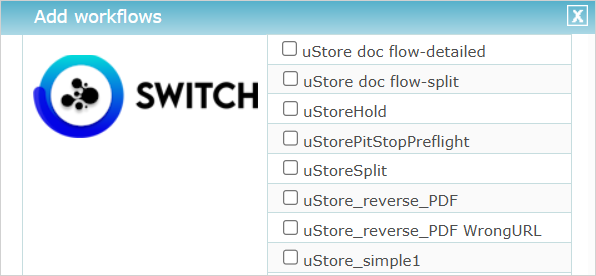
During this stage, uStore retrieves the flow details, including ID and address of the relevant webhook. For retrieving the list, uStore uses the credentials that were previously defined under the Global Configurations
1 uStore: shoppers order products
Shoppers don't need to do anything special.
They just order products, and the processing of the order will include the prepress provider.
2 uStore: queue management
After the order is produced, it either goes automatically to "Prepress in Progress", or needs to be sent manually to this queue. It depends on the product setup under "Add workflows".
3 uStore: send JDF XML to Switch
When the order is moved to "Prepress in Progress", uStore connects to Switch and sends the JDF XML data to the Switch webhook that was defined for the flow.
4 Switch: uStore app gets the JDF
The uStore app in Switch will receive the JDF, and will retrieve the output file and / or the order details XML data, according to the app settings.
5 Switch: uStore app sends status to uStore
The uStore app at the end of the flow will send the selected status to uStore.
6 uStore: move to relevant queue on finish
uStore advances the item in the order queues, based on the response from Switch:
- Ready for Delivery
- Failed Jobs
1 Switch: error handling and retry
In the Switch flow, you can add retry on error, using an app such as "RetryIt", that can be found in the Enfocus App Store.
This will allow you to rule out temporary issues, such as downtime for maintenance or intermittent network issues.
2 Switch: export XML metadata
You can extract the received JDF or order details XML data. In the Switch flow, add the "Export Metadata" action, by right-click and then "Add > Metadata > Export Metadata".
In the "Dataset name" field, enter one of the following values:
- For JDF, use the value:
uStoreJdf - For order details, use the value:
uStoreOrderDetailsXml
Create a connection from the action to a folder, and then click on the connection and change the value of the field "Carry this type of jobs" to "Log".
3 Switch: use output file as a job
To access the output file as a job, add "Job dismantler" to the flow with right-click, and then "Add > Basics > Job dismantler".