Setting Up the Province Table
Similar to the country table, the Province table includes information regarding the province/state in which your store(s) and potential customers are located.
If a province is marked as supported for a certain store, it cannot be deleted from the Province table.
To add a province:
-
On the toolbar click Presets, and then select System Setup.
-
In the System Setup list, click Province.
-
Click the Add New button.

-
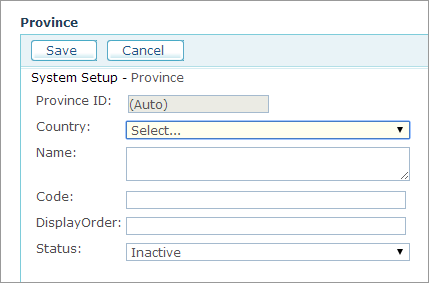
Fill in the following fields:
-
Country: Select the country, in which the province is located.
-
Name: Province name.
-
Code: Province code. For example, enter ‘NY’ for New York.
-
Display Order: Unique number that will determine the location of this province in the relevant dropdown lists in the system.
-
Status: Select whether to activate this province table entry (Active) or deactivate it (Inactive).
-
-
Click Save.
Once provinces are enabled, you can set those provinces onto your stores.
-
Go to Store Setup > Appearance tab > Supported Locations, and select the checkboxes of the provinces you want to enable customers to use in this store.
The new provinces are now available in the storefront.
To edit the province table localized text:
-
Click the Edit Localized Text button in the Province Edit or View pages.
The Localization page for the selected Province table is displayed. -
Click Add New to add a new localized text or Edit
 to edit an existing one.
The selected table’s Localization page is displayed.Note: You are required to add en-US localization prior to adding a localization for any other language.
-
Fill in the Name field in your local language.
-
Click Save to save your settings.
