Allowing Customers to Upload Recipient Lists
Note: This is the only option for using recipient lists in products with single-page flow.
Backoffice: upload a recipient list template
By default, a recipient lists exists as part of the original campaign package (CPKG). It can be overriden by defining a different recipient list in the Recipient Setup page.
To enable upload of a recipient list:
-
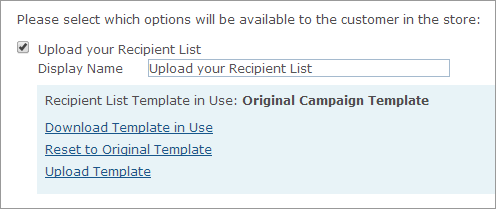
In the Product Setup page, click Recipients Setup.
The Recipients Setup page is displayed.
-
Select the Upload your Recipient List checkbox.
-
In the Display Name field, you can change the default text of this label.
-
Click the Download Template in Use link to download the template in use.
Note that certain fields may not be presented in the template since they have been marked for Internal Use in the schema, in uPlan.
-
Edit the downloaded template by adding notes or comments or changing the fields order.
-
Click the Upload Template link to upload the modified template.
The Upload Recipient List Template window is displayed.
-
Click Browse to locate the template and then click the Upload button.
It is always possible to revert to the original template by clicking the Reset to Original Template link.
Storefront: upload a recipient list
In the storefront, customers may be given the option to upload a predefined recipient list. A recipient list can be saved in Excel or Access data files (.xml, *.xls or *.mdb file extensions accordingly).
The customer can edit the predefined template (configured by the administrator in the backoffice) and design a custom recipient list that will best suit his business needs. For example, you may want to emphasize a headline or use various colors in your recipient list schema, rearrange the order of the fields or pre-populate the list with data. To use an alternative recipient list template, you have to first create it using MS Excel and then copy the resulting .xml or *.xls file to the following path:
CustomerApp\uStoreShared\Products\Product_<X>\RecipientListTemplate.xml
                     (or.xls)
where Product_<X>
indicates the Product ID name.
To upload a recipient list at the store:
-
In the Recipients section, upload your recipient list file.
If you have no recipient list ready to upload, you can click Download Recipient List Template to download a template of a recipient list. Make sure to fill in the recipient list with the proper data before uploading it.
Certain fields may not be visible to you since they have been marked for Internal Use in the schema, in uPlan.
Note: If using the multiple-page flow for dynamic products, when uploading an Excel sheet that had auto-filtering turned on, the shopper will need to select the required table (sheet/range).
-
In products set with the multi-page flow:
-
In List Name, enter a name for the list you are uploading and click Next.
-
If the fields in the uploaded recipient list do not match the fields in the recipient list template, customers can match their field names with the template’s field names by choosing the proper fields in the Match To list. This functionality is available for recipient lists with up to 255 columns.
-
For fields in the template to which customers did not find corresponding fields in the recipient list file they uploaded, they should select Fixed value and enter a value that will be used for all recipients in the data source.
-
If the customers’ recipient list includes more than a single table, they will be prompted to select their primary table.
-
When customers click Next, the recipient list is displayed to enable customers to edit columns, delete columns and proof their product.
-
If customers want to use a different recipient list, they should click the Change Recipient List link. Note that customers cannot use your browser’s Back button to go back and select a different recipient list.
-
Customers are able to edit a record in the recipient list by clicking
 ,
delete a record from the
recipient list by clicking
,
delete a record from the
recipient list by clicking  , proof a record by
clicking
, proof a record by
clicking  , and narrow down search results using the
filter
, and narrow down search results using the
filter  .
.
-
To add recipient list records, customers should click the Add New button. The Add New Records page is displayed to enable customers to add recipients to the recipients list.
-