The
image size for the document icon is 403 pixels x 507 pixels and is displayed
in the center of the overlay image. Make sure that the overlay image is
transparent to enable the document display.
The
image size for the document icon is 403 pixels x 507 pixels and is displayed
in the center of the overlay image. Make sure that the overlay image is
transparent to enable the document display.
You can design an Overlay image that will overlay the composite component document thumbnail in the storefront for a more reliable product preview.
You must define four graphic overlays images:
· Long side binding on portrait document
· Short side binding on portrait document
· Long side binding on landscape document
· Short side binding on landscape document
To create a Property Option Overlay Image:
1. Using any Graphic Software, open files to create the four images. The image size should be 423 pixels x 527 pixels.
The
image size for the document icon is 403 pixels x 507 pixels and is displayed
in the center of the overlay image. Make sure that the overlay image is
transparent to enable the document display.
2. Save each image in the Property Options Icon Management window with the name Overlay_PropertyName_OptionName_XXXXX, where XXXXX reflects the binding side and layout of the document.
The following are examples of image files for Overlays for the property option Spiral Color_Black:
Icon |
Status |
File Name |
|
Long side binding on portrait document |
Overlay_Spiral Color_Black_Long_Portrait.PNG |
|
Short side binding on portrait document |
Overlay_Spiral Color_Black_Short_Portrait.PNG |
|
Long side binding on landscape document |
Overlay_Spiral Color_Black_Long_Landscape.PNG |
|
Short side binding on landscape document |
Overlay_Spiral Color_Black_Short_Landscape.PNG |
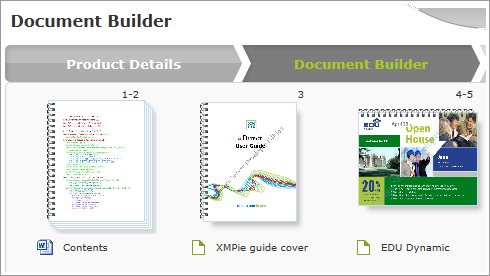
These overlay images are displayed over the component thumbnails if the Show Properties checkbox is selected in the Document Builder page of the Composite order flow in the storefront (see Step 2: Adding Components to Your Product).
For the Perforation property,
the images for the long side and the short side would be the same because
the property is defined for Left and
Right
and not Top Bottom/Long Short.
The following image is an example of overlay images for Spiral Color_Black property options, as displayed over the component thumbnails in the storefront.