Setting Up Upload Products
Note: This product type can only be created in the component (hidden) groups. It will be a component of a composite product.

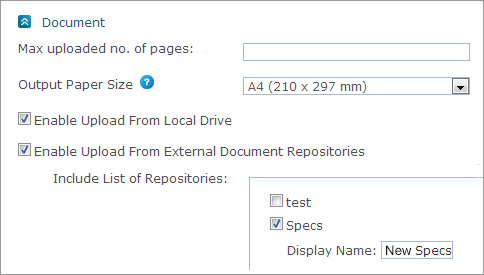
To set up an upload document:
-
Open the product you wish to edit, and in the Product Setup page go to the Document section.
-
In the Max uploaded no. of pages field, enter a value to limit the number of pages that can be uploaded per document.
-
In the Output Paper Size field, select a paper size from the list of values. The paper size options are set in Presets > System Setup > Paper Size. You can add more paper sizes to the list of values. When uploading products in the storefront, the paper size is verified and if it does not fit the printable paper size, conversion to the correct size is suggested.
-
If a repository has been defined, the following options appear. You can select one or both options:
-
Enable Upload from Local Drive: allows storefront customers to upload documents from a local directory.
(Note that this is the default behavior, in case no repository has been defined.) -
Enable Upload from External Document Repositories: allows uploading documents from external document repositories defined in Presets. In the Include List of Repositories section, select the document repositories from which you wish to allow document upload. If you wish to rename a document repository, type its name in the Display Name box.
-
Note: In the storefront, when uploading Office documents, if fonts in a document are not available on the uProduce server, the fonts will be converted to a substitute font in the output PDF documents. Similarly , when uploading a PDF whose fonts are not embedded and are not available on the uProduce server, the fonts will also be converted. No warning is given to the user.
