Setting Up XM Campaign Project Templates
To set up an XM campaign project template:
-
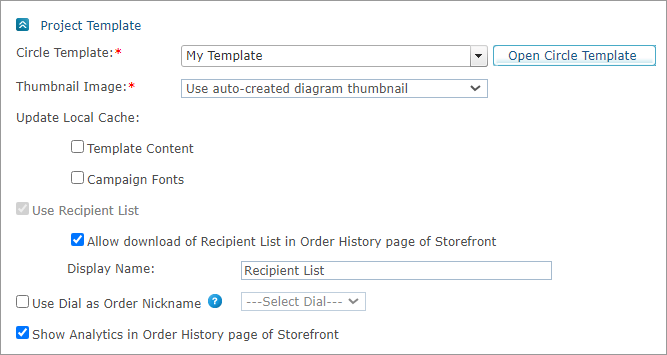
Open the product you wish to edit, and in the Product Setup page go to the Project Template section.
-
From the Circle Template list, select the required template. The list displays all Circle templates to which the Circle user, who has been selected for the store, has permission.
Notes:
-
You can replace the template that has been defined for the product only if an ordering process of the product has not yet begun.
-
In order to work with FreeFlow Core, the print touchpoint document must be in PDF format.
-
-
In the Thumbnail Image area, select the thumbnails that will represent the product in the storefront. Select one of the following options:
-
Use auto-created thumbnail diagram - a screen capture of the diagram as it appears in Circle at present.
-
Upload Thumbnails - Select this option to manually upload thumbnails that have been previously created.
The default display name for uploaded thumbnails is "Page [page number]". If you want to rename the uploaded product images, select the Set the thumbnail displayed namemanually checkbox above the table. Once selected, the Display Name column becomes a text box and you may edit it.

-
-
Select Update Local Cache to update the template content and campaign fonts after the XM campaign project has been modified in Circle.
-
The Use Recipient List checkbox is selected and disabled. This means that clients will personalize the product using a recipient list during the product's purchase process.
-
Allow download of Recipient List in Order History page of Storefront: During the life cycle of the XM campaign product, new recipients may be added to the recipient list via registration or by being referred by a friend. If the checkbox selected, the storefront user can download an updated recipient list from the Order History > Order Details page as an Excel file.
XM campaign products that include an email touchpoint, will also have an out-of-the-box Download Unsubscribe list link in the Order History page of the storefront.
-
Display name– The name of the download link to the updated recipient list, which will be displayed to the storefront user.
-
-
If you want to select a dial to be used as the order nickname, select the Use Dial as Order Nickname checkbox.
The customized value of the selected dial is displayed in the shopping cart. For example, if the selected dial is <First Name>, a possible order nickname would be "John".
You define the dials that will be available for customization on the Customization Wizard page.
-
If you want storefront customers to view analytic reports that have been defined in Circle for this template, ensure that the Show Analytic reports in Order History page of Storefront checkbox is selected. These reports will be available in the Order History > Order Details page, by clicking the Show Analytics link.