Setting Up a Proof
To set up proof approval for all products:
-
Open the product you wish to edit, and go to the Proof section.
-
Select the Let the User Generate a Proof checkbox to enable customers to proof the product before purchasing it.
-
Select the Enable Proof Approval checkbox to have customers approve a document proof before they submit a purchase order. You can change the text used for customer approval in the Proof Approval Text text box, and the text used when a document proof has failed in the Proof Approval Error text box.

To set up proof and preview definitions for dynamic products:
-
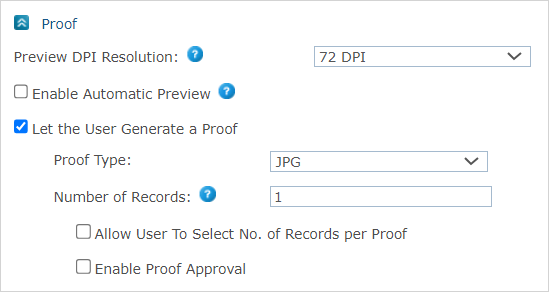
Open the product you wish to edit, and in the Product Setup page go to the Proof section.
-
From the Preview DPI Resolution dropdown, select the resolution of the preview. Note that this is the DPI resolution of the product preview and not of the proof. This option is available only if the product is set to single-page flow.
For larger documents, letter or A4 and above, 72 DPI is fine. However, for smaller documents such as business cards, you will probably want to increase the resolution so the preview will appear larger in the storefront and be easier for customers to see and proofread.
Higher resolution improves the preview's quality, but takes longer to process.
The Auto option calculates the best online display resolution based on the InDesign document size.
Note: This option is available only for dynamic products set to single-page flow.

-
Select Enable Automatic Preview to update the preview in real time following any customization change. If this option is not selected, the preview will be updated when clicking the Refresh Preview button. Note that using this option for documents with complex logic or design could potentially slow down the website and thus affect the shopper’s customization experience.
Note: This option is available only for dynamic products set to single-page flow, and requires uProduce Server version 11.3 or above.
-
Select the Let the User Generate a Proof checkbox to enable customers to proof the product before purchasing it.
-
Proof Type: Enable customers to proof their documents as either PDF files or JPEG files. A default proof type is defined when setting up the store. You can a select value to override the default proof type.
-
Number of Records: Enter the number of records per proof.
-
-
Select the Allow User to Select No. of Records per Proof checkbox to enable users to define a number of records per proof, and enter the number of records in the Max No. text box.
-
Select the Enable Proof Approval checkbox to have customers approve a document proof before they submit a purchase order. You can change the text used for customer approval in the Proof Approval Text text box, and the text used when a document proof has failed in the Proof Approval Error text box.
Note: For composite products, the proof format is PDF only. This applies to all composite components as well. This format overrides the proof format settings of all component products. For XM campaign products, the proof type is set in Circle.
