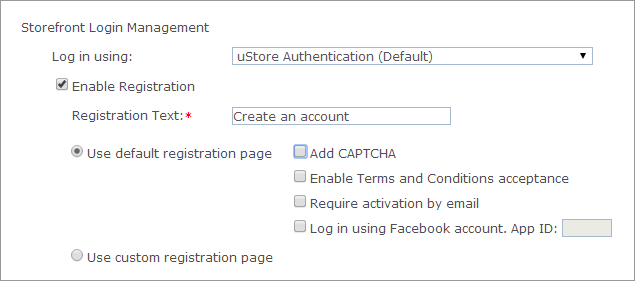
Store administrators can set a store to support user registration for unregistered customers. For example, this can be used for public stores that are not restricted to registered users. Users that log in to uStore using public registration will be directed to create a private account. Once an account has been set up at a store, customers can use their accounts to navigate through the store and make purchases.
If the Public Store (B2C) option is selected in the Store Type field, the Enable Registration checkbox is selected by default and disabled because registration is mandatory in public stores in order to be able to check out orders.
You can use the default uStore registration page. However, the registration page can be replaced with a custom page. Administrators can create a registration page that suites their specific needs and use it instead of the default one. For example, this feature can be used to include personal information fields that are not included in the default registration page.
To select the registration page:
1. Under Storefront Login Management, in the Log in using list, select uStore Authentication (Default).
2. Select the Enable Registration check box.
3. If you want to use uStore's default registration page, select Use default registration page and then continue with the following:

– Add CAPTCHA: You can add CAPTCHA to increase the level of security in your store. This checkbox is empty by default.
– Enable Terms and Conditions acceptance: Select this checkbox to add the Terms and Conditions checkbox to the Storefront Registration page, and thus require customers to accept the uStore Terms and Conditions during the registration process. In the Storefront application, accepting the Terms and Conditions of the store during the registration process is mandatory.
Terms & Conditions HTML file: once the Enable Terms and Conditions acceptance checkbox is selected, you can upload an HTML file containing your legal Terms and Conditions document. Make sure your file is in HTML format. If you have a Word document, save it as HTML prior to uploading it to uStore.
To start the upload, click the Upload button, and in the Upload a Terms and Conditions HTML window browse to locate the file and then click Upload.
The uploaded file will appear as a link in the Store Setup page. You can click this link to open the HTML file in a separate browser window or click Replace to replace the uploaded file with a new one.
– Require activation by email: Select this checkbox if you want to enable registration activation for this store. In this case, customers registering to the store will receive a registration activation email with the activation link. The activation must be performed no later than 48 hours from the registration time. If a customer did not activate the registration during this time, the registration will be cancelled.
– Log in using Facebook account: Select this option if you want to enable store visitors to log in using their Facebook credentials. In the App ID box, enter the App ID that you received when you created the Facebook app.
After you set up the Facebook Login feature in your
store, store visitors will be able to sign in to the store using their
Facebook credentials instead of their uStore credentials. Example
 To be able to use this feature, you first need to create an application
on Facebook.
4. If you want to use a custom registration page, select Use custom registration page, and enter the URL of the page in the Page URL field.
 These registration options are not available when you set up a store
that uses LDAP authentication.
Learn about the available
customer registration options ![]()