Setting Up a Receipt Template for a Store
uStore enables you to set up a customized receipt template for your store.
Design a new receipt template
-
In the Store list, click the required store, and then click Store Settings > Receipt Setup.

The Receipt Setup page is displayed.
This page shows the default uStore receipt template, or the last receipt template, if the default template has been modified.

-
Click Edit to modify the receipt template.
The receipt template is displayed within a text editor and is available for editing.

-
Edit the content of your receipt template using the available editing options. You can edit the receipt template using either the Design or the HTML mode. You can return to the default receipt settings at any time by clicking the Restore Default Receipt button.
-
To add variables, click the Insert Variable button on the toolbar and select a variable from the list.
Note: In addition to the list of pre-defined variables, uStore supports adding more variables that the user will be able to add to the HTML design. This can be done by changing the SQL queries that are used to fetch the order data, and the configuration of the variable fields. To add variables that do not appear in the list, please contact XMPie Professional Services.
-
To add an image, click the Insert Image button and upload an image. The supported image formats are: JPEG, PNG and GIF. To edit image settings (for example, size), right-click the image and select Properties. In the Properties dialog, edit the relevant settings.
-
Click Save.
The Save Receipt window is displayed, notifying you that saving the modified receipt template will permanently remove the previous receipt with all of its details and design, and replace it with the new settings.
-
You can click the Preview Receipt link to preview the receipt and approve it. The preview can also be accessed at any stage during the receipt template design by clicking the Preview button in the Receipt Template page. The receipt preview will be displayed in a new browser window.
-
If you approve the receipt design, select the I approve the receipt checkbox and click OK.
Preview a receipt
-
In the Store list, click the required store, and then click Store Settings > Receipt Setup.
The Receipt Setup page is displayed.
-
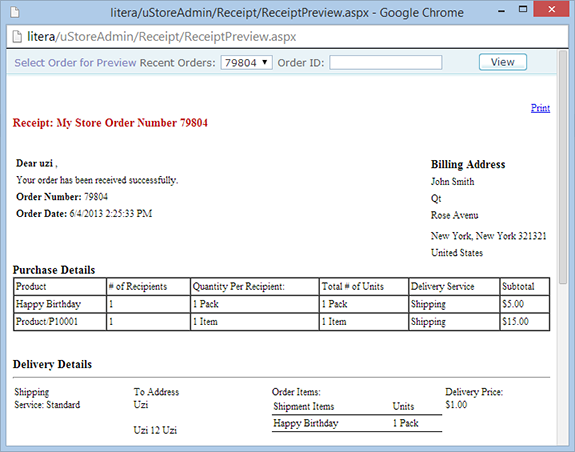
Click Preview to display the preview of the currently defined receipt.
The receipt preview is displayed in a new browser window, displaying the receipt for the last order made in the store. -
You can preview receipts for any other order, by selecting the Order ID in the Recent Orders list (showing the last 20 Order IDs) or by typing a different Order ID from this store in the Order ID box and clicking View.
If the store has no orders, the preview will be empty.
Restore the default receipt template
-
In the Store list, click the required store, and then click Store Settings > Receipt Setup.
The Receipt Setup page is displayed.
-
Click Restore Default Receipt.
The Receipt Setup page is opened in the Edit Mode and the default receipt template is restored.
-
Click Save.
The Save Receipt window is displayed, notifying you that saving the modified receipt template will permanently remove the previous receipt with all of its details and design, and replace it with the new settings.
-
If you approve returning to the default receipt design, select the I approve the receipt checkbox and click OK.