Web touchpoint basics
A web touchpoint represents a webpage or a website residing on the XMPL server or on your own or your customer's network.
Configuring a web touchpoint gives you added control over each webpage and involves defining the path to the webpage for previewing, setting a friendly URL and specifying the name of the page that contains a tracked event.
A website can include webpages for both a managed and custom website deployment, based on how each respective web touchpoint is configured.
Example
You are creating a managed website for a customer’s new promotional campaign. All the web touchpoints in the website have been configured for a managed website. However, you want to provide a link from the managed website to the customer’s website, which is external to the XMPL server. To do so, you can configure a webpage touchpoint for a custom website.
Configure a web touchpoint for a managed website
A web touchpoint represents a webpage or a website and can be configured for a managed or custom website.
To configure a web touchpoint for a managed website:
-
In the diagram, click the Production icon
 above the touchpoint to open the Production
dialog box.
above the touchpoint to open the Production
dialog box.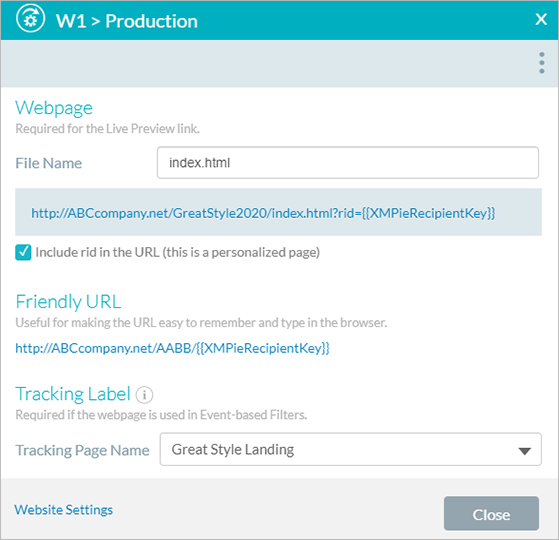
-
In the File Name field, type the file name of the webpage you want to preview in this touchpoint.
While you type, a link to where you can preview your webpage is displayed. This link will be displayed in the Live Preview field in the Integration window.
In addition, the Include rid in the URL option is displayed.
-
Select Include rid in the URL.
When selected, the URL and the content of the webpage are dynamic and can be populated with personalized information. To display the recipient's personalized information, the recipient ID is added to the URL.
This option is selected by default.
-
If required, set a friendly URL. See Creating a friendly URL.
-
From the Tracking Page Name dropdown list, select the name of the page that contains the event you want to track. See Defining a tracking page name.
-
Click Save.
The first touchpoint you configure with a friendly URL becomes the default value for the RURL content object.
Once a webpage file name has been associated with a touchpoint and the touchpoint has been saved, this webpage becomes available for preview when clicking the node title link in the diagram. The webpage URL is also displayed in the Live Preview field of the Integration window for that touchpoint.
Configure a web touchpoint for a custom website
A web touchpoint represents a webpage or a website and can be configured for a managed or custom website.
To configure a web touchpoint for a custom website:
-
Open the library.
-
On the left pane, click Website.
-
In the Website pane, in the general Configuration area, select Enable use of custom website deployment.
-
In the left pane, click Touchpoints.
-
In the Touchpoint list pane, select the touchpoint for which you want to configure a custom website.
The Production dialog box is displayed. It contains two buttons:
-
Managed
-
Custom
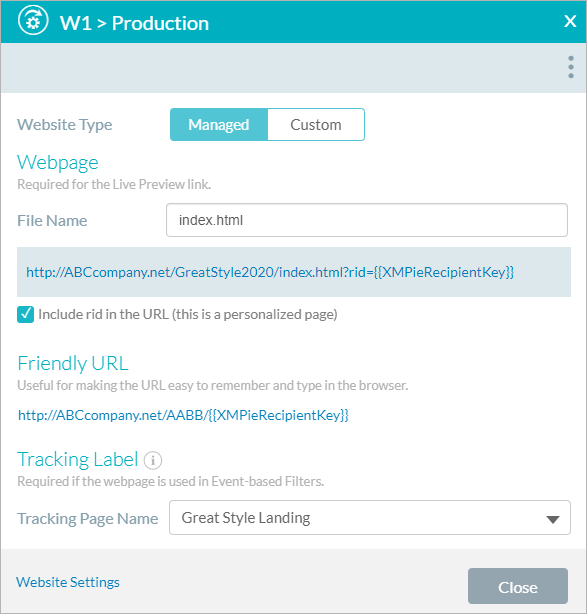
You can also open the Production dialog box directly from the touchpoint on the diagram by clicking the Production
icon. The Managed and Custom buttons are displayed only
if Enable use of custom website deployment
was first selected in the Website
pane in the library. -
-
Click Custom.
-
In the Page URL field, type the URL required to preview the page associated with this touchpoint.
This URL becomes a link once you save your settings. The URL must include the RID in order for the page to be personalized.
-
If required, set a friendly URL. See Creating a friendly URL.
-
If required, specify a name for the page to be tracked. See Defining a tracking page name.
-
Click Save.
The first touchpoint you configure with a friendly URL becomes the default value for the XMPieRURL content object.