Defining webhooks
Overview
Webhooks allow XVS to communicate with external services in order to broaden its customer communication capabilities.
For example, XVS creates a new video and when the rendering is complete, a webhook is called. The webhook can be a call to a REST API, which in turn triggers an email to the recipients with a link to the video. Another example of webhook usage is sending notifications to Facebook.
Webhooks can be called before or after record rendering, and in case of a rendering error.
Using webhooks you can trigger the API of XMPie Circle (XMPie’s platform for cross-media campaigns), Zapier or other 3rd party APIs. Developers can also create their own webhooks.
XVS provides the following out-of-the-box webhooks:
-
General webhook: Webhooks that communicates with an external service either before or after rendering, or if the event failed.
-
Asset webhooks: Webhooks that generate assets, such as image, audio or video files, when the rendering process begins. These files are stored in the XVS project's assets folder and can be used in the videos.
There are several types of asset webhooks:
-
Simple: Retrieves an image, audio or video file from a URL.
-
Custom: Invokes an API to a third party, which then provides a URL to an image, video, or audio file. For example, you can utilize third-party services for creating AI-generated content.
-
Personalia: Retrieves a personalized image generated in Personalia.
-
Dall-E: Invokes the OpenAI image generation API, which then provides a URL to an image file.
-
Text to Speech (TTS): This technology enables text to be converted into speechaudioimitative of the human voice. This is used before rendering, to generate the personalized audio assets that are used in the video. E.g., john.mp3, george.mp3.
Using TTS it is possible to automatically convert dynamic text, composed from the record tag values, into dynamic audio assets, and embed these assets in the personalized videos. It is no longer needed to manually record each dynamic audio file. For more information, see Embed text-to-speech in your project.
-
-
Circle trigger: This webhook triggers a Circle touchpoint following completion of the rendering process. For example, sending an email with the video URL to each of the recipients.
-
Analytics webhook: This webhook triggers an API for each analytic event that is written to the XVS database. For example, whenever the 10% segment event is written, a webhook event is triggered which sends the event to a 3rd party application, such as Google Analytics.
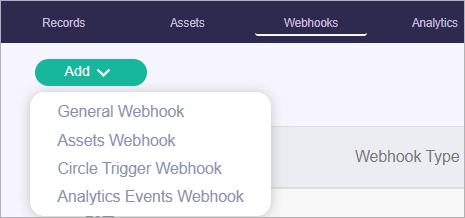
To create a webhook:
-
Click the Webhooks link, and then click Add to create a new webhook.
-
Select one of the following:
-
General Webhook
-
Assets Webhook
-
Circle Trigger Webhook
-
Analytics Events Webhook
-
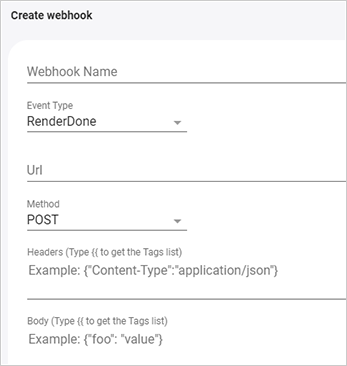
General webhook
These webhooks communicate with an external service either before or after rendering, or if the event failed.
-
Give the webhook a name.
-
Enter the following information:
-
Event type:
-
RenderStart: The webhook will be called before the record rendering. An example can be a text-to-speech webhook that creates a dynamic sound file to be used during rendering.
-
RenderDone: The webhook will be called after the record rendered successfully. An example is a webhook that sends an email which includes the personalized video URL.
-
RenderFail: Rendering of the video fails.
-
-
URL: The URL to which data is sent when the trigger occurs. This can either be a URL that you've set up in Circle, Zapier or other service, or a REST API.
-
Method: GET, PUT or POST method.
-
Header: The API header JSON data.
-
Body: The JSON data that is sent to the URL. The data can include static text, or any of the tag values.
-
Enable webhook to create dynamic assets (RenderStart event type only): Select this checkbox if the webhook creates dynamic assets, so rendering preflight will not fail due to missing assets.
-
-
Test the configuration by clicking Add & Test and selecting a sample record. This executes the webhook and allows you to check that it is valid.
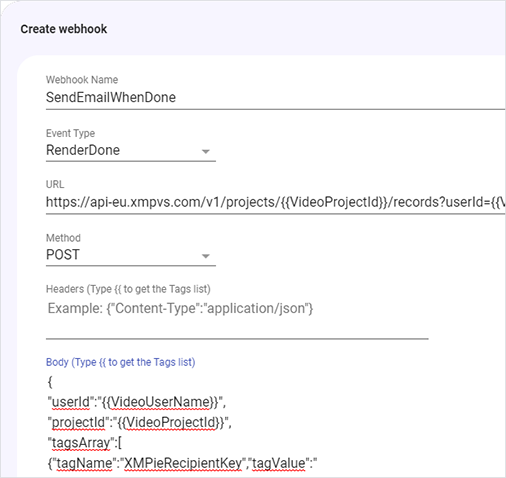
The following is an example of an XVS webhook feature used to trigger an email to be sent to the recipient when the personalized video has been created and is ready to be viewed.
Assets webhooks
Asset webhooks generate assets, such as image, audio or video files. These files are stored in the XVS project's assets folder. There are several types of asset webhooks: Simple, Custom, Personalia, Text to Speech.
Read more for the full workflow on how to generate on-demand assets using the asset webhook.
Important: Take into consideration that assets are not overridden and cannot be deleted. So in case the asset already exits, the webhook will not generate a new one and replace it.
-
Give the webhook a name.
-
From the Select Target Graphic Tag dropdown, select the graphic tag whose values will be used as the asset names of the generated files.
Important: Make sure that the extension of the graphic tag value matches in format the asset created by the webhook.
-
From the Asset Webhook Type dropdown, select the required type of asset webhook.
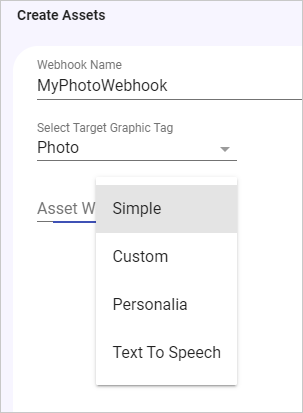
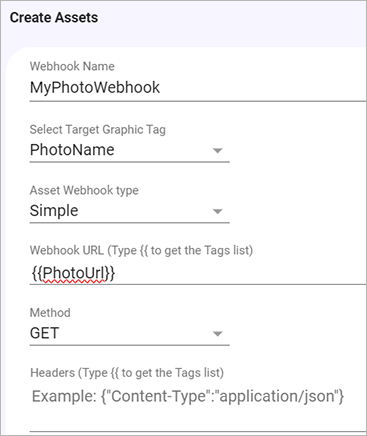
Simple
Simple webhooks retrieve an image, audio or video file from a URL.
Enter the following information:
-
Asset URL: Enter the URL of the asset to be retrieved. The URL can include a tag, for example {{PhotoUrl}} or https://..../{{First Name}}.
-
Method: GET, PUT or POST method.
-
Headers: The API header JSON data.
-
Body: The JSON data that is sent to the URL. The data can include static text, or any of the tag values.
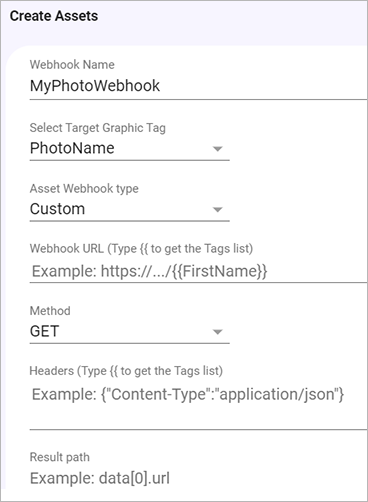
Custom
Custom webhooks invoke an API to a third party, which then provides a URL to an image, video, or audio file. For example, you can utilize third-party services for creating AI-generated content.
Enter the following information:
-
Webhook URL: Enter the webhook URL that will return the JSON which includes the image URL.
-
Method: GET, PUT or POST method.
-
Headers: The API header JSON data.
-
Body: The JSON data that is sent to the URL. The data can include static text, or any of the tag values.
-
Result path: This is the path to the image URL within the JSON structure. The JSON response structure may look like this:
{
"data": {
"images": [
{
"url": "https://example.com/image1.jpg",
"metadata": {
"description": "A sample image",
"size": "1024x768"
}
},
// Additional images may be present in the array
]
},
// Other fields in the JSON response
}In the example above, the path to the image URL is "data.images[0].url".
Personalia
Personalia webhooks retrieve a personalized image generated in Personalia.
In Personalia, copy the JSON of your template. This is an example of a JSON:
{
"TemplateId": "d767e577-8e77-43eb-a88b-97b19755575c",
"Fields": {
"ID": "4027535"
"First Name": "Jane",
"Last Name": "Smith"
}
}
Enter the following information:
-
Template Id: Enter the Personalia template ID.
-
API Key: Enter the Personalia API key.
-
Fields: Paste the JSON fields. You may personalize any of these fields using double curly brackets {{}}.
-
Format: JPG or PNG.
-
Resolution: Enter the required resolution of the image.
-
API Key: Enter the OpenAI API key.
-
Model: The model to use for image generation.
-
Prompt: Enter a textual description of the image you wish DALL-E to generate.
-
Size: The size of the generated image.
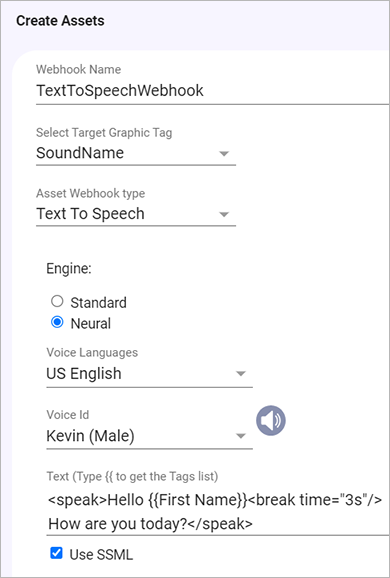
Text to Speech webhook
Using the Text to Speech (TTS) webhooks it is possible to automatically convert dynamic text, composed from the record tag values, into dynamic audio assets, and embed these assets in the personalized videos. For more information, see Embed text-to-speech in your project.
Enter the following information:
-
Engine:
-
Standard: Standard TTS voices use concatenative synthesis. This method strings together (concatenates) the phonemes of recorded speech, producing very natural-sounding synthesized speech.
-
Neural: A system that can produce higher quality voices than standard TTS voices. The NTTS system produces the most natural and human-like text-to-speech voices possible.
-
-
Voice Languages: Select the language of the speaker.
-
Voice ID: Select the preferred voice of the speaker.
-
Text: The text which will be converted into speech. This can include tags.
-
Use SSML: Select to use Speech Synthesis Markup Language (SSML) in your Text-to-Speech request to allow for more customization in your audio assets. Examples include pauses, pronunciation of acronyms, abbreviations, dates, times, whispering, and more. See Supported SSML Tags.
Testing your asset webhook
Test the webhook by clicking Add & Test and selecting a sample record. This executes the webhook and allows you to check that it is valid.
Important: Take into consideration that assets are not overridden and cannot be deleted. So in case the asset already exits, the webhook will not generate a new one and replace it.
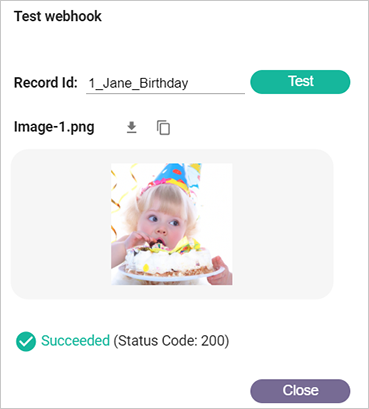
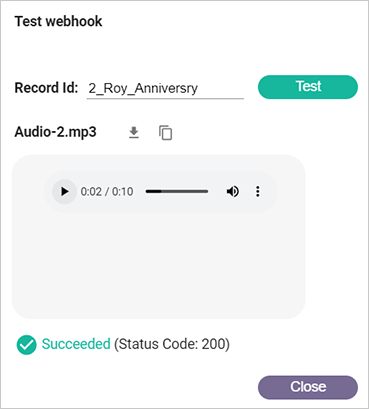
You can download the asset, or copy the asset's secured temporary URL.
The following are examples of an image and audio assets created by the asset webhook:
Circle Trigger webhook
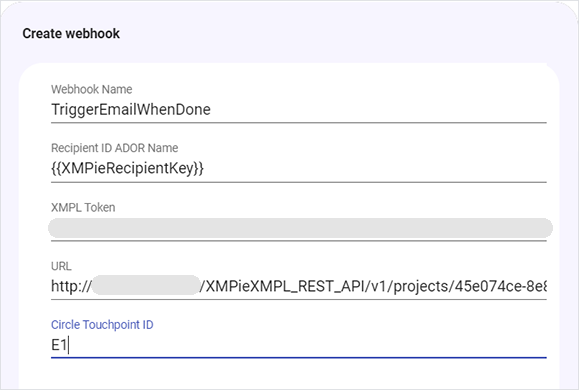
These webhooks trigger a Circle touchpoint following completion of the rendering process. For example, sending an email with the video URL to each of the recipients.
-
Give the webhook a name.
-
Enter the following information:
-
Recipient ID ADOR Name: The Recipient ID ADOR name in Circle. Leave as is.
-
XMPL Token: The XMPL token.
-
URL: Replace [XMPL_SERVER_ADDRESS].
-
Circle Touchpoint ID: The ID of the touchpoint in Circle, e.g. E1.
-
-
Test the configuration by clicking Add & Test and selecting a sample record. This executes the webhook and allows you to check that it is valid.
Analytics Events webhook
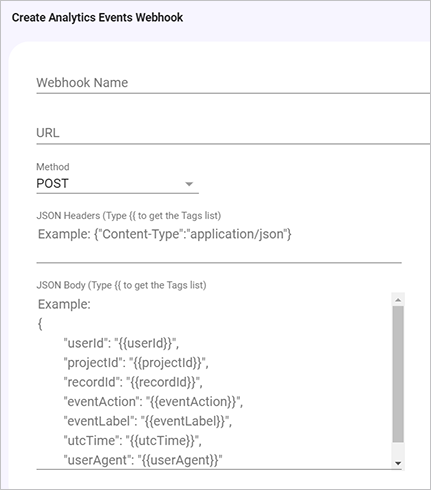
The analytics webhook enables connectivity with third-party analytics systems.
The webhook triggers an API for each analytic event that is written to the XVS database. For example, whenever the 10% segment event is written, a webhook event is triggered which sends the event to a 3rd party application, such as Google Analytics.
-
Give the webhook a name.
-
Enter the following information:
-
URL: The URL to which data is sent when the trigger occurs. This can either be any third party URL, such as Google Analytics.
-
Method: GET, PUT or POST method.
-
Header: The API header JSON data.
-
Body: The JSON data that is sent to the URL. The data can include static text, or any of the analytics tag values. The analytics tag values are:
-
userId, projectId, recordId : the XVS user name, project and record of the video from which the event was triggered.
-
eventAction: the event type. For example, analytic event actions include play, progress10, progress20, ...., progress90, pause, ended.
-
eventLabel: the event's unique identifier.
-
utcTime: the event's UTC time.
-
userAgent: text that describes the software/browser (the "Agent") that is making the request to a website.
-
Once clicking the body area, the example is cleared, and you can enter the required body.
-
-
Test the configuration by clicking Add & Test and selecting a sample record. This executes the webhook and allows you to check that it is valid. During testing dummy analytic tag values are used.
Watch a video
Automating an XM video campaign with an external touchpoint and webhook