Generating on demand assets using webhooks
Asset webhooks allows you to get or generate images, audio or video files during the rendering process, that will be used as assets in the current project.
There are several types of asset webhooks:
-
Simple: Retrieves an image, audio or video file from a URL.
-
Custom: Invokes an API to a third party, which then provides a URL to an image, video, or audio file. For example, you can utilize third-party services for creating AI-generated content.
-
Personalia: Retrieves a personalized image generated in Personalia.
-
Text to Speech (TTS): This technology enables text to be converted into speechaudioimitative of the human voice. This is used before rendering, to generate the personalized audio assets that are used in the video. E.g., john.mp3, george.mp3. For more information, see Embed text-to-speech in your project.
During the rendering phase, image, video or audio assets are generated on demand. However, in the design phase, these files are not yet available. To address this, you will need to create a temporary file. In case of video or audio files, the temporary file's duration should exceed that of the longest file duration.
To embed on-demand asset files in your project:
-
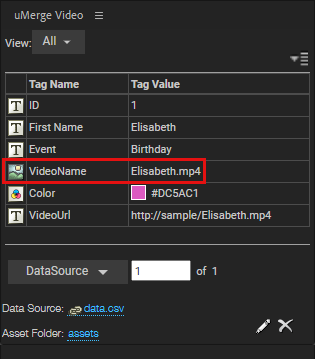
Create a single temporary mp4 video file. For example, Elizabeth.mp4
This file should have the longest duration of all VideoName value files that will be created during rendering, to ensure that it remains uncut. This file will be later replaced in XVS during rendering. -
In your CSV file, add a column containing the name of the mp4 file (in this example it is called "VideoName").

-
Tag the graphic layer VideoName tag into your design.
-
Select the image, video or audio layer to which you wish to apply variability, and then click the graphic tag in the panel.
-
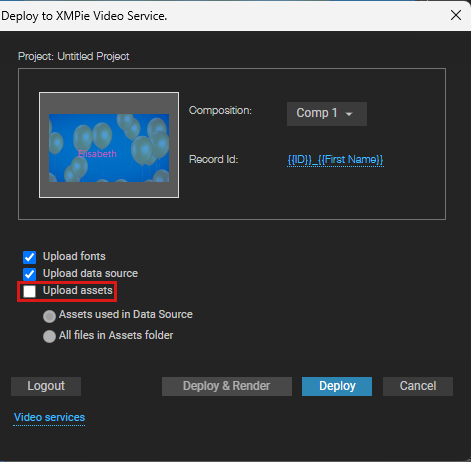
Deploy the project. Do not upload the assets.
-
Once deployed, open the project in the dashboard.
-
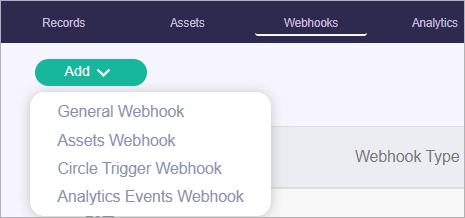
Click the Webhooks tab > Add > Asset Webhook.
-
-
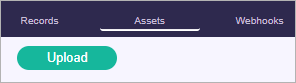
Click the Assets tab to upload all assets excluding the temporary video file.
You can upload more CSV files to create additional videos with on-demand assets.

-
Click the Records tab, and select Render All.