Working with a Document Connected to uProduce
You can perform the following management operations:
Edit rules
To edit a rule:
-
Right-click the content object you wish to edit and click Edit Rule.
-
In the rule editor window, edit the rule and click OK.
-
To save the rule on uProduce and update the plan file, select Save to Server from the Dynamic Content menu.
The Save on XMPie Server window is displayed.
-
Edit the document name if you wish to create a new document with this name. If you just wish to update the existing document, leave the default name.
-
Select the document format (the default format is Adobe InDesign (*.indd).
-
Select if you wish to upload the fonts.
-
Click Save.
Modify a data source
It is possible to link a document saved on uProduce to a different data source.
To link a document to a different data source:
-
In the Dynamic Content panel, click the link icon at the bottom left.

Or, from the Dynamic Content menu, select Link to Data > Data Source on Server.
The Select Data Source window is displayed.
-
From the Data Source list, select a data source that is already stored on uProduce or click New to upload a new data source. When clicking New, the Upload Data Source to Server window is displayed.
-
Locate the required data source to upload it to uProduce.
If a data source with the same name already exists, a confirmation window is displayed.
-
Click OK to replace the existing data source or click Cancel to choose a different data source.
-
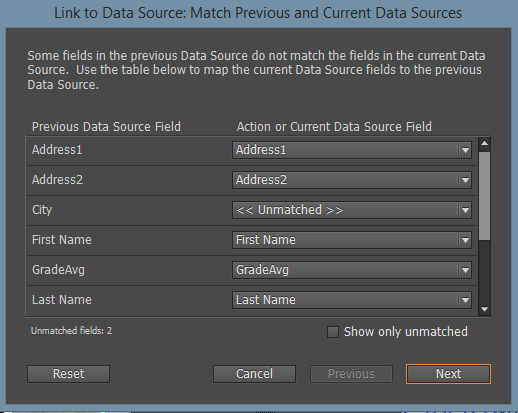
If the fields of the selected data source do not match those of the current data source, click Relink to match the data sources as in the following example.
-
Work with uImage packages
When working connected to uProduce, you can define a graphic content object that references a uImage package.
Note: When working connected to uProduce, it is not possible to reference a uImage template (Photoshop and Illustrator).
To add a graphic content object that references a uImage package:
-
Right-click anywhere in the Dynamic Content panel and select New Content Object.
The New Content Object dialog is displayed. -
Enter a name for the content object
-
Configure the dialog as follows:

-
In the Name field, enter a name for the new content object (for example, the name of the uImage package it references).
-
From the Type list, select Graphic.
-
In the Rule section, go to the functions list and select uImage Photo.
-
-
Click Package.
The uImage Settings dialog is displayed, allowing you to specify the package’s production parameters.
-
From the Template Package list, select an existing template package or click New to upload a new package.
When clicking New, the Upload Template Package to Server window is displayed. -
Select the template package (*.dpkg file).
-
Specify additional uImage settings, as described in Referencing a uImage Document Package.
Note: The output folder field is disabled when working connected to uProduce.
-
Click OK.
The uImage package properties are displayed in the New Content Object dialog and the uImage package is automatically uploaded to the assets folder on uProduce.
Work with a document connected to a plan
When working with a uProduce document connected to a plan, you can edit the plan in uCreate Print’s rule editor with no need to open the uPlan application.
For more information on working with a rule editor, see Managing Content Objects and Variables.
Once you finish editing the plan, save your document on uProduce. The plan file on uProduce will be updated.