Managing Content Objects
Content objects are defined based on a number of attributes: their name, their type, and their business rule (rule, in short). A rule is an expression that is part of the campaign logic, and defines how to calculate the content object’s value for each recipient.
When you link your document to a data source, uCreate Print automatically creates a content object for each column header in that data source. You may wish to manually edit these content objects or create new ones, to tag your design with dynamic formatting, conditional rules or arithmetic operations. Content object rules are both edited and created using the rule editor.
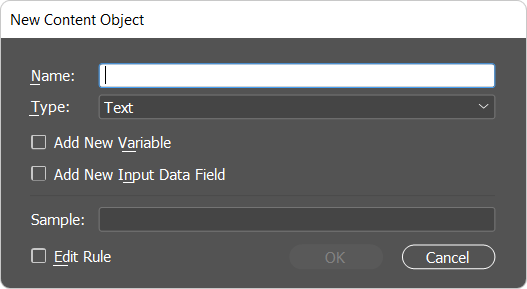
Create a content object
-
Right-click anywhere in the Dynamic Content panel and select New Content Object.
-
Enter a name for the content object. This name will be displayed next to its icon in the Dynamic Content panel.
-
Select the content object type: Text, Text with Style, Text File, Graphic, Visibility, Style, Link, Table or Multi-Page PDF Table. The type determines which options are available in the rule editor.
-
If you wish, you can select the Add New Variable or Add New Input Data Field checkboxes to concurrently create a new variable or input data field. In this case, the rule created will be a reference to the variable/input data field.
-
To launch the rule editor, where you can edit the content object's rule, select Edit Rule.
The Edit Content Object dialog box opens.
Rule editor
The rule editor enables you to create or edit content object definitions, by defining expressions that perform conversions and manipulations on the data source values. These expressions are defined using XMPie’s proprietary QLingo Language.
All expressions can be defined manually as QLingo code, by clicking the rule editor’s Edit QLingo button and editing the content object’s rule definition as a QLingo expression. In addition, the most commonly-used expressions are available for selection directly from the rule editor’s dropdown lists.
The following image shows an example rule editor window, used to edit a text content object (School). The dropdown lists have been expanded to reveal the available options.
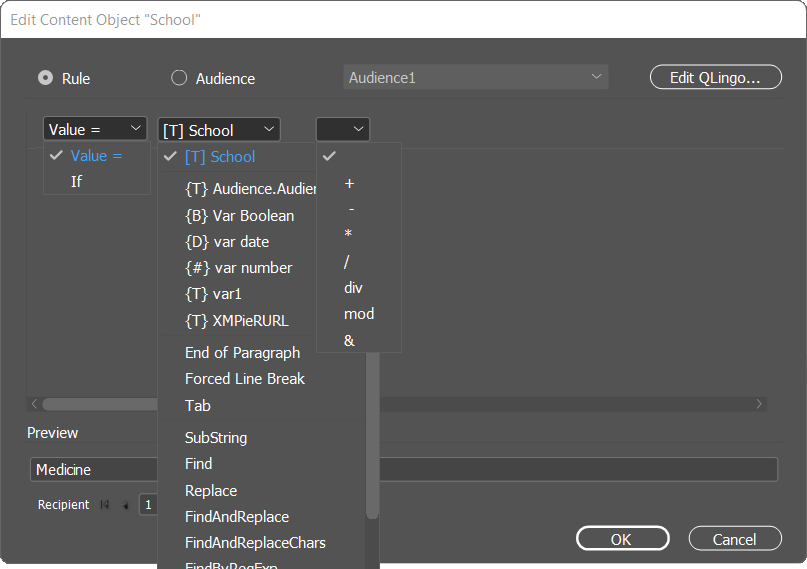
As stated above, a rule is an expression that calculates the content object’s value for each recipient. The rule is defined using the following dropdown lists:
-
Rule type (the first list): determines whether this rule sets a value or a condition (If).
-
Rule building blocks (the second list): literal values (string or number), functions (common and extended), and an alphabetical list of the data source columns.
-
Operations (the third list): operations, such as “+”, “-” etc. When you define a condition (by setting the first dropdown list to "If"), the operations list is enhanced with comparison operators, such as "AND", "OR" etc.
The rule definitions vary, depending on the type of content object you are currently editing or adding (text, graphic, etc.).
Rule definitions
The rule editor helps you set up different rules by offering building blocks that are appropriate for the type of content object currently being created or edited.
For example:
-
If you are defining a text content object, the rule editor prompts you to enter a value for the text string or number. You can also assign a specific style to the string.
-
If you are editing a graphic or text file object, the rule editor prompts you to enter a direct file path or one that is relative to your document.
-
For visibility content objects, the rule editor instructs you to define a condition that will render the object visible or invisible.
-
If you are editing a style content object of a character style, the rule editor instructs you to define the style you want to apply to the text. You can also override InDesign style attributes with alternative font size, font style, and font color by clicking the plus button
 next to the Paragraph Style list
and selecting your choices of style overrides in the Style
Overrides dialog.
next to the Paragraph Style list
and selecting your choices of style overrides in the Style
Overrides dialog.
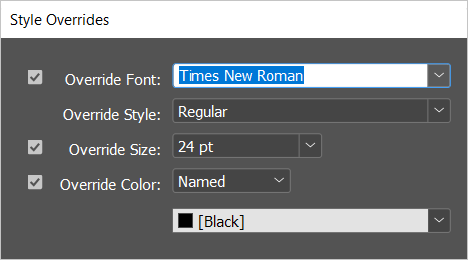
The above image shows an example where the InDesign style original properties were overridden with custom properties, as follows: the font family was changed to Times New Roman (Regular font style), the font size was changed to 24 pt and its color to Black. These settings will take effect regardless of what is defined in the InDesign Style as specified by the style content object.
Note: For Color override, you can select between the Named colors option, which includes a list of color presets, and the Unnamed colors option, which allows you to define the color CMYK values.
The rule editor’s fields are menu-driven. Any time you make a menu selection, the subsequent interface options reflect the current options available, based on your selection. For example, if you are defining a conditional expression, the first line of the expression will end with a menu containing a list of condition operators (for example, AND, OR, =, >, <…).
Rule building blocks
The building blocks you can select from the dropdown menus include:
-
Conditions: used to compare expressions made up of database fields and literal values. Use the AND/OR to add more than one comparison expression.
-
Values: used to define the value expression as a concatenation or calculation of database fields and literal values.
-
Functions: used to easily define rules by performing conversions and manipulations on the data source values. For a complete list of the functions, see QLingo Language.
Work with content objects
Right click the content object in the Dynamic Content panel to perform the following operations:
-
Place into Design: Create an insertion point in your document and then insert this content object.
-
New Content Object: Create a new content object for use in your document.
-
Edit Rule: Open the content object's editor, where you can edit the logical rule that defines this content object.
-
Duplicate: Create a copy of this content object. You can then change the name of this copy and use it as a basis for a new content object, which can be further modified as necessary.
-
Delete: Delete this content object. The design objects that were tagged with it in your document will no longer change dynamically.
-
Rename: Override this content object’s name with a new name.
-
Type: Change this content object’s type. Note that if this content object is already assigned to any of your design objects, a warning is displayed, notifying you that this operation will invalidate all references to this content object within the document.
-
Group: Place the content object in an existing group, or in a new group.
-
Set as Campaign Dial: Select to mark this content object as a campaign dial, thereby making it available for modification via uStore. The uStore Back Office application enables administrators to choose which of the available dials are to be accessible via the uStore customer application, so that customers can customize their values.
A symbol appears next to the icon of the content object which is set as a campaign dial .
.Note that if you're using in uStore the Excel pricing model, the dial name cannot contain parentheses or other special characters.
-
Samples: View live examples of content objects. This provides designers with the ability to easily create content samples for specific content objects, and then cycle through the different values to see how they display in the document. Read more.
-
Highlight Placeholders: Highlight the selected dynamic design object(s) in the document.
-
Other Actions:
-
Turn to Variable: Convert the content object into a variable. A variable with the same name and the same rule definitions is created.
-
Sort by Name, Type or Group: Sort the content objects alphabetically by name, type or group.
-
Go to Shortest: Display the record that has the shortest value for this text content object.
-
Go to Longest: Display the record that has the longest value for this text content object.
-
Highlight All Content Placeholders: Highlight all dynamic design objects in the document.
-
Convert content objects to variables
It is possible to convert an existing content object into a variable (and vice versa). In this case, a variable with the same name and the same rule definitions is created.
To convert a content object into a variable:
-
Right-click the content object you wish to convert, and from the context-menu select Other Actions >Turn to Variable.
A variable with the name of the content object is created and added to the variables list.
The content object that has been converted to a variable is now defined based on the variable (the variable is enclosed in curly brackets {T} to be distinguished from content objects that are enclosed in square brackets [T]).
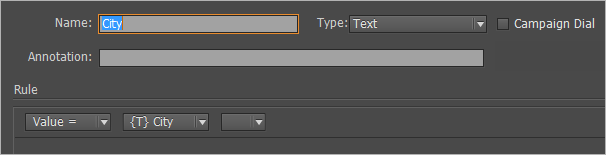
In the example above, the City content object is defined based on the City variable {T} City.
The City variable, in its turn, inherits the previous rule definitions of the City content object.