Dynamic Story Properties
Dynamic story properties display properties related to the flow of dynamic text through one or more text frames. Depending on the length of text for various recipients, the flow may appear differently in the resulting customer communication and therefore may require automatic adjustment. uCreate Print uses story properties to adjust the text flow within story frames.
To view or modify story properties, ensure that your document is already linked to a data source and that you have at least one text content object or text file content object within the story.
There are several types of dynamic story properties:
-
Suppress trailing spaces on empty content: discards the blank spaces left after content objects with empty string values.
-
Suppress tables when empty: automatically discards the header and footer of a table content object that does not have data for a specific recipient.
-
Copyfitting: handles cases of text overflow or underflow by fitting the text into the story area.
-
Auto flow: adds the required number of pages for each recipient to fit the content of a story.
Suppress trailing spaces on empty content
This feature, also known as Suppress trailing spaces, hides a single space or a single soft or hard return following an empty text or text file content object.
For example, consider the following text fragment:
{Salutation}<space>{FirstName}<space>{MiddleInitial}<space>{LastName}<space>
Suppress Trailing Spaces hides the <space> character for each text content object that has an empty value or shows/retains the <space> as needed.
Possible results could be:
Mr. Robert A. Montgomery
Mr. Robert Montgomery
Mr. Montgomery
Robert Montgomery
A. Montgomery
Or take into consideration an address block, where each address line is it's own paragraph.
{Salutation}<space>{FirstName}<space>{MiddleInitial}<space>{LastName}<return>
{AddressLine1}<return>
{AddressLine2}<return>
{City}
 {State} {Zip}
Suppress Trailing spaces hide or show not only the <space> but the <return> characters as well. Possible results could be:
Robert
A. Montgomery
123 Main Street
Anytown, ST 12345
Robert Montgomery
123 Main Street
Apt. 12
Anytown, ST 12345
When using this feature with a bullet or number list that has been created by InDesign paragraph formatting, when Suppress trailing spaces is applied, and the <return> is hidden, the entire paragraph’s formatting is also hidden.
-
{Item1}<return>
-
{Item2}<return>
-
{Item3}<return>
-
{Item4}<return>
If Item2 and Item4 are empty content objects, the text will be rendered as:
-
This is line item #1
-
This is line item #3
This feature is helpful for hiding entire paragraphs that are driven by text file content objects. When hiding whole paragraphs, you should avoid using extra hard returns to leave space between paragraphs, as Suppress Trailing Spaces only hides a single return.
Consider this example:
{Page2Paragraph1}<return>
<return>
{Page2Paragraph2}<return>
<return>
The text that appears below these dynamic paragraphs.
If Page2Paragraph2 is empty, there would be three returns after Page2Paragraph1 when Suppress Trailing as been applied. Instead when spacing between paragraphs is needed, you should use InDesign paragraph formatting features to adjust the spacing before or after the text.
{Page2Paragraph1}<return>
{Page2Paragraph2}<return>
The text that appears below these paragraphs.
With proper formatting and Suppress trailing spaces applied to the story box, the rendered output looks correct even if both paragraph content objects are empty.
Formatting should be especially considered when using this feature with Auto-Flow enabled. Make sure you do not leave extra leading/trailing spaces or returns within your text, as this could cause an extraneous empty page.
Note that suppression is a per story/text box feature. It must be enabled to use the Suppress Empty Tables feature.
You can apply the Suppress trailing spaces on empty content in table cellsoption to the dynamic tables within a text story. This option is available only after the Suppress trailing spaces on empty contentoption is enabled.
To suppress blank spaces that follow empty content objects:
-
Select the desired story text frame.
-
Select Dynamic Content, and then select Suppress Trailing Spaces on Empty Content.
Note that you can also select multiple dynamic text frames and apply this option to them at once.
Suppress table content object when empty
The Suppress tables when empty option automatically discards the header and footer of a table content object that does not have data for a specific recipient.
Note: This feature is enabled only when Suppress trailing Spaces is turned on. It is applied at the story level (and not per-table content object).
To suppress a table when empty:
-
Select the desired story text frame.
-
Select Dynamic Content, and then select Suppress Tables when Empty.
Note that you can also select multiple dynamic text frames and apply this option to them at once.
Copyfit
The Copyfit feature is used to handle cases of text overflow or underflow by fitting the text into the story area.
This feature allows you to specify how the text is to be fitted into the story area, by reducing font size, horizontal scaling and leading for cases of underflow, and increasing the font size, horizontal scaling and leading for cases of overflow.
Note: If you set this option, and then attempt to edit text within the story frame while previewing data, you will receive an alert.
To edit the text, click OK. The copyfitting flow will be temporarily disabled on screen, and the text will be presented in its original form.
Copyfitting is still active for this story, and will remain in effect during proofing and printing.
To apply copyfitting:
-
Select the desired dynamic story text frame, right-click it and then select Dynamic Content > Copy Fit.
The Dynamic Story Copy Fit dialog is displayed.
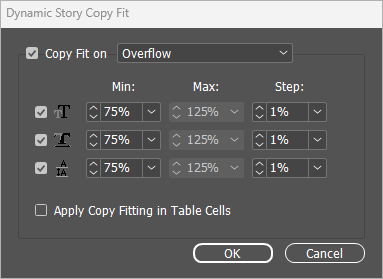
If you've set default copy fit values, they will be displayed in this dialog. You may change these values.
-
Make any necessary adjustment to the copy fit parameters as described in the following table:
Option
Description
Copy Fit on
Handle cases of text overflow and/or underflow: specify how the text is to be fitted into the story area, by modifying the font size, horizontal scaling and the leading.
Underflow
Automatic fitting is used only in case of text underflow. For this option, select the appropriate Maximum value for font enlargement and auto leading.
Overflow
Automatic fitting is used only in case of text overflow. For this option, select the appropriate Minimum value for font reduction and auto leading.
Overflow and
UnderflowAutomatic fitting is used for both text underflow and overflow. For this option, select the appropriate reduction and enlargement options.
Adjust Font Size
Handles the overflow or underflow by changing the font size according to the Step percentage, until the problem is solved or until the Max or Min change percentage has been reached. Note that the leading will be changed in proportion to the font size.
Adjust Horizontal Scale
Handles the overflow or underflow by changing the horizontal scaling according to the Step percentage, until the problem is solved or until the Max or Mi nchange percentage has been reached.
Adjust Leading
Handles the overflow or underflow by changing the leading according to the Step percentage. This is done until the problem is solved or until the Max or Min change percentage has been reached.
This method will not be applied to text defined with a specific Leading.
Min
Minimum overall change allowed for font size or leading. This value can be between 25.0% and 99.9%.
Max
Maximum overall change allowed for font size or leading. This value can be between 100.1% and 400.0%.
Step
This is the percentage change by which the text is adjusted for fitting, in each step.
This value can be between 0.1% and 10.0%. Note that very small steps have a greater impact on performance.
Apply Copy Fitting in Table Cells
When applying this option, copyfitting affects also the text within a table including headers, growing or shrinking the text within the table to maintain a uniform appearance.
Note that you can select multiple dynamic text frames and apply this option to them at once.
Auto flow
The Auto Flow feature is designed for variable number of pages documents, such as transactional documents.
Auto Flow will automatically add the required number of pages for each recipient to fit the content of a story. This is done by duplicating the page that is marked as the mold spread and connecting the relevant story frames, resulting in the story flowing between the pages to fit the entire story content.
To apply auto flow:
-
Select the desired dynamic story text frame, right-click it and then select Dynamic Content > Auto Flow.
The Dynamic Story Auto Flow dialog is displayed.
-
Make any necessary adjustment to the Auto Flow parameters as described in the following table:
Option
Description
Auto Flow
Automatically adds the required number of pages to each recipient’s personalized document instance, so that the story overflow fits into the auto-generated pages.
Mold Spread
Select the spread to be used as the mold, which will be added as many times as needed per recipient to the document, in order to fit the entire story.
All static and dynamic design elements on this mold spread, which are not included in the frames of the Auto Flow story, are duplicated on the generated spread instances.
Generate at Least One Mold Spread Instance
By default, at least one instance of the mold spread exists in the document for all recipients, even when the story does fit into its frames in other spreads (without the mold spread).
Clear this option to allow a design not to include any mold spread when the story does fit into its frames in other spreads (without the mold spread).
Generate at Most... Mold Instances
Limit the number of the mold spread instances generated. For example, you can specify that there should never be more than 10 spreads printed per recipient.