Relinking a Document to an Updated/Different Data Source
After you link your InDesign document to a data source and start working, you may wish to use the dynamic document with a new set of data. In other cases, the data source the dynamic document is linked to may change.
The structure of the previous data source - columns, field names, and so forth - may be different from the structure of the current data source. For example, your first data source may contain the fields “First Name”, “Last Name”, and “Occupation”. You may later link to a different data source, containing the fields “FName”, “LName”, “profession”, and “country”.
Whether you initiated the link to a different data source, or are responding to changes in the linked data source, relinking your document to data requires matching the previous and current data sources.
When uCreate Print detects changes in the data source linked to your document, it launches the Link to Data Source wizard. This wizard helps you match each field of the previous data source with a field in the current data source.
Note: Fields that are used in your document (fields of the previous data source that are used as content objects) must be handled: either match them with fields of the current data source, or convert them to static text.
Data source matching triggered by changes in the document
When a document is linked to a data source, and you try to link it to an updated or different data source, uCreate Print detects the mismatch between the data sources and launches the Link to Data Source wizard. The following procedure explains how to match the data sources and re-link your document to data.
To relink a document to an updated or new data source:
-
Open the linked document you wish to relink to data.
-
From the Dynamic Content menu, select Set Input Data.
-
Browse to the data source you wish to link to, and click Open.
-
Specify data source-specific settings:
-
If you selected a delimited text file, the Specify a Separator dialog is displayed. Select the appropriate delimiter used to separate data values in your text file.
-
If you select a data source with more than one table, the Choose a Table dialog is displayed. Select the table you wish to use for creating content objects.
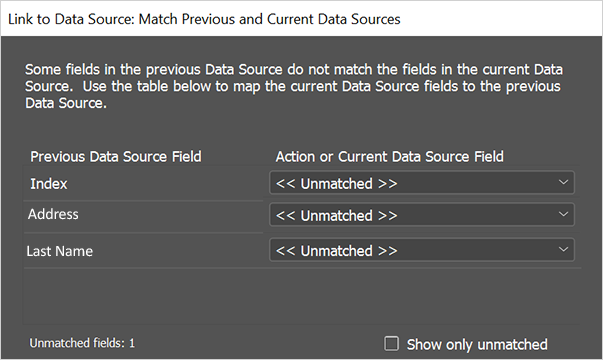
If there are any mismatches between the previous and current data source, the Link to Data Source: Match Previous and Current Data Sources wizard is displayed.
-
-
To successfully link to the current data source, each previous data source field that is used in your document as a content objects must be handled:
-
Match it with a field of the current data source
- or - -
Convert it to static text
Specify how to perform the matching using the following options:
Option
Description
Previous Data Source Field
Lists all fields (column headers) in the previous data source, which were used to create content objects. All these fields must be matched or converted to static text.
Action or Current Data Source Field
Determines how to handle the fields of the previous data source. Each field has a dropdown list, allowing you to choose an action to be performed or a matching field of the current data source.
<<Unmatched>>
A field of the previous data source that is unmatched by a field of the current data source.
Tip: When a field is unmatched, its content object’s expression becomes invalid. To relink the document successfully, you must match all fields or replace them with static text.
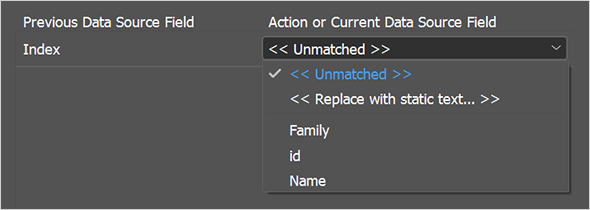
<<Replace with Static Text…>>
Choose this option if a field in the previous data source does not exist in the current data source, to ensure all content objects rules remain valid.
This option displays a text frame, allowing you to enter static text. This text will replace all instances in which this field’s content object appears in your document.
Note that leaving the text frame empty and clicking Next invokes an error message.
Fields
For each field of the previous data source, choose the matching field of the current data source:
-
Fields that have the same name in both data sources (such as City, First Name etc.) are automatically matched.
-
Matching fields are grayed out in the dropdown lists of other fields (in our example, First Name is grayed out the City drop-down lists).
-
When a matching field is found, it can only be replaced by one of the unmatched fields (or by an action). For example, the City dropdown offers the matching field City, as well as the unmatched fields Add_1, Add_2 and RID.
Actions and Fields Available for the “City” Field
Show only unmatched
Filters out the matched fields from both columns, displaying only the unmatched fields that still need to be handled (matched or converted to text).
Reset
Cancels the changes you have made to the Action or Current Data Source Field list and reverts to uCreate Print default matching.
Unmatched Fields
The number of fields in the previous data sources that are not matched by any field in the current Data Source (in this case, Unmatched Fields: 2). As you manually match the fields, this number is updated.
-
-
After matching each previous data source field with an action or current data source field, click Next.
Note: If a field is left unmatched, a message box appears, confirming you wish to continue. Click Yes to continue, or No to finish matching the fields.
-
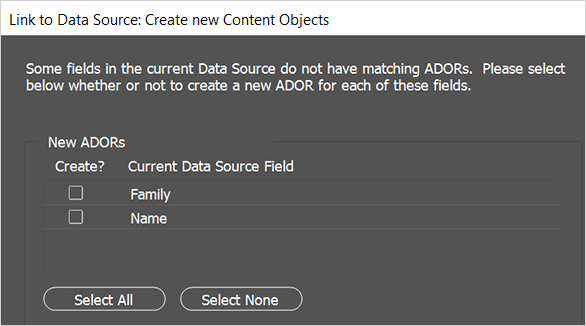
Create new content objects for new fields in the current data source (optional):
If the current data source includes new fields that did not exist in the previous data source, the Create New Content Object dialog is displayed.
A new field may either be an additional field that did not exist in the previous data source, or an unmatched field that has a different name.
-
Specify whether to create a new content objects for each new field:
-
In the Create? column, check the box of each new Current Data Source Field for which you wish to create a new content object.
-
To create new content objects for all new fields, click Select All.
-
To refrain from creating new content objects, click Select None.
-
-
If you need to change the field matching (specifically, handle any remaining unmatched fields), click Prev to return to the Link to Data Source: Match Previous and Current Data Sources wizard.
-
To abort the whole operation and keep the document linked to the previous data source, click Cancel.
-
To create the new content objects, click Next.
-
If there are unmatched previous data source fields, an error message is displayed, providing detailed information on the mismatch. Click OK and fix the problem, for example: modify the fields’ expressions; link to a compatible data source; or return to the wizard and handle these fields.
-
If all previous data source fields are matched with current data source fields, a message is displayed, informing you that the Link to Data Source Completed Successfully.
-
Determine how to proceed:
The Dynamic Content’s content objects list is displayed, showing the matched content objects and any new content objects you have added. You are now properly linked to the current data source and can continue designing your document.
Data source matching triggered by changes in the data source
You may continue to use the same data source, without trying to link your document to a different data source; but the data source itself may change over time. These changes include renaming a field, renaming the data source or deleting it altogether. In any of these cases, the changes in the linked data source are detected the next time you open InDesign and launch your document. The following procedure explains how to match the data source and re-link your document to data.
To relink a document whose data source has changed:
-
Launch InDesign and open your document.
A message is displayed, notifying you of the data mismatch and specifying the path and file name of the data source.
-
Choose one of the following options:
-
To continue using this data source, click Relink.
The Link to Data Source wizard is displayed, allowing you to match the previous and current data sources.
-
To stop using this data source, click Disconnect.
-
-
You can link to another data source by going to the Dynamic Content menu and choosing Link to Data > Data Source. See Linking a Document to a Data Source.