Print Production Properties
Policies
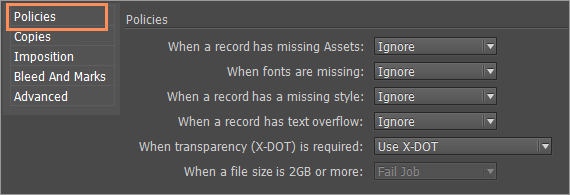
This is the default view displayed when you open the Dynamic Print dialog. Use this view to specify how to define your policies for handling different types of errors that might occur during production.
|
Option |
Description |
|---|---|
|
When a record has missing Assets When fonts are missing When a record has a missing style When a record has text overflow |
A policy specifies how to handle missing items or inconsistencies. For cases of missing assets, missing fonts, missing styles or text overflow, use the drop-down list to indicate how to handle the error. Choose one of the following options:
|
|
When transparency (X‑DOT) is required |
Choose whether and how to implement X-DOT in your document. Available options are:
More on X-DOT technology can be found in Using XMPie Dynamic Object Transparency (X-DOT) Technology. |
|
When a file size is 2GB or more |
You can produce large files (2GB or more) in all Print Output formats except for VDX. Since some RIPs might have problems processing files larger than 2GBs, this production policy allows you to decide whether or not to fail such files. Chose whether to fail job (the default option) or ignore. Note that this option is not available for all formats. |
Copies
This view determines the number of document copies to be printed per-recipient record.

|
Option |
Description |
|---|---|
|
Copies |
Enter the number of personalized document instances you wish to create for each recipient. |
|
Based on the value of |
If the above number of copies is based on the value of a specific content object, choose this object from the drop-down list. |
Imposition
This view determines the arrangement of the printed document’s pages on the printer’s sheet.

XMPie offers three imposition options:
-
Disabled
By default, the imposition settings are disabled: the Imposition template drop-down list displays disabled and all the imposition parameter fields are grayed-out. When imposition is not applied, each recipient’s document is printed on different printer's sheets.
-
Step and Repeat
Step and Repeat is an imposition type that enables you to optimize the press sheet surface, by placing several different pages on one printed sheet and printing the documents duplex head-to-head.
Step and Repeat is often used for double-sided planning, labels, postcards, and packaging printers.
When you choose this option, you have to set up its imposition parameters.
-
Cut and Stack
Cut and Stack is an imposition type that enables you to optimize the press sheet surface, by ordering the pages on the sheet as follows: front-back, left-right, top-bottom.
When you choose this option, you have to set up its imposition parameters.
Imposition settings
If you choose to apply the Step and Repeat or Cut and Stack imposition options, you must define their respective imposition parameters. These parameters are the same for both imposition options.
|
Option |
Description |
|---|---|
|
Imposition Template |
Select the Step & Repeat or Cut and Stack option. Note that all measurement values are in points. You can change the measurement units via the InDesign Preferences dialog (from the InDesign menu, choose Edit > Preferences > Units and Increments...). |
|
Sheet Size |
Select one of the standard, preset sheet sizes
or paper sizes Alternatively, choose Custom and then enter your sheet dimensions. |
|
Sheet Dimensions |
The width and height of the physical sheet used for printing.
|
|
Page Dimensions |
The width and height of the logical design page. These values are used to calculate the number of pages that can fit on a sheet. |
|
Margin |
Enter the width and height of the margins to be maintained between the edges of the logical pages and the edges of the sheet. Note that to use cut (crop) marks, you must set the margin values. Make sure the margins are large enough to draw cut marks (it is recommended to set them to at least nine points). |
|
Gap |
Enter the X and Y values to set the gap that will be maintained between the logical pages on the sheet. These settings are required only if you wish to print or draw page information. |
|
Auto Calculate |
Automatically calculates how many documents fit into the chosen sheet or paper size. To adjust this number, change the sheet size selection. |
|
Pages on Sheets |
Instead of using the auto calculate option, manually enter the number of logical pages (columns and rows) that should fit on each sheet or paper. If the values you set do not fit the sheet size selection, a warning is displayed, specifying range of allowed values. |
|
Duplex |
Select this check box to order even sheets, so the front side and backside will match for each recipient (flip horizontally). This setting is optional. |
|
Center Page on Sheet |
Select this check box to center all the pages that will be printed on the sheet. If you do not select this option, uCreate will set out the pages starting from the bottom-left corner of the sheet. This setting is optional. |
|
Draw Page Info |
Select this checkbox to add the page information above each logical design page. This information includes the recipient number, and the page number of this recipient. This information is printed in the Gap/Margin area. This setting is optional. |
|
Draw Cut
Marks |
Adds cutting (crop) marks on the margin area of the sheet, by defining their coordinates from the outside of the document to the inside of the document (note that this value does not set the length of the cut marks). Select this check box to add crop marks, and then set their inset value in the Bleed X and BleedY fields. Note: Cut Marks require room to draw within the margin area (not next to the document). If you add cut marks, make sure the margin field has height and width values that are large enough to include cut marks. |
Bleed and Marks
Bleed
Bleed refers to the area of a design that extends beyond the intended trim edges of the final printed piece. This ensures that when the paper is trimmed, the design reaches the edge without leaving any unwanted white borders. Bleeds usually require an additional margin beyond the trim line.
By default, the Use document Bleed Settings checkbox is selected to indicate that the bleed settings used in the document design in Adobe InDesign will be applied for the print output.
You can clear this checkbox and set up different bleed settings by entering inset values in the Top, Bottom, Left and Right fields. If the document has facing pages, the bleed settings should be entered in the Top, Bottom, Inside and Outside fields. The inset value is measured from the edge of the document size.
Once the production bleed settings have been set, they will be used for future jobs.

Note that if you have printer marks displayed, the bleed must be greater than 0 in order for the marks to fit in.
Marks
Print marks are symbols or guides included on a printed document to assist in the production process. They ensure accurate cutting, alignment, and color consistency.
These marks are usually positioned in the bleed area, outside the final print area, and are removed during trimming.
Common print marks include:
-
Crop Marks: Adds fine (hairline) horizontal and vertical rules that define where the page should be trimmed. Crop marks can also help register (align) one color separation to another.
-
Registration Marks: Adds small "targets" outside the page area for aligning the different separations in a color document.
-
Color Bars: Adds small squares of color representing the CMYK inks and tints of gray (in 10% increments). Your service provider uses these marks to adjust ink density on the printing press.
-
Page Information: Prints the file name, page number, current date and time, and color separation name in 6-point Helvetica in the lower-left corner of each sheet of paper or film. The Page Information option requires 0.5 inches (13mm) along the horizontal edge.
Offset: Specifies how far from the edge of the page (not the bleed) the printer’s marks will be drawn. To avoid drawing printer’s marks on a bleed, be sure to enter an offset value greater than the bleed value.
Weight: Displays possible weights for crop and registration lines.
The units displayed are points by default, but can be changed to different measurement units in User Preferences.
You can use the Adjust Bleed for Marks button to set correct bleed values based on the selected print marks, offset and weight options.
Advanced
This view enables you to set advanced print parameters, used mainly to determine the specific variant of your output format, to suit the workflow and the specific print controller you are using.

The Advanced options are described in the following table. Note that the available options vary, depending on the chosen print output format.
|
Option |
Description |
|---|---|
|
PDF Export
Settings |
Choose the PDF presets (job options file) for producing this file. All job options files installed on your machine (InDesign’s Adobe PDF Presets) are available for selection. Note: For PDF/VT-1, you can also customize specific job options (see Customizing PDF/VT-1 Export Settings). |
|
PDF Compatibility
Level PDF Standards
Compliance |
These are advanced parameters. If you are unfamiliar with them, please leave the default values, or go online for further reading. |
|
Transparency Implementation (PDF, PDF/VT-1, PDF/VT-3) |
Define how transparency is implemented in the output, by choosing one of the following options:
|
|
Embed (VPS, VIPP, PPML) |
Specify which of the following elements should be embedded in the print output file. Note that the available options depend on your image rendering setting. |
|
Complete Fonts |
Choose whether to embed fonts or not:
This option controls the embedding of all fonts except for Chinese, Japanese and Korean (CJK) fonts. If the document uses CJK fonts, they are always embedded as subsets, regardless of this setting. |
|
Assets Resources |
Choose whether to embed Assets and /or Resources in the print output file. When the check box is unselected, the print output file includes references to external asset /resource files resulting in a “thinner” VPS, VIPP, or PPML file. If your printer’s RIP (Raster Image Processor) supports external Assets/Resources, you may choose not to embed Assets/Resources. Note that when Require InDesign Rendering (Better color management) is selected, Assets and Resources are always embedded (so these check boxes are disabled). |
|
Supplied Resources in PPML Stream |
Choose whether to embed PPML Resources in the PPML Print Output file:
|
|
Image Rendering |
Choose the method of rendering images in the XMPie print output:
|
|
Project Name (VIPP) |
Enter a name for the project to be generated in the VIPP Print Output format. This name enables the RIP to locate referenced images of the VIPP file that reside in the corresponding project folder. |
|
RIP Global Caching (VPS, PPML, PDF/VT-1, PDF/VT‑3) |
For PPML/PS 2.1, PPML PS/1.5, VPS PDF/VT-1 and PDF/VT-3 Print Output formats, you can select the Use RIP Global Caching option to create the print stream in a way that enables the RIP to make use of cached elements from previous runs. The cached elements are shared between runs of the same document (with possible differences of the target data set). |
|
Liquid Layout |
Adobe InDesign includes a feature called Liquid Layout which enables the designer to create rules in the document that determine how the design will change if the page size changes. You can find out more about setting up an InDesign document for Liquid Layouts at Liquid layouts and Alternate layouts. If your document is designed to work with Liquid Layouts and is saved/uploaded to the uProduce server, then when you proof or process the document you can check the Liquid Layout option and set the required page height and width. Note that this feature is not available for XLIM documents, and if the InDesign file does not have any rules defined for Liquid Layout, then changing the page size with the Liquid Layout setting will create output with the new page size, but the document will not be scaled or modified to fit the selected page size. |
|
Extract reusable content to external files (VIPP, PPML & VPS) |
Create external files that hold the document’s reusable elements, which are referenced by the VIPP, PPML and VPS Print Output file, to optimize the document’s processing by certain print controllers. This option is useful for troubleshooting errors in the PPML file. |
|
Extract unique content to external files (VIPP, PPML) |
Create external files that hold the document’s unique elements, which are referenced by the VIPP and PPML Print Output files, to optimize the document’s processing by certain print controllers. This option is useful for troubleshooting errors in the PPML file. |
|
Add metadata
to each record |
Add recipient information values of any content object (except for tables) as metadata. These metadata are stored in the PDF/VT Metadata node of each recipient. |
|
Tag each record as a document group (PPML) |
If your RIP supports document groups, determine the way to mark a document set (in PPML version 2.1) or a job (in PPML version 1.5) in the PPML file.
|
|
Tag fixed background as a master page (PPML, VDX) |
This option applies only to Xeikon RIPs. It allows you to mark a background that is used for all records in a way that enables the RIP to process the Print Output file more efficiently. If the document contains one or more Spread Visibility rules, no tagging as master page is performed, even if this option is checked. |
|
Limit used instances to (connectivity mode only) |
By default, uProduce production engine automatically splits the job between all the available uProduce instances to optimize the production speed. It is possible to limit a job to use only a specific number of instances, so that another job can also be run at the same time on the idle instances. The production optimization is not available in the following cases:
Select the checkbox, and then set the number of required instances. |